Adam's detailing for Dummies

Bird325

Enthusiast
Joined
Nov 4, 2009
Posts
802
Reaction score
1
Location
Ft Worth, Tx
Overview - ready to get started

OK, Junkman, I've hit up the Adam's site and have a decent inventory to get started with making my paint POP. I did the kit that includes the PC DA polisher, all the standard pads (yellow, orange and grey) and polishes (SHR, Machine polish and Machine wax) as well as some necessary items like clay bar, detailing spray and towels. I added the Revive polish, 4" pad set and hand applicators. I've watched a BUNCH of videos from your series (thanks for posting them up). Let's get going!

I'm planning on the following steps, but have a couple of questions embedded in the process. Your input would be greatly appreciated.

1. Wash car (two bucket method)
2. Don't bother drying at this point
3. Clay bar entire car with detailing spry for lubricant
4. Wash car again
5. Orange pad with SHR and detailing spray to keep it activated as needed (same with all applications)
6. Wipe with microfiber?
7. White pad with Machine Polish
8. Wipe with microfiber?
9. Revive by hand or with grey pad?
10. Wipe with microfiber? (starting to see a trend here?)
11. Machine wax with grey pad, avoiding cracks, emblems and trim
12. Apply machine wax by hand (blue pad?) up to areas avoided in previous step
13. NOW, wipe with microfiber towel

AJ, Please correct as needed as I don't want to waste time or products. Thanks!
 

Canyon707

Enthusiast
Joined
Mar 21, 2007
Posts
1,405
Reaction score
0
Location
Napa California
I like these products. The detail spray I think is the best. I order it by the gallon. I nearly never wash my car I just use this spray and good micro fiber rags.
 

PaViper

Enthusiast
Joined
Jan 21, 2004
Posts
2,316
Reaction score
0
9. Revive was meant to be used by hand and I would use it in areas that you could not get in with the FMP and white pad...carry on
 
OP
OP
B

Bird325

Enthusiast
Joined
Nov 4, 2009
Posts
802
Reaction score
1
Location
Ft Worth, Tx
Already did that and there IS a lot of good detailed information over there. But what I was trying to do here was get a good overview of the whole process in one place. Overview here ... details from Junkman's videos and the Adams Forum.

PS - signing up on the Adams Forum got me a 10% discount on my order ... so does the promotion code JUNKMAN
 

Kala

Enthusiast
Joined
Mar 5, 2006
Posts
1,383
Reaction score
0
Location
Ojai, CA
Overview - ready to get started

1. Wash car (two bucket method)
2. Don't bother drying at this point
3. Clay bar entire car with detailing spry for lubricant
4. Wash car again
5. Orange pad with SHR and detailing spray to keep it activated as needed (same with all applications)
6. Wipe with microfiber?
7. White pad with Machine Polish
8. Wipe with microfiber?
9. Revive by hand or with grey pad?
10. Wipe with microfiber? (starting to see a trend here?)
11. Machine wax with grey pad, avoiding cracks, emblems and trim
12. Apply machine wax by hand (blue pad?) up to areas avoided in previous step
13. NOW, wipe with microfiber towel
I knew there was a reason I always pay to have this done :lmao::lmao::lmao:

Thread Hi-Jack over...
Carry on :eater:
 

Junkman2008

Enthusiast
Joined
May 19, 2010
Posts
706
Reaction score
0
I knew there was a reason I always pay to have this done :lmao::lmao::lmao:

Thread Hi-Jack over...
Carry on :eater:

The only problem is, most detail shops don't do all this to your car! They use fillers and glazes to hide the damage, not FIX the damage the way Bird is wanting to do. ;)

Okay Bird, the secret to knowing what to do is in knowing why you are doing it in the first place. Once you know the why, the what is nothing but common sense. Let's look at your routine:

1. Wash car (two bucket method)

Correct, but use Dawn dish washing liquid for this initial wash. Why? Dawn will strip all of the wax and other chemicals off your car which will keep you from contaminating your clay with unnecessary junk.

2. Don't bother drying at this point

Correct, but make sure you pull the car indoors or in the shade on a cool day.

3. Clay bar entire car with detailing spry for lubricant.

Correct, but make sure you stop if you get tired. It is better to clay the car over multiple days CORRECTLY than it is to do the job half-***. This is the one step that will most influence what the final product is going to look like. This is the foundation of your shine. Half step here, and your shine is all downhill at that point.

4. Wash car again.

Correct, using car soap this time.

5. Orange pad with SHR and detailing spray to keep it activated as needed (same with all applications)

Correct.

6. Wipe with microfiber?

Now it is very important that you completely understand what it is I'm about to say. The purpose of SHR is to remove damage from the paint. You apply SHR, work it for the appropriate amount of time and then stop. To see if what you have done has removed all of the damage, you must wipe off the remaining residue and inspect the paint! SHR is NOT something that is applied to the paint and allowed to remain on the paint, it is a paint cleaning and repairing compound that is used and then removed. Just as you use soap to clean your body, you remove the soap once your body is clean. On your car, you repeat this process as many times as necessary until all the damage has been removed, or until you are satisfied with the results.

Keep in mind that some damage may be too deep for you as a novice to remove, or may require a LOT of passes until it is removed when using a machine as safe as the PC-7424XP. When I say a lot, I mean like 50 passes on a worse case scenario. The PC7424XP is safe and effective, NOT powerful. If you want powerful, safe goes totally out the window. :omg:

After you have completely removed all the damage from one panel, you should wipe that panel down with detail spray to remove any residue that you may have missed. This is also true with FMP.

7. White pad with Machine Polish

Only if you are satisfied with the results that you have achieved with SHR. FMP does what SHR does on a MUCH LESSER SCALE. If SHR didn't remove it, FMP doesn't have a chance. It is simply used to "spit shine" the paint back to glory, removing the micro-damage that SHR leaves behind.

8. Wipe with microfiber?

By now, you should know when to do this.

9. Revive by hand or with grey pad?

As Scott said, this is not necessary. I only follow FMP with Revive when I'm working on Flat dark colors, which is what you may find on a muscle car from the 50's 60's and 70's.

10. Wipe with microfiber? (starting to see a trend here?)

Answered.

11. Machine wax with grey pad, avoiding cracks, emblems and trim.

Correct, but this must be done a special way. You apply MSW in a thin layer (this is true of all sealants). After allowing it to dry (.5 hour or longer depending on the humidity), you wipe off the haze. After allowing the product to cure (12-24 hours0, you come bck and wipe it down with detail spray to make sure that you have removed any excess product. At that point, you can be done or add a second THIN layer.

12. Apply machine wax by hand (blue pad?) up to areas avoided in previous step.

Correct.

13. NOW, wipe with microfiber towel/

You know know why and when to do this.

Let me know if you have any more questions. :2tu:
 
Last edited:
OP
OP
B

Bird325

Enthusiast
Joined
Nov 4, 2009
Posts
802
Reaction score
1
Location
Ft Worth, Tx
Thanks, Junkman! I'm on my way to a spectacular shine. Just so happens that I followed steps 1-4 based on previous experience and now the car sits in the cleaned garage waiting for the beginning of the polishing. AS I'm working through the multiple steps, is there any problem with covering the car with a quality cover at the end of each day's work? I'd hate for dust to settle and mess up all that hard work.

I've never clayed an entire car before and it's amazing what the back end of that Viper has accumulated. It's glassy smooth now and ready for some additional TLC.

Someone asked after one of your vids about when to discard the clay. Obviously, sometimes it's a plain as the nose on your face (like dropping it on the floor), but what do you base it on? Is it the texture? Color? Stickiness? Feel?
 

Junkman2008

Enthusiast
Joined
May 19, 2010
Posts
706
Reaction score
0
There's no problem with covering the car as long as there is no dust on te car. Pretty cut and dry. If there is dust on the car, remove it first using my dust removal process that I lay out in this thread.

Claying is the foundation of an excellent shine. The grit and grime that you remove with clay keeps the products that you use from being able to deal with the paint that you are trying to repair. If you don't remove that layer of junk, your products will not be as successful as they will be when that layer of junk is removed. People who have never clayed or who don't understand the advantage of claying have a hard time understanding this until they see it with their own eyes. At that point, they are sold.

Clay is ready to be discarded when you can no longer flip it and find a clean spot. That's why you never clay a dirty car. When you do the initial wash before claying, you want to use Dawn dish washing liquid to remove all of the old wax so that it does not end up in your clay. That is the ONLY time you should ever wash your car with that stuff. As you said, if that clay hits the ground then it's toast!
 

JHill9

Enthusiast
Joined
Mar 18, 2008
Posts
220
Reaction score
0
Location
Houston
When you do the initial wash before claying, you want to use Dawn dish washing liquid to remove all of the old wax so that it does not end up in your clay.

What type of mixture do you use with the Dawn soap?

I am guessing that you only use Dawn when you are going to use the clay bar, right?
 
OP
OP
B

Bird325

Enthusiast
Joined
Nov 4, 2009
Posts
802
Reaction score
1
Location
Ft Worth, Tx
When you get ready to clay bar the car, the Dawn will really cut through the dirt and wax. I use about 2 oz in a 2 gallon bucket. Junkman may have a different ratio, but the bottom line is that you ARE going to DESTROY your finish and wax protection! That's actually the intention. Get all that old stuff OFF there so you have a cleared surface to work with. NO, DON'T USE A SCOTCH PAD TO SCRUB IT ALL OFF... the dishwashing detergent is good enough and will leave you with enough remaining finish to work with.

Actually saw a post with pictures of a 'loving' wife that used a Scotch pad to clean her husbands car when he was out of town as a 'surprise'. OMG, what a mess. Bet Junkman could clean it up, but it would be between fits of laughter and tears.:lmao:
 

RobZilla

Enthusiast
Joined
Nov 18, 2007
Posts
1,588
Reaction score
0
Location
Jacksonville, FL USA
1. Wash car (two bucket method)

Correct, but use Dawn :omg: dish washing liquid for this initial wash. Why? Dawn :omg: will strip all of the wax and other chemicals off your car which will keep you from contaminating your clay with unnecessary junk.

Dawn :omg:

7-16-2010:

You should not be using any type of product that will strip wax.


:usa:
 
Last edited:

Junkman2008

Enthusiast
Joined
May 19, 2010
Posts
706
Reaction score
0
... Actually saw a post with pictures of a 'loving' wife that used a Scotch pad to clean her husbands car when he was out of town as a 'surprise'. OMG, what a mess. Bet Junkman could clean it up, but it would be between fits of laughter and tears.:lmao:

That WAS my thread that you saw. He brought it to Carlisle for me to look at. It took 2 days to fix that damage. The following year, his car won first place at Carlisle. He finally learned how to take care of his paint. :smirk:

Here's the damage:

You must be registered for see images


You must be registered for see images


You must be registered for see images


You must be registered for see images


You must be registered for see images


You must be registered for see images


You must be registered for see images


Now for some after shots. The lighting wasn't all that great at all but Saturday is supposed to be beautiful!


You must be registered for see images


You must be registered for see images


You must be registered for see images


You must be registered for see images


This was a shot of the other side of the hood before I fixed it.

You must be registered for see images


Here's a shot of the rest of the hood fixed, with Kelly from New York waving at the camera. :2tu:

You must be registered for see images


You must be registered for see images


... the hood...

You must be registered for see images


You must be registered for see images


That car was a mess!
 

RobZilla

Enthusiast
Joined
Nov 18, 2007
Posts
1,588
Reaction score
0
Location
Jacksonville, FL USA
Can I use Dawn to clean things other than dishes?

Dawn is so effective in cutting grease on dishes that over the years, consumers have used Dawn on other greasy messes around their homes, from cleaning kitchen messes like grease build up on the stove range hood to oily spots in the garage. Dawn is not recommended for window cleaning, car washing, body wash or washing hair.

Source: FAQ


:usa:
 

Junkman2008

Enthusiast
Joined
May 19, 2010
Posts
706
Reaction score
0
Can I use Dawn to clean things other than dishes?

Dawn is so effective in cutting grease on dishes that over the years, consumers have used Dawn on other greasy messes around their homes, from cleaning kitchen messes like grease build up on the stove range hood to oily spots in the garage. Dawn is not recommended for window cleaning, car washing, body wash or washing hair.

Source: FAQ


:usa:

True. The only time it is used on a car is to strip all the old wax and glaze off the car before claying, if in fact your car needs to be clayed. It a common practice in the detailing industry.
 

thompsonracing

Viper Owner
Joined
Apr 24, 2009
Posts
450
Reaction score
0
Location
Chalfont, PA
Don't forget the two bucket system with Grit Guards! I also use a large Adam's wash pad for the upper paint and a small Adam's wash pad for the lower half. The dirt comes right out of the all acrylic Adam's pads.

Guess which bucket was my rinse bucket (removed grit guards for photo):
You must be registered for see images


Viper was super dirty!
 

Junkman2008

Enthusiast
Joined
May 19, 2010
Posts
706
Reaction score
0
Don't forget the two bucket system with Grit Guards! I also use a large Adam's wash pad for the upper paint and a small Adam's wash pad for the lower half. The dirt comes right out of the all acrylic Adam's pads.

Guess which bucket was my rinse bucket (removed grit guards for photo):
You must be registered for see images


Viper was super dirty!

You must be registered for see images


I guess the only warning label we pay atention to around here is "Dry clean only". :dunno:

:usa:

We have got to change that! :D
 
OP
OP
B

Bird325

Enthusiast
Joined
Nov 4, 2009
Posts
802
Reaction score
1
Location
Ft Worth, Tx
Many thanks to Junkman for his input on this thread and the many hours that he has spent doing vids and posts for us. For those that are not aware of it, he posts on a BUNCH of 'car guy' forums as well as the Adams forum and I've never had to wait for even a day to get an answer from a PM sent to him.

I'm going to finish up my 'paint correction' project this weekend if all goes well. So far, the only down side is that I found a rotary burn on my hood about 1/2"x2" ... doing the polishing not only brings out the paint and shine, it also shows where someone ELSE didn't quite get it right. Thankfully, my son is practicing and learning to use a rotary on HIS cars and will probably fix this little spot soon.
 
OP
OP
B

Bird325

Enthusiast
Joined
Nov 4, 2009
Posts
802
Reaction score
1
Location
Ft Worth, Tx
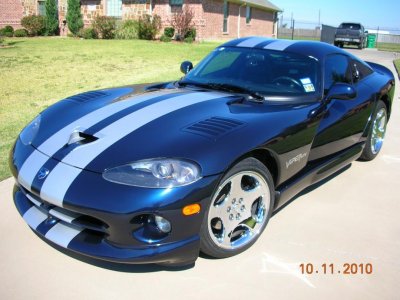
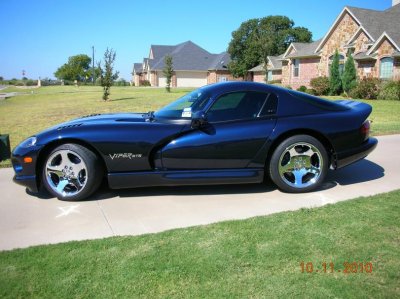
If this shows up as a multiple post, I'm sorry. I've tried a few times with nothing showing up!:dunno: This is my '01 GTS after applying Junkman's principles for the first time. NEVER used a DA polisher or really cleaned up the paint on a car before.
 

Attachments

  • DSCN2652.jpg
    DSCN2652.jpg
    93.1 KB · Views: 55
  • Left side.jpg
    Left side.jpg
    96.6 KB · Views: 42

01sapphirebob

Enthusiast
Joined
Apr 21, 2008
Posts
4,962
Reaction score
0
Location
"OIHO"
She looks great!!!! I'm getting ready to do something similar to my '01 sapphire rt//10. Car is gonna be 10 years old next year so I wanted to do a nice detail on her. Get all those fine scratches out. I keep watching threads like this to get all kinds of good tips.
 

Junkman2008

Enthusiast
Joined
May 19, 2010
Posts
706
Reaction score
0
Wow Bird, that color is the same as what is on my car so I know how it can pop! Outstanding job for a noob! You will give other the courage to get into this. Good job!
 
OP
OP
B

Bird325

Enthusiast
Joined
Nov 4, 2009
Posts
802
Reaction score
1
Location
Ft Worth, Tx
For what it's worth, I'm going to post up a 'follow up' with the outline that I used with Junkman's help. I'm sure that there are many ways to approach this, but some of us just need to know that even a beginner can do it with the correct mentoring. I hope my questions (as novice as they may have been:D) have helped others and give them the confidence to clean up their paint. I'm going to do this again during the winter here in Texas to really get the best paint that I can. :headbang:
 

Junkman2008

Enthusiast
Joined
May 19, 2010
Posts
706
Reaction score
0
Trust me, you will never know how many other "novices" that you've helped with your questions. Some folks are members of forums for years and never post, but read everything posted within their interest. You have definitely helped some folks for sure.
 
OP
OP
B

Bird325

Enthusiast
Joined
Nov 4, 2009
Posts
802
Reaction score
1
Location
Ft Worth, Tx
As promised, here are the steps that I took with minor mods as advised by Junkman and others. The list is basically the same with a few improvements. I'll highlight additions with color.


1. Wash car (two bucket method) Use dish washing detergent, not car wash. Junkman suggests Dawn, but I used Palmolive. This strips off the old wax and deep dirt.
2. Don't bother drying at this point Not necessary, I moved directly to Clay at this point while car was still wet.
3. Clay bar entire car with detailing spry for lubricant. DON'T scrimp on the lube (seems like good general advice :D). Spend plenty of time really working the surface. DON'T lightly work it (if you're not sweating, you're not doing it right) and go in straight lines, not circles. This is going to set up your base for the rest of the work!
4. Wash car again Use car soap - you've already stripped off the old wax and contaminated clear coat.
5. Orange pad with SHR and detailing spray to keep it activated as needed (same with all applications) This is IMPORTANT here in Texas. Even out of the sun and in the garage, the polish dried out quickly. It took me a while to realize that my pad was slowly disintegrating due to the polish drying out before I was done with the first few sections. You're better off spending more time doing a section slowly than to rush through it. Keep your sections SMALL ... if you move your feet or your rolling seat, it's too large of a section! This applies to this step and the next. Once you get to wax, you'll love being able to cover larger areas, believe me.:D
6. Wipe with microfiber Throw away the cheap Auto Mart MF towels! Get a quality polishing towel like Adams Double Soft MF Polishing cloth. They are worth their weight in gold. My original MF towels have been shifted to wheels and the trash. This step gives you a chance to see what you've accomplishing and give you the drive to keep taking your time and doing it right. You may need to use a little detail spray to get all the polish that has dried. This is contrary to Adam's vids, but I like to get the old stuff out of the way as I progress.
7. White pad with Machine Polish This is putting the icing on the cake. The first step did all the hard work, this is the step that brings all of your work to the surface and you will be shocked at the results if you take your time.
8. Wipe with microfiber? Can't help but do it ... it looks so good and reminds you why you're doing this.
9. Revive by hand or with grey pad? I only did this on the areas that I couldn't get to with the DA polisher. Figured that it couldn't hurt. I used the blue Adam's hand applicator. The pad should be pretty soft, but not as soft as the wax applicator.
10. Wipe with microfiber? As with each previous step, this will give you a look at what you've accomplished and show any areas that you missed. I had to wash my polishing towels (3 of them) before I got to the next step. Keep using a clean area of the towel to keep from ruining what you've already done.
11. Machine wax with grey pad, avoiding cracks, emblems and trim This is the FUN part ... you've done all the hard work and you're bringing out the depth of the color. PLUS, I didn't use ANY pressure in this step, just let the polisher do its thing.
12. Apply machine wax by hand (blue pad?) up to areas avoided in previous step I used the softest pad I had and just took care of the areas that I couldn't do with the DA.
13. NOW, wipe with microfiber towel The satisfaction at this point is worth all the work. Use a CLEAN towel with detailing spray to clean up any remaining residue. I used Adam's All Purpose Cleaner on the trim that I got sloppy near to clean off the 'white stuff' that we all hate.

14. Roll her outside and take pictures. This step is absolutely necessary to make all of your friends want to spend a few weekends making THEIR ride look like yours.:lmao:


I want to add a brief comment about the pressure using a DA orbital polisher. Junkman suggested putting a mark on the pad so that you can see the rotation. DO THIS! For the first polishing step, you want to keep the mark rotating at a slow rate. This assures that you are applying pressure, but not so much as to stall the action. For the second polishing step, let that mark run about twice as fast to make sure that you are maintaining a lighter pressure. If you stall out the orbital (mark not moving), you're wasting your time and effort. For the waxing, I let that sucker run free with no pressure at all. By this point, you've done all the work and you're sealing your paint with the wax.

I hope you guys enjoy your first 'paint correction' as much as I did and thank you to those that answered my *** and questions. The effort was well worth the return and I am now a full believer in fixing it right and avoiding the 'glaze' and quick fixes.
 

Junkman2008

Enthusiast
Joined
May 19, 2010
Posts
706
Reaction score
0
The only thing that I would correct is about pressure. The amount of pressure that you want to use is 9-14 pounds, including the weight of the polisher (use a bathroom scale to figure out how much pressure 9-14 pounds is). Use that same amount of pressure for the orange & white pad. That will have the mark on your polisher spinning at a good rate. You want the polisher working for you, not you working your butt off. I can apply the correct amount of pressure with one hand.

Other than that, your process looks good.
 

goldcup

Enthusiast
Joined
Jul 26, 2006
Posts
1,581
Reaction score
0
Location
Lee Summit Mo.
I have worked on my paint several times with good results but have learned alot following these posts!!Thanks for the help love the results!
 

Junkman2008

Enthusiast
Joined
May 19, 2010
Posts
706
Reaction score
0
You would be surprised how much a proper technique will improve your results if you are using a quality product. There are quite a few to choose from but the technique you choose to use is consistent with all of them.
 

Latest posts

Forum statistics

Threads
153,202
Posts
1,681,934
Members
17,699
Latest member
jpolen21
Top