Window Lift Making Cracking Sound

ghengishahn

Viper Owner
Joined
Apr 10, 2010
Posts
232
Reaction score
0
Location
Louisville,KY
Have a 03 with only 5k miles, that the window just started making a loud cracking sound when it reaches full up or full down position. It still works but is sounds awful....soon to break? I have taken off the trim panel to diagnose but still not sure what is going on. It seems to be coming from the front track. That little plastic piece that slides up and down that I have read about on the some other posts.

Any idea what is going on or what to do prevent it from breaking?

I've heard these regulalors are weak in all Vipers. Surely someone has a clue where to start.
 

hdscreens

Enthusiast
Joined
Nov 28, 2008
Posts
65
Reaction score
0
It is probably the white tube that covers the cable that went loose at a corner.
 
OP
OP
G

ghengishahn

Viper Owner
Joined
Apr 10, 2010
Posts
232
Reaction score
0
Location
Louisville,KY

Jon

Viper Owner
Joined
Jun 6, 2010
Posts
73
Reaction score
0
Location
Western New York State
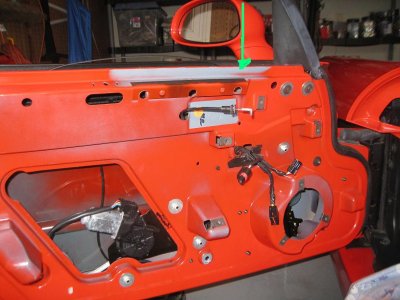
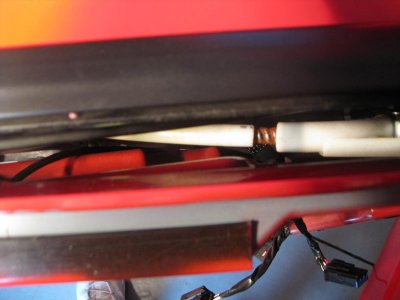
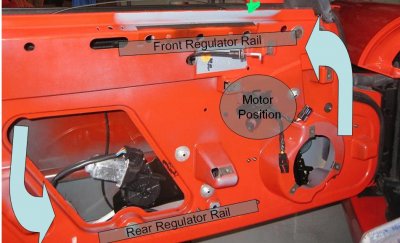
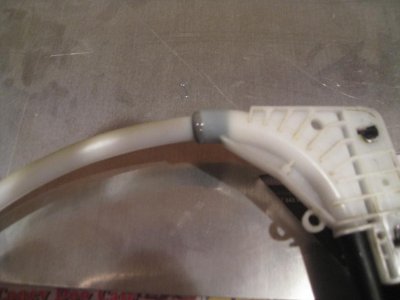
I own a small fabrication shop selling various automotive and motorcycle parts of my own design. A large part of my business is a series of window regulator repair kits for a couple of different Jeep models, so although I am not familiar with the Viper window regulator specifically, I have a lot of experience with window regulator problems and so I might be able to be of some assistance. Based on the original post and Chuck's reply, it sounds like the Viper regulator may be very similar to the Jeep's, where the metal guide rail is attached to the motor housing via a plastic tube, and inside the regulator is a "spiral cable" which meshes with the gear inside the motor housing. (edit: OK, I just found some photos of Viper regulators on eBay and the design is indeed very similar to the Jeep regulators, so the above does apply.)

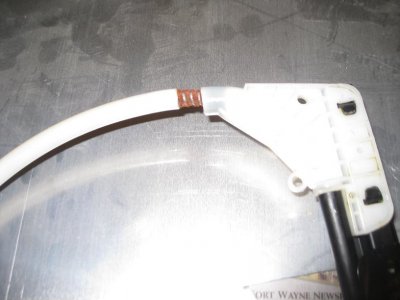
The problem the OP mentioned is exactly the same as a very common problem for the Jeep regulators. What happens is the spiral cable is worn down by the harder metal gear in the motor housing, and eventually this will cause the gear to slip on the cable, making a grinding or a clicking sound. Almost always this happens at the full up and/or full down positions. For the Jeep, the solution is to remove the window regulator from the door and disassemble it so that you can remove the spiral cable, then re-install the spiral cable backwards. (i.e. attach the opposite end of the cable to the window bracket) This causes a fresh section of the cable to be against the gear at those critical full up and full down positions, and the regulator is back to normal, at least until those spots wear away. In order to disassemble the regulator, it will be necessary to drill out a small rivet or two, but its not a difficult procedure.

In some rare cases, I have seen some window regulators where the gear itself is worn down, but almost always the damage is limited to the cable.

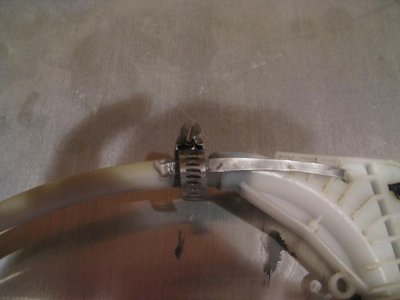
The breaking of the tube as Chuck mentioned is also a problem on the Jeep regulators, however if the Viper regulator is anything like the Jeep version, when that main tube breaks, usually the window will not operate properly in one direction. For the Jeeps, the window will go up just fine with a broken main tube because the regulator is under compression in that direction, however if you try to lower it, the cable will just feed outside of the regulator through the break unless you press down on the window glass at the same time. Based on the original post though, it sounds like the window still works fine, but is clicking at the full up and full down positions. Based on my experience with the Jeep, this would indicate a worn spiral cable as opposed to a broken main tube.

I hope that helps!

PS: I just did some searching on the 'net and Viper window regulator prices are absolutely insane! If anyone is faced with a $1,000 repair bill for a broken window regulator, feel free to contact me. Sounds like the Viper may need a window regulator repair kit also. :) I'd be happy to work with some beta testers to develop one. However, many window regulator problems (the clicking noise in this post or a broken tube) can be fixed for free (or close to it), so depending on the exact nature of your problem, a specific "repair kit" might not even be necessary, but I'd be happy to help, even if its just to dispense advice.
 
OP
OP
G

ghengishahn

Viper Owner
Joined
Apr 10, 2010
Posts
232
Reaction score
0
Location
Louisville,KY
Thanks Jon. Soon as I have time to dig into this project and see what is going on...I may be back in contact. Right now I am over a week from doing the any Viper work.
 
OP
OP
G

ghengishahn

Viper Owner
Joined
Apr 10, 2010
Posts
232
Reaction score
0
Location
Louisville,KY
You know the more I think about this...and my 03 only has 5K miles...how many times does one have to replace this window mechanism. This is ridiculous.

I read the quality ratings of manufacturers and Chrysler still has never got it together...and this is living proof.
 
OP
OP
G

ghengishahn

Viper Owner
Joined
Apr 10, 2010
Posts
232
Reaction score
0
Location
Louisville,KY
You guys are genius'. Yes the white tube is dislodged. How have you all repaired?

Also, to remove the regulator I have to remove the glass. Using the manual it is pretty straight forward except for one retainer.

According to the manual; Lower the glass almost all the way down and remove the front retainer clip. Fig 4

Unfortunately there is no mention of that retainer in figure 4. Anyone know where and how to remove?
 

Attachments

  • IMG_2377.JPG
    IMG_2377.JPG
    79.9 KB · Views: 997
  • IMG_2383.JPG
    IMG_2383.JPG
    49.1 KB · Views: 296

Black Moon

Enthusiast
Joined
Dec 28, 2007
Posts
1,730
Reaction score
0
Location
Knoxville, TN
You guys are genius'. Yes the white tube is dislodged. How have you all repaired?

Also, to remove the regulator I have to remove the glass. Using the manual it is pretty straight forward except for one retainer.

According to the manual; Lower the glass almost all the way down and remove the front retainer clip. Fig 4

Unfortunately there is no mention of that retainer in figure 4. Anyone know where and how to remove?

OK Just did mine so I'll try to explain. The front clip has a black metal tab/ spring/ clip that has to be pulled and the window will pop off. Take a mirror and try to get a better look at it. You only have to pull it about an 1/8" for it to release.

I fixed mine with 'Lord Fusor' available at any auto paint store (Specialty Adhesives & Coatings - Environmentally Friendly Adhesives, Water Based, Aqueous Rubber). It is the world's greatest adhesive and comes in different strengths. Check the chart and find the strongest one. Problem is you'll have to buy the gun too. My buddy has the gun and all the different formulas so I'm not sure which one he used. DON'T GET IT ON THE CABLE OR YOU'RE SCREWED. Also once mixed the working time in hot weather is seconds so work fast. Use a little on the end of the male end and after inserted cover the entire joint. Do all the joints if you pull the unit out.

I also regreased the regulator gear, slides, track and cable.

Let us know how it works out.

Sal:)
 
OP
OP
G

ghengishahn

Viper Owner
Joined
Apr 10, 2010
Posts
232
Reaction score
0
Location
Louisville,KY
Thanks Sal. First let me say I actually did find the retainer clip late last night and got the glass. But had I not found it your description was helpful.

I am in the process of removing the regulator. (BTW I only have evenings to work on the car) I have taken the 3 nuts off that hold the motor and 2 more on the door (1 at front and 1 rear). I have not figured out if I have all the fasteners removed yet or how to remove the assembly. I assume I will lift the entire mechanism out the top of door? If you recall how many nuts get removed (see pic for ones I have removed) or any tips to remove the assembly it would appreciated. Disassembly if not done well can tear up something else and I want to do a first class job.

On the repair.
I believe you applied adhesive to the male tube and reinserted to the female housing. I assumed getting adhesive on the cable would be bad, so I was concerned about getting adhesive bleed over onto the cable. I guess it can be done if careful.

On the remaining joints, I assume you applied adhesive only to the outside surface...right? Or did pull the tube out (break the joint) to apply and reinsert. Hope this makes sense.

Again I appreciate you help. Thanks.
 

Attachments

  • IMG_2377.JPG
    IMG_2377.JPG
    81.8 KB · Views: 96
Last edited:

Black Moon

Enthusiast
Joined
Dec 28, 2007
Posts
1,730
Reaction score
0
Location
Knoxville, TN
Thanks Sal. First let me say I actually did find the retainer clip late last night and got the glass. But had I not found it your description was helpful.

I am in the process of removing the regulator. (BTW I only have evenings to work on the car) I have taken the 3 nuts off that hold the motor and 2 more on the door (1 at front and 1 rear). I have not figured out if I have all the fasteners removed yet or how to remove the assembly. I assume I will lift the entire mechanism out the top of door? If you recall how many nuts get removed (see pic for ones I have removed) or any tips to remove the assembly it would appreciated. Disassembly if not done well can tear up something else and I want to do a first class job.

REMOVE THE MOTOR FROM THE ASSEMBLY (STAR BOLTS I THINK) AND REPACK THE GEAR DRIVE.

On the repair.
I believe you applied adhesive to the male tube and reinserted to the female housing. I assumed getting adhesive on the cable would be bad, so I was concerned about getting adhesive bleed over onto the cable. I guess it can be done if careful.

BE CAREFUL AND IT WON'T BLEED.

On the remaining joints, I assume you applied adhesive only to the outside surface...right? Or did pull the tube out (break the joint) to apply and reinsert. Hope this makes sense.

IF IT ISN'T BROKEN JUST REINFORCE IT. LOOK FOR HAIRLINE CRACKS WHICH WILL BREAK IN THE FUTURE UNDER LOAD AND HEAT FAILURE.

Again I appreciate you help. Thanks.[/QUOTE

/////////////////////////////////////////////////////////////

There are 2 nuts on each slide. Notice one has a brass bolt stem with an allen fitting. These are your adjusters that lean the window in or out. Note their approximate distance from the track and then remove them from the track (just unscrew them. Seperate the motor from the track and remove.

Removal and reinstallation- Here is where someone else needs to chime in. Getting it out was not a problem but all the top weatherstripping has to be popped off. Nothing is glued so don't freak. Since it was broken twisting was possible to remove. NOW- reinstalling I found was impossible without altering the inner door skin. It just wouldn't go in.

ANYONE that has the correct way to reinstall the track is welcome to chime in.

Here's what I did after hours of frustration. I slid the track down from the top and marked where the studs/ brackets wouldn't clear the inner door assembly. I took an air saw and cut 2 slots about 1" wide and 3/4" deep. OK now is when everyone chimes in and calls me a hack. Well screw it. It's covered by the door panel and offers no structural support so I cut it. If you wanted you could Lord Fusor the two removed slots back in but I didn't. I still have them so I may some day.

Once it's back in reinsert the brass adjusters (one top/ one bottom). Reinstall the regulator motor to the track. Screws in from the back (pain). I used a star bit on my 1/4" drive. Connect the wiring harness including attaching it to the inner door. Then slide the tracks in place and rebolt. If you have to adjust loosen the nut with an open end wrench and hold it in place while screwing the adjusters in or out. Mine needed a bit of adjustment and seals better than it did from the factory.

When all bolts are tightened reach in the hole and check for any obstructions like the wiring harness wrapped around the cable. If everything is clear try the switch with no glass attached. Should work fine. Reattach the glass and cycle through up and down (auto) and down slow.

Reinstall plastic dust cover and door panel.

Conclusion- So this may not be the correct way to reinstall but after having read the service manual (useless) and having 2 mechanics screw with it (almost breaking it again) I removed the obstruction. My repair was much more involved since one side of the plastic tube was broken in several places (cheap crap plastic) so my buddy disassembled the track and used 3/8" PEX plastic piping to replace the old white cheap crap plastic that dodge used. I should say the subcontractor in France uses since these are made there.

Hope this helps. I would have documented with photos but I have never figured how to upload. In fact I could write dozens of repairs since I do almost all (except A/C) my own work.

Again, I hope this helps. Good luck. PM sent with phone number.
 

Jon

Viper Owner
Joined
Jun 6, 2010
Posts
73
Reaction score
0
Location
Western New York State
Removal and reinstallation- Here is where someone else needs to chime in. Getting it out was not a problem but all the top weatherstripping has to be popped off. Nothing is glued so don't freak. Since it was broken twisting was possible to remove. NOW- reinstalling I found was impossible without altering the inner door skin. It just wouldn't go in.

ANYONE that has the correct way to reinstall the track is welcome to chime in.


I've never worked on a Viper regulator, but do have experience with some Jeep regulators that are very similar. Based on that experience, the regulator should come out through the large opening in the door skin. Based on the illustration in the FSM, it appears that there should be 7 bolts - 3 for the motor housing and 2 for each guide rail. After you have disconnected (and possibly removed) the glass then removed those bolts, you should be able to move the regulator around inside of the door.

Again, I haven't done this in the Viper, but based on the FSM illustration, what I would try is to move the regulator forward in the door, towards the front of the car. In this case, on a driver's side door, that would be moving it to the right. You may be able to rotate the entire regulator assembly in a counterclockwise direction (for the driver's side door) such that you can get the top of the rear guide rail through the large opening in the door. Once you do that, the rest of the regulator should be able to be snaked out through that opening. Installation would be the opposite of removal.

I hope that is of some help!
 

Jon

Viper Owner
Joined
Jun 6, 2010
Posts
73
Reaction score
0
Location
Western New York State
You guys are genius'. Yes the white tube is dislodged. How have you all repaired?

In the photo you provided, it looks as though the main tube has simply popped out of the motor housing. The main tube breaks that I have experienced with some of the Jeep products were actual breaks, where the main tube has cracked and broken as opposed to just separating. In your case, you may be able to simply glue it back into place. The tricky part to this is that nylon can be difficult to bond with adhesives. I have had some positive comments from some customers who have successfully reattached their Jeep regulators using a product called "SuperGlue2 for Plastics". Another product was mentioned earlier in the thread.

My preferred repair method is a mechanical repair. In this method, you basically create an "exoskeleton" to support the stress on the main tube by attaching a piece of heavy gauge wire to the tube on both sides of the break. Hose clamps seem to work well for this - a larger piece of tubing can be placed between the main tube and the hose clamps to increase the diameter and give the clamps a better bite. In your case, where the separation is so close to the motor housing, hose clamps will not be able to be used on both sides (unless you carry the wire all the way across the motor housing and attach it to the tube on the other side) so you may need to attach that end of the wire to one of the motor housing bolts. Attached is a photo showing an example of this type of repair.

You must be registered for see images attach


I hope that helps!
 
OP
OP
G

ghengishahn

Viper Owner
Joined
Apr 10, 2010
Posts
232
Reaction score
0
Location
Louisville,KY
Based on the illustration in the FSM, it appears that there should be 7 bolts - 3 for the motor housing and 2 for each guide rail. After you have disconnected (and possibly removed) the glass then removed those bolts, you should be able to move the regulator around inside of the door.

Thanks Jon.

So do the guide rails have to come out too? Or do you just need to loosen the rails to disconnect the regulator asm before snaking out the hole.
 
OP
OP
G

ghengishahn

Viper Owner
Joined
Apr 10, 2010
Posts
232
Reaction score
0
Location
Louisville,KY
My preferred repair method is a mechanical repair. In this method, you basically create an "exoskeleton" to support the stress on the main tube by attaching a piece of heavy gauge wire to the tube on both sides of the break.
You must be registered for see images attach


/QUOTE]

Actually this this was my thought too. An exoskeleton...it looks garage-a-tronic but likely to never have to do again.
 
OP
OP
G

ghengishahn

Viper Owner
Joined
Apr 10, 2010
Posts
232
Reaction score
0
Location
Louisville,KY
Getting the regulator out of the door can be a feat without knowing the trick to do it. I called the local Viper Tech who works nights and he looked it up and told me how to do it. Nice guy!

See Picture of Door:
1. Rotate rear track to the bottom of the door while rotating the front track to the top of the door. You'll need to tuck the motor asm rearward to do this.

See picture of Door Opening:
2. At this point the rear track can be removed through the door opening. The the motor and front track will easily follow.
 

Attachments

  • door repair.JPG
    door repair.JPG
    77.1 KB · Views: 213
  • IMG_2385.JPG
    IMG_2385.JPG
    70.1 KB · Views: 206
OP
OP
G

ghengishahn

Viper Owner
Joined
Apr 10, 2010
Posts
232
Reaction score
0
Location
Louisville,KY
Here is the fix:

1. White tube separted from body
2. Epoxy tube back into body
3. Run aluminum strap though body hole, epoxy and clamp to white tube.

A bit of belt in suspenders but it should work.
 

Attachments

  • IMG_2386.JPG
    IMG_2386.JPG
    56.8 KB · Views: 219
  • IMG_2389.JPG
    IMG_2389.JPG
    45.8 KB · Views: 213
  • IMG_2394.JPG
    IMG_2394.JPG
    47.5 KB · Views: 227

Black Moon

Enthusiast
Joined
Dec 28, 2007
Posts
1,730
Reaction score
0
Location
Knoxville, TN
Great fix. A moderator should move this to the illustrated upgrades forum. This is such a common problem. Glad you worked it out.
Sal
 
OP
OP
G

ghengishahn

Viper Owner
Joined
Apr 10, 2010
Posts
232
Reaction score
0
Location
Louisville,KY
Great fix. A moderator should move this to the illustrated upgrades forum. This is such a common problem. Glad you worked it out.
Sal

Thanks Sal. If a moderator moves this to the illustrated upgrades forum and since I am non VCA member, then I think I could no longer access my own post.:crazy2:
 

Jon

Viper Owner
Joined
Jun 6, 2010
Posts
73
Reaction score
0
Location
Western New York State
Getting the regulator out of the door can be a feat without knowing the trick to do it. I called the local Viper Tech who works nights and he looked it up and told me how to do it. Nice guy!

See Picture of Door:
1. Rotate rear track to the bottom of the door while rotating the front track to the top of the door. You'll need to tuck the motor asm rearward to do this.

See picture of Door Opening:
2. At this point the rear track can be removed through the door opening. The the motor and front track will easily follow.


Hmmm, that sounds familiar! ;) That's OK, I can certainly understand your wanting to hear it from a Viper tech as opposed to some random schmoe on a forum. I'm glad to see that I guessed right, anyway. :) Congrats on the fix!
 
OP
OP
G

ghengishahn

Viper Owner
Joined
Apr 10, 2010
Posts
232
Reaction score
0
Location
Louisville,KY
Hmmm, that sounds familiar! ;) That's OK, I can certainly understand your wanting to hear it from a Viper tech as opposed to some random schmoe on a forum. I'm glad to see that I guessed right, anyway. :) Congrats on the fix!

Jon I had to re read your posts to see that you mentioned how to remove the regulator. I clearly oversighted your help. Sorry. No offense intended. Oh well. I'll learn to read more carefully next time.

And by the way the fix that I showed in the earlier post essentially did not work. That joint has incredible force on it if you do the auto down feature, which I would like to maintain. I created another joint that was also very garage-a-tronic and while it does work well for the moment, it has some flex that will likely fatique fail within a year. I used screw clamps like your design but those clamps interfere with the glass if not oriented correctly. Keep in mind you are showing the lower joint which may not have glass interference....my failure is the upper joint and is very tight. We'll see how it goes this weekend.
 
Last edited:

Jon

Viper Owner
Joined
Jun 6, 2010
Posts
73
Reaction score
0
Location
Western New York State
Jon I had to re read your posts to see that you mentioned how to remove the regulator. I clearly oversighted your help. Sorry. No offense intended. Oh well. I'll learn to read more carefully next time.

And by the way the fix that I showed in the earlier post essentially did not work. That joint has incredible force on it if you do the auto down feature, which I would like to maintain. I created another joint that was also very garage-a-tronic and while it does work well for the moment, it has some flex that will likely fatique fail within a year. I used screw clamps like your design but those clamps interfere with the glass if not oriented correctly. Keep in mind you are showing the lower joint which may not have glass interference....my failure is the upper joint and is very tight. We'll see how it goes this weekend.


Not a problem, no offense taken - it was a guess guided by experience, but still just a guess. :)

Regarding the fix, something you might want to try is to get a piece of vinyl tubing with approximately the same ID as the regulator tube OD, slit it, and put it over the tube, then put your hose clamps on that. The larger diameter will allow the hose clamps to get a better bite (and/or allow you to use larger clamps). The vinyl tubing, being softer than the nylon tube, would also "give" a bit and when your metal wire is sandwiched between the hose clamps and the vinyl, would tend to grab that wire tighter than the hard nylon tube would. Using a wire with a round profile as opposed to flat could also help, because this will force the wire down into the soft vinyl, gripping it tighter. I would recommend something about the size of a piece of solid 12 gauge electrical wire (or larger). Another thing I might be inclined to do is to make your metal wire (or whatever you end up using) longer so that you can put two or three hose clamps around it and the tube. That would allow a few hose clamps to share the load rather than putting it all on just one. Anyway, just a few ideas there in case you decide to go to version 3 at some point in the future.
 
OP
OP
G

ghengishahn

Viper Owner
Joined
Apr 10, 2010
Posts
232
Reaction score
0
Location
Louisville,KY
Not a problem, no offense taken - it was a guess guided by experience, but still just a guess. :)

Regarding the fix, something you might want to try is to get a piece of vinyl tubing with approximately the same ID as the regulator tube OD, slit it, and put it over the tube, then put your hose clamps on that. The larger diameter will allow the hose clamps to get a better bite (and/or allow you to use larger clamps). The vinyl tubing, being softer than the nylon tube, would also "give" a bit and when your metal wire is sandwiched between the hose clamps and the vinyl, would tend to grab that wire tighter than the hard nylon tube would. Using a wire with a round profile as opposed to flat could also help, because this will force the wire down into the soft vinyl, gripping it tighter. I would recommend something about the size of a piece of solid 12 gauge electrical wire (or larger). Another thing I might be inclined to do is to make your metal wire (or whatever you end up using) longer so that you can put two or three hose clamps around it and the tube. That would allow a few hose clamps to share the load rather than putting it all on just one. Anyway, just a few ideas there in case you decide to go to version 3 at some point in the future.

Yes I have contemplated a design similar to what you showed inanother post. Thanks for the additional definition of materials. I could not tell what was used or if any adhesive or silicon was used. Has the design you did held up and how long has it been in service??

I did another design (more of an experiment)with Zip Ties (those nylon straps). I tried those because they can pulled the two parts into compression that I thought was a plus over the metal wire or my stirrup design. However when activating the full down windor, the tube tended to still dislocates downward as the regulator hit the stop. The joint has a a lot force. The metal wire like you show offers stiffening to prevent that movement. I'll be working on this again this weekend.

I still have to say Chrysler quality really *****. This should not happen at 5K miles and on a premium vehicle.
 

Jon

Viper Owner
Joined
Jun 6, 2010
Posts
73
Reaction score
0
Location
Western New York State
Yes I have contemplated a design similar to what you showed inanother post. Thanks for the additional definition of materials. I could not tell what was used or if any adhesive or silicon was used. Has the design you did held up and how long has it been in service??

The photo I posted was not actually my work; it was from a customer. I haven't actually had to perform this repair myself, but have walked a number of people through it. I haven't had any of them contact me to say that the fix has failed. (Granted, that doesn't mean it hasn't happened, I just don't know of any.) In the photo that was posted, I believe the gentleman who performed that repair used some hot glue in addition to the hose clamps and additional tube. Personally, I don't think any adhesive is necessary; it will probably not stick well in the first place, and will just make things messy if it fails and you need to clean it up to try again. The plastic pieces on the regulator are Nylon, which is really difficult to bond. A couple of years ago, I was designing a part which required attaching a Nylon 6/6 piece to it. I experimented with adhesives, including some specialty industrial adhesives from Devcon which were designed for Nylon, but the results were not great. I ended up using a mechanical fastener instead. If two nylon pieces need to be attached together without using an external fastener, probably welding is the best way to go, but that generally requires specialized equipment under controlled conditions. (And as you have discovered with your regulator breakage, even that is no guarantee of success, since I assume that's exactly how the regulator was originally assembled.)

I have heard back from some folks who have used "SuperGlue2 for Plastics" with success on this regulator nylon, but I have not tried it myself, and do not know anything about the longevity of that repair.
 

wikkid

Viper Owner
Joined
Apr 13, 2010
Posts
895
Reaction score
0
I need mine fixed, but im a little bit hesitant on fooling around with the door panel and regulator. Last thing i need right now is another repair bill if i make a mistake.
 

Jon

Viper Owner
Joined
Jun 6, 2010
Posts
73
Reaction score
0
Location
Western New York State
I need mine fixed, but im a little bit hesitant on fooling around with the door panel and regulator. Last thing i need right now is another repair bill if i make a mistake.

If it is any consolation, Chrysler doesn't sell replacement parts for their window regulators, so from their perspective, you are already in it for an entire window regulator. Thus, if you break the regulator even more than it already is, you're not really any worse off than you started.

Granted, during the repair process, you could drop the window glass or gouge up your door panel or something, so if you're not comfortable with the DIY route, you're basically stuck having the dealership charge $800-1000 plus labor, or perhaps finding an independent mechanic or mechanically inclined buddy to help.
 

Latest posts

Forum statistics

Threads
153,215
Posts
1,682,041
Members
17,708
Latest member
xeng yang
Top