I wish I would have taken photos when I did mine to show the steps.
The first step was to take a automotive trim removal tool (a flat metal tool with a notch in it) and pop all the buttons loose. Once you have removed all of them (don't forget the one in the middle) you can lift off the carboard panel which the old headliner is attached to. You can peel back the old cloth towards the center and then you will have to remove the metal fasteners which hold the mesh pocket in place. They are sort of like a nut, but will pop off and try to hide on the floor if you aren't careful.
Once you have that off you need to find a suitable headliner material. I went to a local fabric store and found a black flannel looking material with a tan backing which would accept glue. It was thin enough to mold onto the cardboard part, but would not allow the glue to soak through the fabric. I imagine you can find a better material through automotive upholstery places, but the material I found was an almost exact match for the original. By the way, when I removed the cardboard I found the original factory "build sheet" for the top with signoffs for all the manufacturing steps.
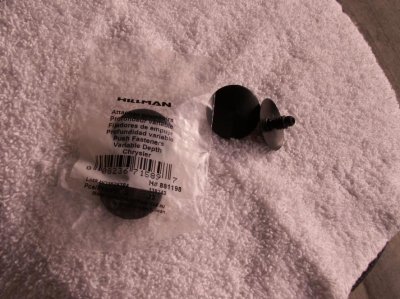
Once you have gotten the special headliner adhesive, the fabric and the buttons (I think they were about 45 cents each at Lowes) you can fit the cloth to make sure where you want it and then spray adhesive per the instructions on the can. I used a fairly heavy coat and didn't spray the fabric as I thought I would have trouble laying it on easily. You may do better than I did. Then you can start layiing the fabric (I started in the middle) and pushing it outward, smoothing it onto the cardboard, and working out all the wrinkles. You will not have a lot of time to smooth the wrinkles, so it might be nice to have a spare set of hands. You need to be very careful that you don't get excess glue on the headliner cloth as it doesn't come off easily and may leave spots.
I was able to get it nice and smooth except for one little area, fortunately it hardly shows. I waited till I had all the fabric on the cardboard and in place before I sprayed adhesive on the back side and wrapped the material around to secure it. You will have to trim the material to wrap it around the edges, just like you do when upholstering a household item.
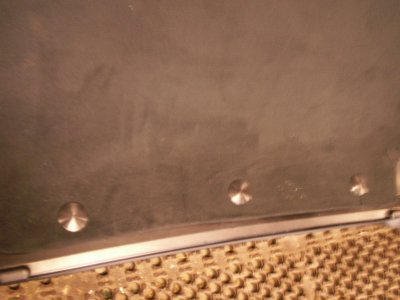
Once that is done you can let the glue dry. After the adhesive is dry you need to use something sharp like an awl to carefully poke holes in the headliner from the backside of the cardboard panel. This will allow you to put the plastic buttons in place on the newly upholstered panel before attaching it to the hardtop. Be sure to re-install the mesh basket and fasteners at this time. You may need to use a small drill to make the hole large enough to push the new buttons in. The headliner fabric can make the hole a little tight, so check fit the buttons.
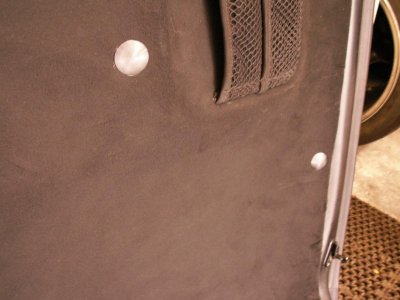
Double check to be sure you have a button in each hole (including the middle) before you re-install the panel. I started in the middle and pushed the buttons in a small amount to align them correctly. Once you have all of them in place you can start pushing them in. I used a rubber mallet get them all the way in. If you are aligned correctly you will be able to give them a small hit with the rubber mallet and they will pulll down nicely. Be sure to buy some extra buttons in case you break some off. I learned that they sometimes will shift during installation and snap off. The only difference in my headliner installation I noticed was that the buttons are a semi-gloss and the original had some upholstery material on them. You could probably paint them with a flat black paint befoe you install them if you want an exact look.
I was able to do the whole job for less than $35 for everything and I noticed that the 3M headliner adhesive does a fantastic job holding the material in place.
Good luck on your installation. I have attached 3 photos showing my finished headliner as well as the buttons you will need. Unfortunately the photos make the fabric look kind of brown, but that is just my camera. It is actually dark black.