Gen 1 Audio Upgrade Thread.

maverickagm

Enthusiast
Joined
Jun 9, 2023
Posts
82
Reaction score
39
Location
New Westminster
I'm starting a thread for my audio upgrades on my 1993. Gen 2 seems to be well documented in various places, but I figured Gen 1 is different enough to warrant some posts. My goals are:

1) Door midrange speakers (See posts 2 3 4 5)
3) Door tweeter speakers (See post 7)
3) Rear speakers (See posts 12 and 13 )
4) Antenna (I covered this in a different thread here)
5) Add cd changer emulator to stock cassette player (See posts 17, 18, 19)
6) Make the head unit easier to remove so I can service it periodically (See post 20)
7) Repair the cassette player. I suspect it just has a broken rubber belt, but maybe some capacitors have blown as well.

Each of the above will be multiple posts, but I will link all the post numbers here (eventually) so it acts like a table of contents.
 
Last edited:
OP
OP
M

maverickagm

Enthusiast
Joined
Jun 9, 2023
Posts
82
Reaction score
39
Location
New Westminster
First up is door speakers.

Items bought:
A pair of Kicker 5.25" 4 ohm speakers. Model #: 46CSC54
A pair of Silicone 5.25" Car Speaker Baffles. Brand: Recoil. Model #: SPB525. I'm sure there are many like this
A pair of Bass Blockers. I chose one that eliminates frequencies between 0-5.6kHz at 4Ohms. Brand: Recoil. Model #: BB-T.

I'm keeping my stock tweeters (for now).

Here's the wiring diagram:
You must be registered for see images attach


The midrange speaker and tweeter are wired in parallel. The parallel connection is done at the midrange speaker terminals. There's two positive wires and two negative wires. One set of wires routes back into the plug/harness and forks off to the tweeter. There is also a "bass blocker" wired inline on the tweeter's positive wire, though it's in the least obvious place. There's an extra capacitor on the midrange speaker next to the positive terminal. That's the (basic) bass blocker.

You must be registered for see images attach


I used open barrel connectors to wire everything. If you're unfamiliar with them, you use a special crimper. It crimps to the wire insulation and the wire. Then there's an open spot to add solder. Finally, slide the heat shrink tube in place and heat it. Dark Green and Dark Blue go to negative. Light Green, and bass blocker (black wire) go to positive. Light blue goes to bass blocker (black).

You must be registered for see images attach


Removing door panels:

Here's what the service manual had to say, but I found my early 93 to be a bit different. Also the last two steps just say to remove the door panel and slide the seatbelts through the slits to free them.

You must be registered for see images attach

You must be registered for see images attach


Post continued below
 
Last edited:
OP
OP
M

maverickagm

Enthusiast
Joined
Jun 9, 2023
Posts
82
Reaction score
39
Location
New Westminster
Door speakers part 2:

My photos will not always be from the same side. I sometimes put screws back in the holes they came from in order to keep track of them.

Tools:
#2 philips screw driver
T50 socket
I recommend a Finger Grip bit driver (i.e.: super-stubby screw driver)

1) Remove door pull cup thingy. 2 screws. Easy. Not pictured.

2) Remove door latch cover. Pull it straight back. Hopefully yours isn't super-glued on like mine were because a previous owner broke the tabs! Not pictured.

3) Removing the latch cover exposes a screw. Remove it along with the other two then remove the grey trim piece. With both removed:

You must be registered for see images attach


4) Remove upper seat belt trim piece. Remove one screw. Remove cover. Remove screw under the cover.
You must be registered for see images attach

You must be registered for see images attach


5) Remove 2 screws for the bottom seat belt trim
You must be registered for see images attach


Post continued below
 
Last edited:
OP
OP
M

maverickagm

Enthusiast
Joined
Jun 9, 2023
Posts
82
Reaction score
39
Location
New Westminster
Door speakers part 3.

6) Three mounting screws. These are screwed in horizontally via tabs that are mostly visible. The short screw is the front-most screw. The other two are the same size. Two are shown below. The last is on the bottom towards the rear of the car. My screw driver is pointing to it in the photo on step 5.

You must be registered for see images attach

You must be registered for see images attach


7) Three trim screws. These are vertical and located at the bottom of the panel. You may have to dig through some carpet to find them. If you can't open your door all the way, a super-stubby screwdriver can save you here.
You must be registered for see images attach

You must be registered for see images attach


8) If this piece of weather stripping is attached to the door panel, carefully cut through it. Mine was adhered with double-sided foam tape.
You must be registered for see images attach


There's one more spot to unscrew. This part wasn't in the service manual. Maybe the early 93's were built a bit differently. It requires removing the stanchions and seat belt mount.

Post continued below.
 
Last edited:
OP
OP
M

maverickagm

Enthusiast
Joined
Jun 9, 2023
Posts
82
Reaction score
39
Location
New Westminster
9) Remove four screws on back of stanchions. Remove three screws on front stanchion. The seat belt mount prevents the stanchion from coming off.

You must be registered for see images attach


10) Time to remove the big seatbelt bolt. Start by unclipping the triangular seat belt trim piece. There's a tab on each side. It has to be worked a bit, but it comes out. Then use a T50 to unbolt the seatbelt mount. Remove the stanchion.

11) With the stanchion out of the way, you now have access to the last two screws. Mind the orientation of the metal 90 degree tab, then remove the last two screws.

You must be registered for see images attach


Side note: I don't want to have to do all these extra steps again the next time I remove the door panel. When I reassembled the door, I removed the two screws holding the metal bracket to the door panel, but left the 2 screws connecting the metal bracket to the door frame. You can only see 2 of the 4 screws in the picture above but there are 2 more screws attaching the bracket to the underside of the panel. It does provide support for the door panel. When reinstalling, it looked exactly as above, but the 2 screws attaching the bracket to the door panel were ommitted.

12) Pull the door panel up and out a bit. You'll need to reach in to unplug the harness and slide the seat belt through the slits in the door panel. There's some trim clips that hold the door on but they pop off easily.

You must be registered for see images attach

You must be registered for see images attach


13) Undo four screws holding in the speakers. Unclip the harness. There's also a plastic housing for the speaker. Maybe it's there to keep water off of it. I used my silicon baffles instead.
You must be registered for see images attach


14) Install new speaker, test them, then put it all back together.
 
Last edited:

laney487

Enthusiast
Joined
Apr 16, 2022
Posts
1
Reaction score
0
Location
Canyon TX
nice writeup. when i bought my car i know the middle speakers have been changed not sure about the side.. is there any good bass upgrade?
 
OP
OP
M

maverickagm

Enthusiast
Joined
Jun 9, 2023
Posts
82
Reaction score
39
Location
New Westminster
Door Tweeters.

I wasn't originally going to replace these, but I found something that fit. I measured about 46.7mm on the stock tweeters. The closest I could find that would fit the hole were Herts CP 26 which measured 44mm. Also, the Hertz tweeters have a bolt hole on the back of the tweeter, much like the stock ones.

With the door panel removed (see posts about door midrange speakers), undo the two screws holding the metal bracket onto the door panel. The tweeter and metal bracket can come out as one. Mine was kind of wedged in there. You can try and push from the front, just don't push on the speaker grill, try and push on the plastic ring around the grill.

You must be registered for see images attach

You must be registered for see images attach


I modeled and printed a mounting adapter. In addition to this adapter, you will need a pair of M3 bolts that are 12mm in length. The adapter is here:

Insert speaker into adapter. Secure it with the M3 bolt. I also used some loctite blue on these threads. I put recesses in the adapter so I could reuse the original screws that mounted the tweeter to the door panel.

You must be registered for see images attach

You must be registered for see images attach


There's not much to say about wiring. On the tweeters, the red wire is positive. You can tell because the included bass blocker just has a capacitor on the red wire. So red goes to light blue (+) and the clear wire goes to dark blue (-). You can refer to the wire diagram in the post about door midrange speakers. I did not use the bass blocker that came with the Hertz tweeters because, if you read my posts about the door midrange speakers, I already installed a bass blocker closer to the midrange speaker.

I crimped on some spade disconnects, then wrapped each connection in electrical tape. I then slipped on some split loom tubing to keep things tidy (not pictured).
You must be registered for see images attach


Reinstall door panel and you're done!
 
Last edited:

GTS Dean

Enthusiast
Joined
Jul 22, 2000
Posts
3,912
Reaction score
303
Location
New Braunfels, Texas
Very thorough and well illustrated. What was the piece of paper inside the door - assembly instructions from the production line?
 
OP
OP
M

maverickagm

Enthusiast
Joined
Jun 9, 2023
Posts
82
Reaction score
39
Location
New Westminster
Yeah it's an assembly check list. I thought it was pretty cool. I think I'm going to carefully remove them and store them in a ziplock bag.
You must be registered for see images attach
 

GTSnake

Enthusiast
Joined
Oct 26, 2000
Posts
2,767
Reaction score
22
Location
Motor City
You should upgrade the head unit too. New head units are much better with digital playback instead of old many moving parts CD players or cassette tapes.

When I upgraded my sound system I went crazy trying to get more bass and high fidelity sound. In the end it wasn't worth it because my exhaust drowned out any audiophile improvements. But it is a huge leap better than the OE system.
 
OP
OP
M

maverickagm

Enthusiast
Joined
Jun 9, 2023
Posts
82
Reaction score
39
Location
New Westminster
I won't be upgrading the head unit, simply because my car would no longer be eligible for collector plates. Speakers were also selected so they could hide behind the oem grills.

As for audio quality, If the DAC is offloaded to an external cd changer emulator, and the amplification is offloaded to the trunk amplifiers, what is the head unit going to hurt? Perhaps it has low voltage on the amplifier rca preouts. I wonder how many people have tested a CD changer on the stock cassette head unit with aftermarket speakers. I'm not convinced the head unit is inherently bad. I could be wrong, but I will find out. Perhaps other gen 1 owners blame the quality on the head unit where it could be their cassettes or the quality of the stock (by now, rotting) speakers. Plus, the oem cassette unit has dolby noise reduction. You won't find that on any modern player since dolby dolby doesn't license it any more. I also just want to be able to rock out with my Pixies cassettes hahaha.
 
Last edited:
OP
OP
M

maverickagm

Enthusiast
Joined
Jun 9, 2023
Posts
82
Reaction score
39
Location
New Westminster
Rear Speakers.

Items bought:
A pair of Kicker 6.5" 4 ohm speakers. Model #: 46CSC654
A pair of Silicone 6.5" Car Speaker Baffles. Brand: Recoil. Model #: SPB65.

Tools:
#2 philips screw driver
Finger Grip bit driver (i.e.: super-stubby screw driver)

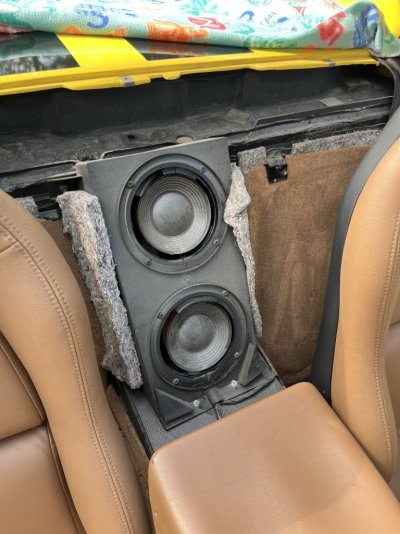
This was delightfully easier than I thought it would be. I read threads about people having to remove the seats. There was absolutely no need in my '93.

1) Remove rear window (you'll see why). Mine were 3 button snaps and Pins you pull on the top. Easy.

2) Move seat all the way back and remove the screw going into the center transmission tunnel grey panel.
You must be registered for see images attach


3) Move the seat all the way forward and angle the back rest as far forward as it will go. Remove the two screws in the rear bulkhead (black rear plastic cover). Once again, my super-stubby screw driver saved me.
You must be registered for see images attach


4) Repeat steps 2 and 3 for the opposite side

Side Note: These screws do NOT need to come out:
You must be registered for see images attach


5) There are some trim clips. No need for any sharp tools. Use your fingers to pry around all the edges and things will pop out.

6) Once the panel is mostly free, get the center black piece over the grey one. Just carefully pull it from under the grey center panel. It's really not hard at all.
You must be registered for see images attach


7) Now you may notice that you still can't get the bulkhead piece out of the car. It hits the back of the seats. Soooooo.... toss a towel down and jam it out the back window. It's still not out, but it's out of the way!
You must be registered for see images attach


Post continued below.
 
Last edited:
OP
OP
M

maverickagm

Enthusiast
Joined
Jun 9, 2023
Posts
82
Reaction score
39
Location
New Westminster
8) Here's what things look like. Unscrew the bottom speaker first since you can access both harness plugs from there.
You must be registered for see images attach


Side note: I tested. Once the rear bulkhead panel is in this position, and if you want to fully remove it, you can move it towards the front of the car, up and over the seats.

9) Wiring is straight forward. The oem speakers were labeled. Dark green is negative and light green is positive. Once again I crimped and soldered mine with open barrel connectors.
You must be registered for see images attach


10) Install top speaker first, then the bottom. Once again I used silicone baffles. My stock screws were too short for the thicker plastic bezel on the kicker speakers. Fortunately kicker provides longer screws with the same thread size! However, I did have to add M5 washers so the screw head wouldn't slip off the speaker mount point (it's an open ended slot). Also, In the picture below the silicone baffle is at full length in the front. They fold back. Do fold it back! The lower one was pushing the rear bulkhead panel forward a couple of millimetres making the center console screw holes not line up right.
You must be registered for see images attach


11) Test speakers then reinstall rear bulkhead trim and rear window, then you're done!
You must be registered for see images attach
 
Last edited:
OP
OP
M

maverickagm

Enthusiast
Joined
Jun 9, 2023
Posts
82
Reaction score
39
Location
New Westminster
I've only had my car since last June. It was previously a garage queen. Most of my plastic seems to be fine. The hooks on my black door latch trim were snapped off. It turns out they used that trim piece up until 2002 on Jeep Grand Cherokees. I found a seller on Aliexpress (I know I know...) selling pairs shipped to my door for 70 Canadian dollar bucks. I figure I would take a gamble on those.

I have seen your site and I am thrilled there is an option out there. But I must admit, the unit costs + tax + duties + international shipping + Canadian exchange rate really adds up for a Canuck up north.
 
OP
OP
M

maverickagm

Enthusiast
Joined
Jun 9, 2023
Posts
82
Reaction score
39
Location
New Westminster
On audio quality. So far I've only replaced all my speakers. As far as the radio goes, and I know that isn't saying much, the quality is great. It's better than my '07 mustang with an aftermarket head unit. The factory amps do a better job than a head unit. It can get very loud.

Is there bass? yes. Is there deep bass?? No. I doubt theres much that can be done about that unless you fabricate a sub enclosure in the passenger foot well, and wire up a new amp. That's not something I'm interested in doing.

My next change is to add a cd changer emulator to the stock head unit which involves removing it to get access to the m-bus cable. I kind of dread this task since the whole dash must come off. But once that's done I can try a lossless digital audio file on the system.

In short, changing out only the speakers is totally worth it. Radio audio quality is good 'nuff for rock and roll.
 
OP
OP
M

maverickagm

Enthusiast
Joined
Jun 9, 2023
Posts
82
Reaction score
39
Location
New Westminster
CD Changer Emulator.

Items bought:
Yatour YT-M07 MBus edition. The YT-M06 is similar. However, the manual made no mention of being able to play WAV files, whereas the M07 did.
Alpine 4913 adapter. These are hard to come by. There's someone in Europe selling replicas as seen here:
I bought one of these. He sells on eBay under the username "sbeube02"
By now you've probably noticed it's cheaper to buy an aftermarket head unit. I wouldn't blame you! However, if you want to create a tricked out old school cassette deck, proceed.

Tools:
#2 philips screw driver
Finger Grip bit driver (i.e.: super-stubby screw driver). I'm starting to think they should have been giving these away at the dealership to anyone who bought a Viper.

1) Before starting, I disconnected my negative battery terminal. Start by removing the grey knee bolster panels. There are 5 screws on each side. Stubby screw driver comes in handy here.
You must be registered for see images attach


2) Remove ash tray. Pull the center console trim off. It's secured with 4 trim clips. Be careful prying this. Mine was on there good! Theres two connectors for the cigarette lighter. There's one fog light switch connector. The other is connected to nothing since it's only connected to European cars to toggle rear fog lights.
You must be registered for see images attach


3) You need to remove the headlight pull rod. Reach your hand under the dash and over the switch assembly. There's a button on top that you push so you can remove the pull rod fully.
You must be registered for see images attach


4) Time to remove the dash screws. There are 8.
2x screws (one on each side):
You must be registered for see images attach


2x screws in the center
You must be registered for see images attach


Post continued below.
 
Last edited:
OP
OP
M

maverickagm

Enthusiast
Joined
Jun 9, 2023
Posts
82
Reaction score
39
Location
New Westminster
4 continued)
2x screws in the glove box
You must be registered for see images attach


2x screws under the steering wheel
You must be registered for see images attach


5) Pry the dashboard off. There are trim clips that need to pop off.

The doors will want to close and get in the way. Jam a towel in the doors to keep the space free.
You must be registered for see images attach


Here's a good spot to pull on the passenger side:
You must be registered for see images attach


On the driver's side, pull above the speedometer and tachometer gauges
You must be registered for see images attach


Post continued below.
 
Last edited:
OP
OP
M

maverickagm

Enthusiast
Joined
Jun 9, 2023
Posts
82
Reaction score
39
Location
New Westminster
5 continued)
It's almost free. The last part can be a bit finicky. The left side will get caught up on the steering column. Keep a cool head. It will come out. Just gently work it out and dont flex anything too much. You shouldn't have to. Generally, I moved the panel counter clockwise a bit. I then tipped the top side towards the back. I also made sure the back of the speedometer bezel was not caught on anything.
You must be registered for see images attach


6) So much work just so these stereo mount tabs will clear.... Undo the screws and there should be plenty of slack cable to pull out the head unit.
You must be registered for see images attach


7) Jackpot. These are the unused connections we are looking for. An rca pair and an 8 pin din.
You must be registered for see images attach


8) Connect the alpine 4913 to the rca and din cables on the head unit. Connect the din cable from the cd changer emulator to the alpine 4913. You can see how I routed my cables and how I stuffed the alpine 4913 in the empty void between the glove box and head unit. You could velcro tape the emulator to the underside of the knee bolster or route it into the glove box. I routed to the glove box. No holes were necessary. Don't ever try to haphazardly drill holes in the glove compartment! There's lots of wires and hvac duct work that's butted up against it!
You must be registered for see images attach


9) Reassemble your dash.
You must be registered for see images attach


I tested this device. It works with mp3 files and wav files, but not flac files. Meh, High capacity SD and USB sticks are cheap these days.
 
Last edited:
OP
OP
M

maverickagm

Enthusiast
Joined
Jun 9, 2023
Posts
82
Reaction score
39
Location
New Westminster
Alternate head unit mount.

Since I'll have to remove the head unit again at some point, I designed and printed (in abs) an alternate style mount. I posted it on printables.com here:

It eliminates the metal L brackets. It moves the mount point to the same screws the dash uses. The mount tabs are over the dash. The next time I remove the head unit, I need only to remove the single panel around the radio, heater controls, and shifter.
You must be registered for see images attach

You must be registered for see images attach


This post illustrates what I am solving:
 
Last edited:
OP
OP
M

maverickagm

Enthusiast
Joined
Jun 9, 2023
Posts
82
Reaction score
39
Location
New Westminster
Running new cables from trunk to interior.

This post explains what I'm solving:

My path goes from
1) The trunk, into the fuel tank area
2) Over the driver's side wheel well
3) Behind the carpet behind the back seat
4) behind the carpet along the driver's side of the transmission tunnel
5) Up over the driver's side knee bolster and in behind the radio

The most difficult part is from the trunk to behind the driver's seat. Fortunately for me, my fuel tank area has been serviced before. I didn't have to drill out the rivets and replace them with plastic push pins because someone else already had

1) Remove fuel tank closeout panel in the trunk. Also remove the rear bulkhead panel (demonstrated in posts on rear speakers)
You must be registered for see images attach


2) Drill the hole in the correct place. This step required my patience (but don't worry I'll give you a good pilot hole starting point below). Using a Magnetic telescoping pickup tool (magnet on a stick) you must fish it into the fuel tank area from the trunk. Behind the drivers seat, you must use another magnet to locate the magnetic stick. The lower panel is steel, but the upper body surround is plastic. So you can find a location in the plastic and measure some distance downwards to drill the hole. The rear steel panel has a vertical section and then it begins to angle. Don't drill too high. That perfectly vertical section has a thick square tube frame piece right behind it. You must find the spot below the plastic and below the frame piece. I drilled a super-tiny hole then shined a bright flashlight into the hole, then went into the trunk and observed how close I got. In my case, I drilled a second pilot hole a few millimeters to the side and down.

Here is where I lined up the magnet.
You must be registered for see images attach


Here is where I drilled my hole. From the outermost rear bulkhead screw hole I measured about 66mm inwards and 10mm down towards the floor. I think that's enough information to drill your initial pilot hole. I drilled a 1 inch hole so that should allow for at least 12mm of correction for your final pilot hole. You shouldn't be anywhere near the fuel tank drilling here. Unless you're using an unusually long step drill bit, it shouldn't go deep enough to hit the wheel well.
You must be registered for see images attach


After using a step drill bit to make a 1 inch hole, here is what it looks like from the interior and trunk.
You must be registered for see images attach

You must be registered for see images attach


Post continues below
 
Last edited:
OP
OP
M

maverickagm

Enthusiast
Joined
Jun 9, 2023
Posts
82
Reaction score
39
Location
New Westminster
Running new cables from trunk to interior continued.

3) With the hole drilled, the rca cables must be fished through.

4) The carpet is glued to the back. I jammed a metal bar with the green rope through the carpet to avoid unsticking all the carpet
You must be registered for see images attach

You must be registered for see images attach


5) Remove the driver's side knee bolster (5 screws)

6) Run your cables behind the carpet along the transmission tunnel. First get both ends of the cables just under the plastic center console piece. Then get both ends of the cable under the carpet. You can grab both ends of the cable and kind of floss it in between the carpet and steel tunnel.

7) Route the cable in behind the head unit and plug them in (I hope at this point it was obvious you had to pull the head unit out). You don't need a fish line for this, but the photo below has the green rope showing the path
You must be registered for see images attach


8) Pull all the excess line into the trunk. Finish the hole with a grommet. The cables squeezed into the gap above the fuel tank closeout panel so I did not need any hole there.
You must be registered for see images attach

You must be registered for see images attach


9) Zap strap the cables down and connect to your amps. To make things look really nice, you may want to cut the cables to length and solder new RCA heads on (there are even solder-less RCA plugs out there made by Sewell)

I bought 17 foot RCA cables. I suspect 12 is too short.

This same cable path can be used for upgraded speaker wires though I don't know how you route from the interior to the doors.
 
Last edited:

Mr Diesel

Enthusiast
Joined
Jul 31, 2023
Posts
6
Reaction score
0
Location
Belgium
This is a very valueable post.
I am going to start this job soon myself.
Curious of there is a difference with my 94 european spec, my seatbelts are located in the middle above the speakers.
 

GTS Dean

Enthusiast
Joined
Jul 22, 2000
Posts
3,912
Reaction score
303
Location
New Braunfels, Texas
Collectively, these were classed as BUX (Export) cars by Chrysler/Dodge. In the parts book, you would need to look for the suffix BUX for seatbelts, exhaust systems, lighting, etc.

Since they spent the money to move the shoulder belts and exhaust inboard, they were able to defray the development costs when the Gen2's came out with those items as standard equipment. The export exhausts were much more restrictive though.
 
OP
OP
M

maverickagm

Enthusiast
Joined
Jun 9, 2023
Posts
82
Reaction score
39
Location
New Westminster
This is a very valueable post.
I am going to start this job soon myself.
Curious of there is a difference with my 94 european spec, my seatbelts are located in the middle above the speakers.
I have no idea. But this type of scenario is why I provided a reference point (with an offset in mm) along with how I came to the conclusion. You really don't want to make a mistake here. Using a welder to fill in a misplaced hole is difficult with the fuel tank right there. Worse yet is you could accidentally drill through the square tube frame around the fuel tank.

You have to remove the fuel tank closeout panel to do the job so you will easily see once that panel is removed. Using a flashlight you will see curves and indents that you can use as rough reference points while comparing the interior and in the trunk. The magnet method should help you confirm.
 

ninetyfive

VCA Member
VCA Member
Joined
May 25, 2023
Posts
64
Reaction score
10
Location
Chicago
Similar instructions for 95 rear speakers. Stubby philips saved me. Had to get #8-1” sheet metal screws since the ones that came with speakers were a bit too skinny. Bass is meh on these at full volume but much better overall. How did my old speakers make any sound at all is a mystery.
 

Attachments

  • IMG_1552.jpeg
    IMG_1552.jpeg
    170.8 KB · Views: 12

Badsnek

Enthusiast
Joined
Jun 7, 2020
Posts
163
Reaction score
64
Location
Pennsylvania
Holy wow. That’s one heck of an impressive write up. Talk about great information!

I’d personally be too terrified about breaking brittle plastic to do all of that. Especially with what everything costs. My only critique is that you went through all of that to throw those kickers in……if I was going to do all of that work and take all the brittle stuff apart, I’d be throwing some way higher quality and better performing speakers in. But that’s just my two cents. But using the factory head unit isn’t going to help anyway, only going to sound so good no matter what quality speakers you get. I get it about the collector plates. But you could have ran an alternative Bluetooth unit in the trunk etc etc.

But seriously this is one heck of a great write up and the pictures are super helpful!
 

Badsnek

Enthusiast
Joined
Jun 7, 2020
Posts
163
Reaction score
64
Location
Pennsylvania
Alternate head unit mount.

Since I'll have to remove the head unit again at some point, I designed and printed (in abs) an alternate style mount. I posted it on printables.com here:

It eliminates the metal L brackets. It moves the mount point to the same screws the dash uses. The mount tabs are over the dash. The next time I remove the head unit, I need only to remove the single panel around the radio, heater controls, and shifter.
You must be registered for see images attach

You must be registered for see images attach


This post illustrates what I am solving:
This is gold! My 93 Antenna car has a messed up radio mount. Trying to see if my buddy with a 3d printer can print this off for me. Thank you so much for doing this!
 

ninetyfive

VCA Member
VCA Member
Joined
May 25, 2023
Posts
64
Reaction score
10
Location
Chicago
What is the high pitched humming noise on the radio that increases frequency with higher RPM?
 

Latest posts

Forum statistics

Threads
153,636
Posts
1,685,139
Members
18,211
Latest member
viper70762
Top