
You are using an out of date browser. It may not display this or other websites correctly.
You should upgrade or use an alternative browser.
You should upgrade or use an alternative browser.
Odometer Lighting
- Thread starter kcarlasc
- Start date
cothrelo
Enthusiast
I just replaced all of mine. I fooled with several for 10 min getting them turned just right to work. I noticed the other day that one of mine is not working now. luckly it is just the battery meter. I'm waiting on an inner shift boot and i'll fool with it again during disassembly to replace that
I put LEDs in my car several years back and have found them to be a bit finicky at times. I also think I have more vibration in my car than typical due to the cam and poly mounts though, so that likely doesn't help them any. I've had one or two lights around the gauges not always work. Not sure if it's the contacts or the actual LEDs themselves as they are somewhat delicate.
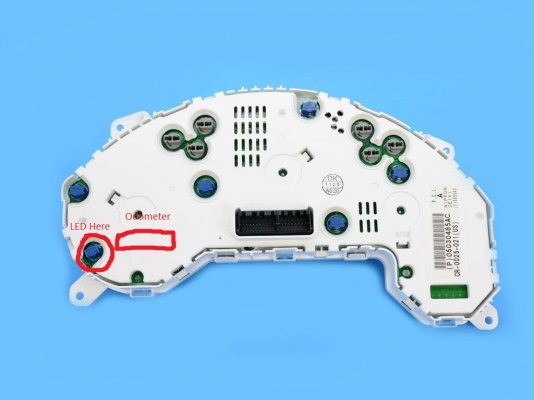
Thanks.. thats the one I thought it was.. will have to mess with it more I guessDouble check the LED I circled in the attached photo. I found those LED contacts are a little finicky. Hope that helps.
Steve M
Enthusiast
Here's an interesting issue I ran into.
Over the past few years, I've had a couple of LED failures in the 4 gauge cluster on the dash. The few times it has happened, it's been intermittent (e.g. it would blink, or go out and then come back on a few minutes later). I dismissed it as cheap Chinese **** LEDs, but it's rare to have a low voltage LED fail, especially intermittently.
Unfortunately, when one fails, you have to pull the entire dash apart to get to it. Total PITA.
As I was messing around with both gauge clusters, I noticed a couple of things, both dealing with the T5 twist lock sockets/bulb holders. The first thing I noticed was that some of them seemed a bit loose. The second can be seen (somewhat) in the picture below:
On the left is a new socket fresh off the boat from the friendly folks at Amazon. The two on the right are a couple of the old sockets - the one in the middle is missing one of the tabs that makes contact with the bulbs, and the one on the right had tabs that were so close together they were almost touching until I tried pushing them apart with a small screwdriver.
Most of mine were like this, so I replaced them all. They aren't expensive, and the new ones fit WAY tighter on the circuit boards. This is what I ordered: https://www.amazon.com/gp/product/B0...?ie=UTF8&psc=1
So if you find one of your dash LEDs blinking randomly (which is incredibly distracting at night), don't automatically assume it is a problem with the LEDs.
Over the past few years, I've had a couple of LED failures in the 4 gauge cluster on the dash. The few times it has happened, it's been intermittent (e.g. it would blink, or go out and then come back on a few minutes later). I dismissed it as cheap Chinese **** LEDs, but it's rare to have a low voltage LED fail, especially intermittently.
Unfortunately, when one fails, you have to pull the entire dash apart to get to it. Total PITA.
As I was messing around with both gauge clusters, I noticed a couple of things, both dealing with the T5 twist lock sockets/bulb holders. The first thing I noticed was that some of them seemed a bit loose. The second can be seen (somewhat) in the picture below:
You must be registered for see images attach
You must be registered for see images
On the left is a new socket fresh off the boat from the friendly folks at Amazon. The two on the right are a couple of the old sockets - the one in the middle is missing one of the tabs that makes contact with the bulbs, and the one on the right had tabs that were so close together they were almost touching until I tried pushing them apart with a small screwdriver.
Most of mine were like this, so I replaced them all. They aren't expensive, and the new ones fit WAY tighter on the circuit boards. This is what I ordered: https://www.amazon.com/gp/product/B0...?ie=UTF8&psc=1
So if you find one of your dash LEDs blinking randomly (which is incredibly distracting at night), don't automatically assume it is a problem with the LEDs.
ChampzViper06
Enthusiast
How difficult is it to take the Dash off to get to the lights? Any special tools I need? Which LEDs do you guys recommend?Here's an interesting issue I ran into.
Over the past few years, I've had a couple of LED failures in the 4 gauge cluster on the dash. The few times it has happened, it's been intermittent (e.g. it would blink, or go out and then come back on a few minutes later). I dismissed it as cheap Chinese **** LEDs, but it's rare to have a low voltage LED fail, especially intermittently.
Unfortunately, when one fails, you have to pull the entire dash apart to get to it. Total PITA.
As I was messing around with both gauge clusters, I noticed a couple of things, both dealing with the T5 twist lock sockets/bulb holders. The first thing I noticed was that some of them seemed a bit loose. The second can be seen (somewhat) in the picture below:
You must be registered for see images attachYou must be registered for see images
On the left is a new socket fresh off the boat from the friendly folks at Amazon. The two on the right are a couple of the old sockets - the one in the middle is missing one of the tabs that makes contact with the bulbs, and the one on the right had tabs that were so close together they were almost touching until I tried pushing them apart with a small screwdriver.
Most of mine were like this, so I replaced them all. They aren't expensive, and the new ones fit WAY tighter on the circuit boards. This is what I ordered: https://www.amazon.com/gp/product/B0...?ie=UTF8&psc=1
So if you find one of your dash LEDs blinking randomly (which is incredibly distracting at night), don't automatically assume it is a problem with the LEDs.
It's not terrible, but you have to be careful with old plastics. For the most part it's all just hex, torx, and phillips screws, then just clips you have to pull out. Helps to know where the clips are so you don't bend the plastic too much if you pull next to them instead of on top of them though.
Steve M
Enthusiast
You may be in luck...let me check the archives.How difficult is it to take the Dash off to get to the lights? Any special tools I need? Which LEDs do you guys recommend?
Steve M
Enthusiast
Interior Disassembly - Basic Steps
This is intended to help those folks that have never taken their interior apart. This is specifically geared toward those that are trying to get their dash panel trim out of the car, which you need to do if you intend to swap out the gauge cluster lamps for LEDs.
You don't have to follow all of these steps, but I've found that skipping any of these steps adds a significant amount of risk of messing up the finish on the dash trim. Once that soft touch finish starts to peel, it won't stop. Don't say I didn't warn you. I've learned this lesson the hard way so you don't have to.
Here are the basic steps, keeping in mind that some of this is going to be specific to coupes, but for the most part, what I write below should also apply to roadsters/convertibles.
This will be followed by a couple more detailed posts with some pics that will hopefully help.
The basic steps:
1. Remove shifter console (you'll end up removing the shifter handle in the process)
2. Remove the 4-gauge dash bezel
3. Remove interior side sill trim pieces
4. Remove seats
5. Remove rear hatch side panels (coupe specific)
6. Remove waterfall panel (behind the seats - what I show below will be coupe specific)
7. Remove the side panel above the dead pedal
8. Remove the knee bolster panel
9. Remove steering column shroud
10. Unbolt steering column so it can hang down
11. Remove center console
12. Remove dash panel trim
13. Remove gauge clusters
Tools needed:
- 3/4" open end wrench
- 3/16" Allen/hex wrench
- 5/32" Allen/hex wrench
- #2 screwdriver (a long one and a stubby one)
- T-20 torx driver/bit
- 13mm 6-point socket
- 15mm 6-point socket
Highly recommended:
- Large towels to cover the door panels, side sills, and steering wheel when you pull the seats
- Blue masking tape to cover anything you don't want scratched (like the 4-gauge cluster)
- Trim removal tools (plastic preferably - a butter knife works in a pinch)
Steve M
Enthusiast
1. Remove shifter console
- Remove shifter trim ring (6x socket head cap screws - takes a 3/16" Allen/hex wrench)
- Remove shifter handle (requires 3/4" open end wrench for the jam nut)
- Pull up on e-brake handle
- Pry up on the shifter console (see yellow arrows in the second pic below) - it is held in place with a handful of clips
- Disconnect window switches and cigarette lighter/power outlet, and set the shifter console aside
2. Remove the 4-gauge dash bezel
- The dash bezel is held in place with 7 screws - 6 socket head cap screws that you can easily see (takes a 5/32" Allen/hex wrench), and 1 hidden screw that isn't revealed until you pull the shifter console (takes a #2 Phillps head screwdriver)
- Pull the bezel out a bit, and disconnect the Engine Start button and the two connectors for the HVAC controls
3. Remove interior side sill trim pieces
- These are held in by clips - you just have to pull up on them, but it does take some force to get the clips to disengage
4. Remove seats
- The seats are held in place by two bolts in the front and two nuts in the rear (I think all take a 15mm 6-point socket - extensions help here)
- Each seat has a connector underneath that needs to be disconnected. Look for a red tab that you have to pull out, then you should be able to press down on a tab to unhook them
- For a coupe, you have to tilt the head rests towards the center of the car and pull the seat out of the car bottom first
- Cover the door panels and side sills with large towels - the seats are heavy and awkward, and the seat tracks will do serious damage to your paint and/or trim if you start bumping them into things
5. Remove rear hatch side panels (coupe specific)
- These are held in place by a single screw, a push pin clip, a couple of spring clips, and some Velcro
- To disconnect the push pin clip, push in on the center, and then pull out on the entire assembly
- You should be able to see where the clips go in the pic below
- There is a hidden screw on each side - you have to pull the door weather strip/seal back to reveal it on the upper part of the door frame
6. Remove waterfall panel behind the seats - what I show below is coupe specific
- Removing the waterfall panel makes getting the center console out much easier
- For a coupe, the panel is held in by 6 Phillips head screws and 2 thumb screws (see pics below)
- Unhook the rear fill speakers (if you still have them)
- Getting the panel out is awkward - I highly recommend a second set of hands to help guide it out of the car (can go out either side)
Optional: remove center subwoofer
- This doesn't have to come out, but it does make it easier to remove the center console
- It is held in place by two bolts and one nut
- Don't forget to unhook the speaker wiring before pulling it out
- Remove shifter trim ring (6x socket head cap screws - takes a 3/16" Allen/hex wrench)
- Remove shifter handle (requires 3/4" open end wrench for the jam nut)
- Pull up on e-brake handle
- Pry up on the shifter console (see yellow arrows in the second pic below) - it is held in place with a handful of clips
- Disconnect window switches and cigarette lighter/power outlet, and set the shifter console aside
You must be registered for see images attach
You must be registered for see images attach
2. Remove the 4-gauge dash bezel
- The dash bezel is held in place with 7 screws - 6 socket head cap screws that you can easily see (takes a 5/32" Allen/hex wrench), and 1 hidden screw that isn't revealed until you pull the shifter console (takes a #2 Phillps head screwdriver)
- Pull the bezel out a bit, and disconnect the Engine Start button and the two connectors for the HVAC controls
You must be registered for see images attach
3. Remove interior side sill trim pieces
- These are held in by clips - you just have to pull up on them, but it does take some force to get the clips to disengage
You must be registered for see images attach
4. Remove seats
- The seats are held in place by two bolts in the front and two nuts in the rear (I think all take a 15mm 6-point socket - extensions help here)
- Each seat has a connector underneath that needs to be disconnected. Look for a red tab that you have to pull out, then you should be able to press down on a tab to unhook them
- For a coupe, you have to tilt the head rests towards the center of the car and pull the seat out of the car bottom first
- Cover the door panels and side sills with large towels - the seats are heavy and awkward, and the seat tracks will do serious damage to your paint and/or trim if you start bumping them into things
5. Remove rear hatch side panels (coupe specific)
- These are held in place by a single screw, a push pin clip, a couple of spring clips, and some Velcro
- To disconnect the push pin clip, push in on the center, and then pull out on the entire assembly
- You should be able to see where the clips go in the pic below
- There is a hidden screw on each side - you have to pull the door weather strip/seal back to reveal it on the upper part of the door frame
You must be registered for see images attach
You must be registered for see images attach
6. Remove waterfall panel behind the seats - what I show below is coupe specific
- Removing the waterfall panel makes getting the center console out much easier
- For a coupe, the panel is held in by 6 Phillips head screws and 2 thumb screws (see pics below)
- Unhook the rear fill speakers (if you still have them)
- Getting the panel out is awkward - I highly recommend a second set of hands to help guide it out of the car (can go out either side)
You must be registered for see images attach
You must be registered for see images attach
Optional: remove center subwoofer
- This doesn't have to come out, but it does make it easier to remove the center console
- It is held in place by two bolts and one nut
- Don't forget to unhook the speaker wiring before pulling it out
Steve M
Enthusiast
7. Remove the side panel above the dead pedal
- Removing this panel is critical to being able to get the knee bolster panel out easily
- It is held in place by one screw (revealed after pulling the interior side sill trim pieces) and two Christmas-tree style push pins with large heads
8. Remove the knee bolster panel
- It is held in place by some clips and two Phillips head screws
- Don't forget to disconnect the pedal adjustment switch
9. Remove steering column shroud
- This comes apart in two pieces (top/bottom), and is held together by two Phillips head screws along with some plastic tabs
- The plastic tabs do take some force to get them to disengage - just keep messing with it and I promise it will come apart
10. Unbolt steering column so it can hang down
- This will make it 1,000x easier to get the dash panel trim out
- The steering column is held up by two nuts (takes a 15mm 6-point socket if I recall correctly)
- Once you remove the nuts, you can just let it hang there
11. Remove center console
- While it seems like overkill, removing the center console helps the dash panel trim come out so much easier
- Removing the center console is why you had to remove the waterfall piece, which is why you had to remove the seats
- It is held in place by 8 screws, 2 of which were removed when the waterfall panel came out
- The two screws in front attach the center console to the dash trim
- Removing this panel is critical to being able to get the knee bolster panel out easily
- It is held in place by one screw (revealed after pulling the interior side sill trim pieces) and two Christmas-tree style push pins with large heads
You must be registered for see images attach
8. Remove the knee bolster panel
- It is held in place by some clips and two Phillips head screws
- Don't forget to disconnect the pedal adjustment switch
You must be registered for see images attach
9. Remove steering column shroud
- This comes apart in two pieces (top/bottom), and is held together by two Phillips head screws along with some plastic tabs
- The plastic tabs do take some force to get them to disengage - just keep messing with it and I promise it will come apart
You must be registered for see images attach
10. Unbolt steering column so it can hang down
- This will make it 1,000x easier to get the dash panel trim out
- The steering column is held up by two nuts (takes a 15mm 6-point socket if I recall correctly)
- Once you remove the nuts, you can just let it hang there
11. Remove center console
- While it seems like overkill, removing the center console helps the dash panel trim come out so much easier
- Removing the center console is why you had to remove the waterfall piece, which is why you had to remove the seats
- It is held in place by 8 screws, 2 of which were removed when the waterfall panel came out
- The two screws in front attach the center console to the dash trim
You must be registered for see images attach
Steve M
Enthusiast
12. Remove dash panel trim
- Everything leads up to this - take your time when pulling on this panel, especially if your car has sat out in the sun a lot, as it may be brittle
- Make sure you have all the screws removed (5 total, 2 of which were removed when you took out the center console) before you start prying on things
- You'll also need to unclip a small silver clip that holds part of the vehicle wiring harness to the dash trim (see pics below for where you should expect to find it)
- I took a lot of pics of this part so you can understand where all of the screws and clips are that hold this piece in place
- If you do end up breaking something, this piece can still be sourced (new OEM parts), but it ain't cheap (current as of 2/24/2022)
Front:
Back:
Note the 3 screws (2 Phillips head, 1 T-20 torx) that were hidden by the knee bolster panel:
Some close-up views:
13. Remove gauge clusters
- Now that all of that is out of the way, you should see a handful of Phillips head screws holding the two gauge clusters in place
- You'll end up needing to disconnect a few wiring harness connectors - you don't have to keep track of which one goes where on each cluster because they can't be reversed
And that's pretty much it. Clearly I've glossed over a few things, but you should be able to fill in any gaps I've left in these posts with some good old common sense.
Random tip: I keep the screws/fasteners/clips for each subassembly in a separate plastic baggie so I don't lose any, and also so I can remember where they go. Taking the time to do this extra little step has served me well over the past few years, especially since a lot of my projects stretch out for weeks (and sometimes months).
- Everything leads up to this - take your time when pulling on this panel, especially if your car has sat out in the sun a lot, as it may be brittle
- Make sure you have all the screws removed (5 total, 2 of which were removed when you took out the center console) before you start prying on things
- You'll also need to unclip a small silver clip that holds part of the vehicle wiring harness to the dash trim (see pics below for where you should expect to find it)
- I took a lot of pics of this part so you can understand where all of the screws and clips are that hold this piece in place
- If you do end up breaking something, this piece can still be sourced (new OEM parts), but it ain't cheap (current as of 2/24/2022)
Front:
You must be registered for see images attach
Back:
You must be registered for see images attach
Note the 3 screws (2 Phillips head, 1 T-20 torx) that were hidden by the knee bolster panel:
You must be registered for see images attach
Some close-up views:
You must be registered for see images attach
You must be registered for see images attach
You must be registered for see images attach
You must be registered for see images attach
13. Remove gauge clusters
- Now that all of that is out of the way, you should see a handful of Phillips head screws holding the two gauge clusters in place
- You'll end up needing to disconnect a few wiring harness connectors - you don't have to keep track of which one goes where on each cluster because they can't be reversed
And that's pretty much it. Clearly I've glossed over a few things, but you should be able to fill in any gaps I've left in these posts with some good old common sense.
Random tip: I keep the screws/fasteners/clips for each subassembly in a separate plastic baggie so I don't lose any, and also so I can remember where they go. Taking the time to do this extra little step has served me well over the past few years, especially since a lot of my projects stretch out for weeks (and sometimes months).
Steve M
Enthusiast
For LEDs, there's tons of options out there. Here's the basic list of what you'll need:
- 10 instrument panel general bulbs, (color of your choice), T1.5 type
- 3 HVAC bulbs, (color of your choice), NE05 (5mm)
- 1 key ring bulb, (color of your choice), NE04 (4mm)
- 6 misc. bulbs (interior and exterior - footwells, the lights in the rear-view mirror, and the license plate at the exterior of the car), (color of your choice), 194 type, 5 SMD LED
Some links below to what I've used, but like I said, there's lots of options out there.
Instrument panel: https://www.superbrightleds.com/veh...ge/74-led-bulb-3-smd-led-miniature-wedge-base
I really like these for the instrument panel because they are circuit board based, and don't have thin leads that can snap off.
HVAC (need 5 mm size): https://www.superbrightleds.com/neox-led-bulb-high-power-instrument-panel-led
Key ring (need 4 mm size): https://www.superbrightleds.com/neox-led-bulb-high-power-instrument-panel-led
Misc. 194 bulbs: https://www.superbrightleds.com/194...wer-miniature-wedge-retrofit-car-194-xhp5-car
Similar threads
- Replies
- 8
- Views
- 753
- Replies
- 4
- Views
- 629
- Replies
- 0
- Views
- 186
- Replies
- 11
- Views
- 1K