window regulator repair

vjjack04

Enthusiast
Joined
May 18, 2013
Posts
49
Reaction score
8
Location
Hereford AZ
Folks, I am going to try to repair my driver's side window with "The Viper Store" kit (Dodge Viper SRT10 (2003-17) Door Window Regulator Repair Kit). I have looked at the Havik Performance video on You tube. It seems like a tedious but "do-able" repair. Looks like the clips at the top of the door panel will be agrevating. Anyone, who's done this, have any advice as to how to make this go more smoothly? Thank you.
 

EastCoastSRT10

Enthusiast
Joined
Jul 13, 2024
Posts
51
Reaction score
16
Location
Maryland
The hardest part is getting the regulator in and out. I caused more damage to the plastic tubing that is super brittle by now than when I started, lol.

I repaired both of mine using the kit and no issues since.

Only tip I have is that you pay close attention to reversing the removal procedure. I didn’t and ended up fussing with getting it back in for like an hour.
 

MoparMap

VCA National President
VCA Officer
Joined
Jan 7, 2013
Posts
2,587
Reaction score
343
Location
Kansas
I've got two regulators now in my basement that I hung on to just in case they could repaired at some point. Didn't know someone was selling a kit, so might have to look into that just to have some good spares on hand, or to sell.
 
OP
OP
vjjack04

vjjack04

Enthusiast
Joined
May 18, 2013
Posts
49
Reaction score
8
Location
Hereford AZ
MoparMap,
The "kit" is to repair a failing regulator (at least that is the way I understand it). Here is what I purchased:
See the second item from the top of the page:
ACC-971018Dodge Viper SRT10 (2003-17) Door Window Regulator Repair Kit
Hopefully, I am going to be making the repair next week.
 

MoparMap

VCA National President
VCA Officer
Joined
Jan 7, 2013
Posts
2,587
Reaction score
343
Location
Kansas
Hmm, hard to tell from the wording on those, but what I have might be too far gone to use the repair kit (though their full rebuild service could be an option. Looks like they just have an overlap plate they attach to the motor that the tubes then attach to for better support. I think I remember someone on the forum mentioning another place that did regulator rebuilds, unless it was the same one. My one regulator isn't too bad, though it might be irrelevant as I'd likely have to replace the full length anyway as it broke right where it goes into the guide at the track. The other one I got from the donor door they used to fix my car and the tube on it is broken all over the place and along the length of it.

It always looked like you could potentially replace the tubes with a little careful work, though that's more of a "catastrophic" repair. You'd have to cut the tube out where they glued them into the guides, then drill out the glue and remaining tube pieces and hope to be able to replace it. Seems doable, but could be tough as the plastic ages and has a tendency to crack.

I'll be curious to follow along with your experience and I'll have to check out the YouTube video to get a better idea of what they are doing.
 

EastCoastSRT10

Enthusiast
Joined
Jul 13, 2024
Posts
51
Reaction score
16
Location
Maryland
Hmm, hard to tell from the wording on those, but what I have might be too far gone to use the repair kit (though their full rebuild service could be an option. Looks like they just have an overlap plate they attach to the motor that the tubes then attach to for better support. I think I remember someone on the forum mentioning another place that did regulator rebuilds, unless it was the same one. My one regulator isn't too bad, though it might be irrelevant as I'd likely have to replace the full length anyway as it broke right where it goes into the guide at the track. The other one I got from the donor door they used to fix my car and the tube on it is broken all over the place and along the length of it.

It always looked like you could potentially replace the tubes with a little careful work, though that's more of a "catastrophic" repair. You'd have to cut the tube out where they glued them into the guides, then drill out the glue and remaining tube pieces and hope to be able to replace it. Seems doable, but could be tough as the plastic ages and has a tendency to crack.

I'll be curious to follow along with your experience and I'll have to check out the YouTube video to get a better idea of what they are doing.

Yes, it’s just a support brace. It can repair tubing that’s cracked perpendicular to the tube. It can’t fix tubing that’s cracked parallel to the tube.

It’s basically to give it more support and keep the plastic from breaking apart further.

OP, the one thing I forgot that I had issues was that I couldn’t use the screws at the end. The screw heads kept binding onto the rails. Your mileage may vary but my car didn’t have the clearance to run the screws so I’ve just been using the tape.
 
OP
OP
vjjack04

vjjack04

Enthusiast
Joined
May 18, 2013
Posts
49
Reaction score
8
Location
Hereford AZ
Ok, I am finally back to this. Removed the window regulator assy. yesterday. Hardest part (to me) was moving it from inside the door to the outside. The instructions at Havik Performance were very good.

https://www.havikperformance.com/resources/how-to-remove-a-gen-iii-v-door-panel-without-damaging-it#:~:text=Step 6: Remove electrical connectors,inner window track holder out

However, I found the tool this fella used and his procedure to remove the door panel clips more effective (for me).


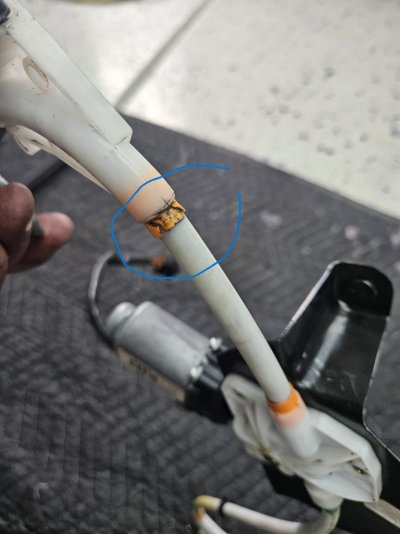
Now, having said that, I am in the process of determining if I want to send these to a repair shop to see what they can do, on top of using the Viper Store re-enforcement. Here's a picture of one area that seems to be the problem (I can't find any other issues).
 

Attachments

  • Cracked area in tube2.jpg
    Cracked area in tube2.jpg
    99 KB · Views: 8
Last edited:
OP
OP
vjjack04

vjjack04

Enthusiast
Joined
May 18, 2013
Posts
49
Reaction score
8
Location
Hereford AZ
After talking to these folks [email protected]
I have decided to send it to them (2 day turn around).
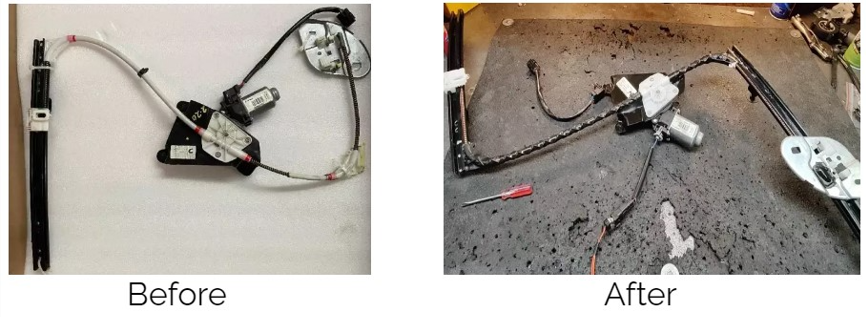
You can see they modify the original to make it more sturdy and just as functional.
 

Attachments

  • after window reg.png
    after window reg.png
    398.1 KB · Views: 16
OP
OP
vjjack04

vjjack04

Enthusiast
Joined
May 18, 2013
Posts
49
Reaction score
8
Location
Hereford AZ
GooglesP,
It cost me $29 to ship it UPS, but I am only 3hrs 15 minutes away from their facility in Phoenix AZ. From FL, you'll have to go to the UPS site to calculate. I needed a 30" x 24" x 5" box at about 8-9 pounds.

Send to these folks:
Power Window Repair
Rebuild & Return Services
2439 E McDowell Road
Phoenix AZ 85008
(480)570-5116
 

Goggles Pizano

Enthusiast
Joined
Nov 25, 2009
Posts
620
Reaction score
156
@vjjack04 i meant how much was the cost to fix it by the AZ company? Because there is also a FL company doing the same. Both have been doing fixes for a number of years.
 
OP
OP
vjjack04

vjjack04

Enthusiast
Joined
May 18, 2013
Posts
49
Reaction score
8
Location
Hereford AZ
ok. It is $375.00 for the repair. It is overpriced, but one other good point is it has a "lifetime" warranty.
 
OP
OP
vjjack04

vjjack04

Enthusiast
Joined
May 18, 2013
Posts
49
Reaction score
8
Location
Hereford AZ
An update. I got the re-enforced window track/regulator back within a total of 4 days, sending it to them, then the repair and them sending it back. Put the thing in and all is fine. So, the problem is fixed. Thanks to all who provided advice.
 
Last edited:
Top