Anyone painted their gray interior "fuzzy" dash on a gen 1 flat black?

cfiiman

Viper Owner
Joined
Nov 3, 2010
Posts
1,173
Reaction score
1
Location
Southwest FL
Was just wondering if someone had a photo I could see b/c I've been thinking about doing it. I have a red 94 with the gray interior and "fuzzy" painted dash that I thought would look good flat black or even dark gray? If anyone has a pic I sure would like to see it, I have followed the other threads with the paint to match glossy but that is not for me.
 

ROCKET62

Has Left the Room!
Joined
Mar 6, 2003
Posts
2,392
Reaction score
0
Location
Phoenix, AZ bye-bye IOWA
I did mine when I had my '93 and added just a bit of color as well:

5122Red_Painted_Dash.jpg
 
OP
OP
C

cfiiman

Viper Owner
Joined
Nov 3, 2010
Posts
1,173
Reaction score
1
Location
Southwest FL
Yeah, that dash looks great, do you have more pics of it you could post? Maybe of the passenger side too? Thanks for posting! BTW, did you paint it yourself or have it done?
 

plumcrazy

Enthusiast
Joined
Jun 9, 2003
Posts
16,243
Reaction score
7
Location
ALL OVER
i remember seeing one or two around localy with painted dashes. looked good but there was no added color IIRC
 

zzeck1

Enthusiast
Joined
Mar 23, 2008
Posts
54
Reaction score
4
Location
Georgia
I'm thinking about doing the same thing. I like the color combo you have there. How difficult was it to get the instrument covers off? Is that a satin black on the dash? :2tu:
 

rpm9000

Enthusiast
Joined
Feb 24, 2006
Posts
367
Reaction score
0
Location
Texas City, Tx.
I did mine a few years ago in flat black and it looks great. I have many people comment that they really like it. I used Krylon flat black on it. I put a coat of Krylon primer on it first.
 
OP
OP
C

cfiiman

Viper Owner
Joined
Nov 3, 2010
Posts
1,173
Reaction score
1
Location
Southwest FL
RPM9000, any pics? I've seen "satin" and it looks so boss, but would love to see "flat" too.
 

ROCKET62

Has Left the Room!
Joined
Mar 6, 2003
Posts
2,392
Reaction score
0
Location
Phoenix, AZ bye-bye IOWA
I did all of the work myself. Hardest part is the prep and getting off all of the fuzzy gray stuff. EZ Off oven cleaner is supposed to work magic on the fuzzy gray coating. The plastic will scratch very easily - so be gentle in removing it. I used a satin black, a flat clear, and Viper Red (Think I ordered it from Paintscratch.com). It's not a very hard job - but it does take some time and patience to get it done.

I really liked the look and it was 1000% better than the dingy gray. Here was the only other picture I had in my gallery:
COCKPIT.JPG


I also added some color to my SRT Street Serpent:
rocket_interior_Large_.JPG
 
OP
OP
C

cfiiman

Viper Owner
Joined
Nov 3, 2010
Posts
1,173
Reaction score
1
Location
Southwest FL
Sweet, thanks everyone for the pics, it has made my decision to do it, it looks too nice when it is done. So Rocket, can you give me a quick rundown of the prep steps you did? I was thinking just sand the dash down and then prime/paint but since you made some comments about scratching easy I am thinking that may be the wrong technique :dunno:
 

rpm9000

Enthusiast
Joined
Feb 24, 2006
Posts
367
Reaction score
0
Location
Texas City, Tx.
I used oven cleaner to soften the original paint, then used a putty knife to carefully remove the old paint. Next was a coat of Krylon primer. Then lightly sanded the primer. If there are any scratches you can put on more primer then sand again. Then put on the flat black Krylon paint.
 

2snakes4us

Enthusiast
Joined
Apr 29, 2007
Posts
1,299
Reaction score
0
Location
Nixa , MO
I used oven cleaner to soften the original paint, then used a putty knife to carefully remove the old paint. Next was a coat of Krylon primer. Then lightly sanded the primer. If there are any scratches you can put on more primer then sand again. Then put on the flat black Krylon paint.

This is why you had scratches on the dash. DO NOT use a putty knife. just use paper towel or clean rags to wipe off. use the oven cleaner again if you have to but dont scrape.:omg:
 

sdaddy

Enthusiast
Joined
Dec 22, 2006
Posts
425
Reaction score
0
Location
Jacksonville, FL
The fuzzy grey dash is a PITA and does not match any of the other grey in the interior. The flat black dash creates a flow from the top of the doors cleanly across the dash. The flat black not only is easier to maintain, but also makes the interior look much better overall. That is the way the car should have been made originally.
 

Attachments

  • 001.jpg
    001.jpg
    86.4 KB · Views: 59

jdeft1

Enthusiast
Joined
Jul 9, 2008
Posts
2,401
Reaction score
1
Location
Metropolis
The fuzzy grey dash is a PITA and does not match any of the other grey in the interior. The flat black dash creates a flow from the top of the doors cleanly across the dash. The flat black not only is easier to maintain, but also makes the interior look much better overall. That is the way the car should have been made originally.

I totally agree...

I was a bit worried about changing my dash color but after it was done......

!!!!!!!!!!!!!!!!! So much better!

I waited years to do this because of worries over stock/mod/value..... Just do it. The car should have been made this way.
 

RAWV10

Enthusiast
Joined
Oct 31, 2009
Posts
21
Reaction score
0
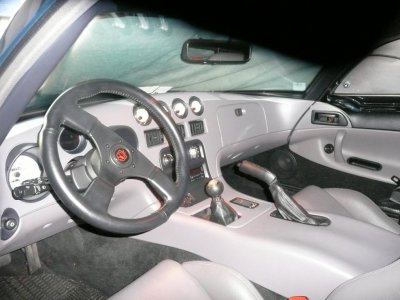
I just refinished the dash/center console/door handle surrounds on my 95 RT10. It was a relatively simple job, requiring lots of patience. I kept the original medium quartz / satin black color scheme and added a full set of chrome guage bezel rings. Best point of contact for technical guidance and the correct factory urethane paint is Jon B. at PartsRack.

Carefully remove the center console / dash and door handle surrounds in this order. All are held on with phillips head screws, velcro and metal force fit clips. Remove the headlight control stalk by reaching up under the dash and depressing the metal button/detent on top of the rheostat controller that the stalk goes into and gently pulling the stalk out of the rheostat. Be patient - the stalk will come out = not easy to pul out - but it will detach.

EZ Off foamy oven cleaner did a great job dissolving the old paint and primer off the plastic. Carefully mask off the black painted areas around each bezel and center console radio/climate control areas (this is the tedious part - but worth it as I did not have to repaint the black areas). I used common auto paint masking tape (blue or green color) and an x-acto knife to position/trim the tape (patience grasshopper). I then taped a small plastic cup over each of the center gauge holes for extra protection. Spray oven cleaner on - wait 5 mins and scrub off with a tooth brush (use the wife's = she may never notice:) and a green scratch pad. Rinse with water and repeat the process, if neccesary. Allow the parts to air dry and thoroughly wife them down with a good quality paint degreaser/prep solution and a white rag. Lightly sand the areas to painted with 800+ grit sandpaper. This promotes primer and paint adhesion. Wipe the parts again with degreaser. By this time the masking tape will likely be in nasty condition. Remove old masking tape and remassk the black areas. Take your time and do a perfect masking job. Wipe areas to be painted with degeaser (again). Spray primer on. I used a good quality high build white primer designed for plastic. Apply 2-3 thin coats of primer and allow to thoroughly dry. We sand the primer using 1200 + grit auto body paper. Wipe parts again with degreaser. Check your masking tape and remask as neccessary. Paint all parts using several light coats of paint. I used the factory spec med quartz urethane paint = perfect finish. allow paint to dry and conduct touch ups as required. Carefully remove the masking tape to reveal the satin black trim areas. stand back and admire the fruits of your labor !!!! Appply masking tape to the edge area around that rests areound the steering column and and edge areas you beleive you may scratch while reinstalling the plastic pieces. Reinstall the dash, door handle surrounds and center console in this order.

The chrome bezel rings are easy to install as they a precisely machined and used adhesive strips = fit perfectly and look great.

Call Jon B. for tech support and paint, trim rings etc.

Good luck
 

jdeft1

Enthusiast
Joined
Jul 9, 2008
Posts
2,401
Reaction score
1
Location
Metropolis
Yep. Another job well done.... It's not brain surgery but the results are instantly better! IMO..
 

RAWV10

Enthusiast
Joined
Oct 31, 2009
Posts
21
Reaction score
0
I forgot to mention that you must also remove the glove box door from the dash (2 plastic pins and 2 clips/sleeves) and the glove box door latck. Paint and refinish the glove box dooor separately. I will post a pic of the refinished dash sooon. Again - thanks to Jon B at Partsrack foor his support. It really does not cost much to refinish your Gen I dash and console.
 

RAWV10

Enthusiast
Joined
Oct 31, 2009
Posts
21
Reaction score
0
Here is a pic of my refinished interior. The partsrack bezels sis not show up too good. Will try and post another - better pic.
 

Attachments

  • P1020796.jpg
    P1020796.jpg
    90.3 KB · Views: 40

Latest posts

Members online

Forum statistics

Threads
153,219
Posts
1,682,093
Members
17,715
Latest member
SKY1960
Top