Steve M

Enthusiast
Joined
Dec 29, 2011
Posts
1,071
Reaction score
202
Location
Dayton, OH

Introduction​

Better late than never?

I'm admittedly about 10 years late to this party, maybe more. People have been installing Double DIN aftermarket head units in Gen 3 and 4 Vipers for many, many years. There are plenty of threads out there on this topic, most of which I perused while I was trying to figure out how to do this.

There are other, less invasive ways to go about this, including some direct fit options from Ebay and the like if you are willing to try your luck at sampling the latest electronics from the Far East, there are some not-so-direct fit options of that ilk, or you can just slap a tablet (of sorts) on your dash and call it a day:


Every single option for doing this has some sort of drawback, whether it be questionable electronics (Ebay units), less-than-ideal mounting (Alpine Halo9), or having to hack away at the magnesium dash support structure to make it fit (full size, full-depth double DIN).

My goals for this install were:

1. Install a double DIN with an install that looks as OEM as possible
2. Gain Android Auto and Apple CarPlay functionality
3. Gain the advantage of a bigger screen to display the backup camera I installed last year
4. NOT HAVE TO CUT INTO THE METAL DASH SUPPORT STRUCTURE

The last one is what has kept me from doing this for so many years. I'm not opposed to cutting stuff, but I like to keep things as non-invasive as possible, and cutting away at the dash support structure is just too much IMO. Don't get me wrong, I did end up having to enlarge the dash opening, but all of the cutting I did was plastic, not metal.

The biggest issue I had when researching this was the lack of details as to how to make a double DIN work in place of the wonky-shaped 1.5 DIN stock unit straight out of the Chrysler minivan parts bin. There are some good write-ups out there, but I felt like they were missing a few critical steps that I knew I would have to fill in myself. Some of that is by design; mounting solutions and cutout dimensions are going to vary depending on the head unit chosen. The intent of this thread is to show you a slightly less invasive option for doing this, and include a lot of pictures along the way that will hopefully help you gauge whether or not this is something you want to tackle yourself.

Please keep in mind that the following information is a way to do this, but it is most certainly not the way. In my opinion, any way that works is the correct way. As long as you are happy with the final result, that is all that matters. I'd consider myself to have average mechanical ability, and below-average fabrication skills. I'm sure there are better ways to do some things. That will be readily apparent in the posts to come.

I'm going to break this down into sections that I'll populate with a few words and lots of pictures as I have the time/energy:

Section 1: The Head Unit
Section 2: Head Unit Mounting Brackets
Section 3: Enlarging the Dash Opening
Section 4: Cutting/Filling/Shaping the Dash Bezel
Section 5: Finishing Options for the Dash Bezel
Section 6: Tools That Helped

But first, the before and after pictures:

Before:

You must be registered for see images attach


After:

You must be registered for see images attach
 
OP
OP
Steve M

Steve M

Enthusiast
Joined
Dec 29, 2011
Posts
1,071
Reaction score
202
Location
Dayton, OH

Section 1: The Head Unit​

This section will be short and sweet.

The head unit I chose was the Kenwood DMX706S (there are newer versions available). What I liked:

1. Shallow mount w/ nice sized screen (6.95")
2. At least some physical buttons to push (volume, attenuation, home/power, menu, apps, camera)
3. Variable button colors
4. Android Auto and Apple CarPlay Functionality
5. Front/Rear camera inputs
6. Bluetooth (ver. 4.1)
7. Fully adjustable crossovers
8. 3 sets of 4V pre-outs (front, rear, subwoofer)

It does have some drawbacks though:

1. Android Auto and Apple CarPlay both require a wired connection (not a huge deal to me)
2. It is a multi-media only receiver - it does not play CDs
3. No volume dial (only buttons)
4. It is a resistive touch screen

I was hoping for wireless Android Auto and Apple CarPlay, but you had to go with a full sized, full depth double DIN unit to get that at the time I did this install. It looks like they have since started offering wireless in shallow depth models.

Although listed as a drawback, the resistive touch screen on this unit is quite nice. I generally like capacitive touch screens, but this one made me rethink that. It is nice and responsive.

As a side note, I prefer at least some hard buttons for any head unit. If I was king for a day, all head units would come with a volume dial. I realize that you have to give up screen real estate to have a volume dial, but I greatly prefer being able to turn up/down the volume quickly, and a dial is one of the best ways to do that. I had to give that up, but I felt like the buttons available on the Kenwood DMX706S were sufficient for my needs. It is also becoming increasingly common to see head units that have no buttons at all - everything is on screen. I'm sure they work just fine, but there's no substitute for having something you can physically push when needed. Just my opinion.

Here are the dimensions:

You must be registered for see images attach


And here are the different views:

You must be registered for see images attach


Nice and shallow. My hope was that it would make the install a lot easier. Turns out I was right.

I'm not going to go into any detail on how to wire everything up. If you need that, just ask. If you've wired up one aftermarket head unit, you've pretty much done them all. I used the standard Metra 70-6502 wiring harness adapter just like I did before with the single DIN I replaced.

Also of note: even though the single DIN head unit I was replacing was also a Kenwood, the connectors into the back of each unit were not compatible, so I had to make a new adapter harness. It isn't a huge deal, but it'll take you a little time to put one together. I prefer solder and shrink wrap for all my connections, so it took me a little longer than most.
 
OP
OP
Steve M

Steve M

Enthusiast
Joined
Dec 29, 2011
Posts
1,071
Reaction score
202
Location
Dayton, OH

Section 2: Head Unit Mounting Brackets​

When it comes to mounting a double DIN head unit in a Gen 3/4 Viper, you are on your own. This is a custom fit application, which means you are in for some custom fabrication. I thought about this aspect for quite a while, so I already had at least some idea of how I was going to go about accomplishing this task before I even ordered the head unit.

So how big do the mounting brackets need to be? This is where a template will pay for itself many times over. What do you use for a template? How about a single DIN mounting bracket (or "dash kit"), like the Metra 99-6503? You know, this thing:

You must be registered for see images attach


Ugly, but extremely useful. You could also use the factory head unit if you have it laying around, but the Metra piece is way easier to measure, and you know the holes are in the exact right spot to line up with the mounting points in the Viper's dash. For $10-$12, it is money well spent.

Do yourself a favor, and cut off the alignment dowels so you can lay it flat on your work surface:

You must be registered for see images attach


And a more detailed picture:

You must be registered for see images attach


Now you can lay it flat on a piece of paper, and use a pencil to trace the basic outline including the mounting holes, which will make it much easier to get decent measurements like these:

You must be registered for see images attach


You can also use the mounting bracket to figure out about where the new head unit will need to sit depth-wise in order to be flush with the dash trim. That's a very useful piece of plastic.

The sky is the limit when it comes to material choices for the mounting brackets, but you need to choose wisely. I knew metal was going to be the best choice for strength, and aluminum is by far the easiest to work with while still being strong enough. Based on the measurements above, I knew I needed something wide enough to allow the 7" wide head unit to span the rest of the distance required to line up with the dash mounting holes. I also needed something that would allow me to hit the mounting holes on the sides of the head unit to provide adequate support front-to-back. This head unit doesn't need much support because it is so light, so what I did was definitely overkill.

I ended up deciding on 2" x 2" x 1/16" thick aluminum angle (6063-T52): https://www.onlinemetals.com/en/buy/...-t52/pid/17858

That thickness was chosen so I could easily cut it with a nibbler if needed (I'll cover that later in the "Tools That Helped" section), but it would still be strong enough for the intended purpose.

I don't usually keep a random stock of aluminum angle laying around, so I place a lot of small quantity orders with places like Online Metals that allow you to order custom cuts with no minimum order. Yes, you pay out the nose for small amounts of aluminum (they also stock brass, steel, titanium, copper, plastics, etc.), but I don't like having to store a bunch of random junk on the off chance that I will need exactly that size/shape/thickness of material sometime later (usually years) down the road. If I need something specific (and I usually do), I order something specific.

They'll make custom cuts any size you want, and their policy is to make the cuts +1/8" -0", so you'll always end up with at least as much as you asked for, maybe a hair more. I ordered 4 pieces of aluminum angle that were 3-7/8" long each so I'd have a couple extra pieces in case I messed one up. They sent pieces that were almost exactly the same height as the head unit (3.9375"); lucky me. It was expensive, but my time is not free these days.

Now you have to figure out where to put these things so you can get the mounting depth in the right ball park. Again, the Metra single DIN adapter was worth it's weight in gold here. I spent a lot of time with that plastic mounting bracket and my trusty set of digital calipers to figure out exactly where the holes would have to be to drilled to hit the desired mounting holes in the head unit. I chose the mounting holes you see below circled in red because they were symmetric top to bottom, and gave me the maximum distance front-to-back without the fastener heads interfering with the bracket faces. You'll have to forgive all of the metric measurements...it's like the rest of the world doesn't measure things in freedom units:

You must be registered for see images attach


If you'll notice, the side of the head unit is stamped with a drawing of a couple types of fasteners along with "8mm MAX" (bottom right hand side); that's telling you not to use a fastener any longer than that or you'll send one through some delicate electronics that would rather you not. The 1/16" (1.5mm) thick aluminum brackets combined with the recessed fastener holes told me that 8mm fasteners probably wouldn't have enough thread engagement, so I decided to source some slightly longer fasteners from Home Depot. The exact size was M5 x 0.8 x 10mm (thread diameter x thread pitch x under head length) Phillips pan head fasteners, and I needed 8 of them. I was much happier with that size vs. what was supplied by Kenwood (~7mm under head length). As I've tried to tell my wife, an extra 3mm makes a big difference.

I did all the marking, drilling, and cutting by hand with normal hand tools, so if they look a little rough, that's because I don't own a drill press, a mill, or anything else you'd really need to make it look professional. What I was able to do was good enough though:

You must be registered for see images attach


You must be registered for see images attach


You must be registered for see images attach


And one more showing the measurements I used to shape the face of the brackets:

You must be registered for see images attach


Why the shaping? Mainly because you have a width restriction on the left due to the gauge cluster, on the right due to the dash trim, and on the top and bottom due to how the gauge cluster mounts along with possible interference with the threaded insert for one of the bezel socket head fasteners on the right-hand side (obstructions marked with red arrows):

You must be registered for see images attach


Again, that piece of plastic by the fine folks at Metra proved to be well worth the $12 I spent to make sure I got the brackets right on the first try. When I did my first test fit, I was within about 1/16" in all dimensions (left/right, up/down, and mounting depth). Which is good, because I spent probably about 1 hour measuring, and another 3 hours making those damn things.
 
OP
OP
Steve M

Steve M

Enthusiast
Joined
Dec 29, 2011
Posts
1,071
Reaction score
202
Location
Dayton, OH

Section 3: Enlarging the Dash Opening​

I'm going to assume that most folks know how to take the dash apart to get to the head unit. For those that haven't done it before, here's a very brief rundown:

1. Remove shifter trim ring (6x socket head cap fasteners - takes a 3/16" Allen/hex wrench)
2. Remove shifter handle (requires 3/4" open end wrench for the jam nut)
3. Pull up on e-brake handle
4. Pry up on the shifter console - it is held in place with a handful of clips
5. Disconnect window switches and cigarette lighter/power outlet, and set the shifter console aside

The dash bezel is held in place with 7 fasteners - 6 socket head cap fasteners that you can easily see (takes a 5/32" Allen/hex wrench), and 1 hidden fastener that isn't revealed until you pull the shifter console (takes a #2 Phillps head screwdriver):

You must be registered for see images attach


Pull the bezel out a bit, and disconnect the Engine Start button and the two connectors for the HVAC controls. Once that is done, you'll be left with this:

You must be registered for see images attach


Remove the 4 fasteners (blue arrows) holding the head unit in place, and you'll be left with this:

You must be registered for see images attach


What I didn't want to do was cut into the magnesium dash support structure, but I didn't really know where it was until I had everything out of the way. Here are a couple of pics to give you an idea of what you are dealing with:

You must be registered for see images attach


You must be registered for see images attach


The fasteners that hold the plastic dash to the magnesium support structure mark the upper and lower bounds for what needs to be removed:

You must be registered for see images attach


As a side note, a single DIN head unit is approximately 2" tall. A double DIN is approximately 4" tall. The OEM Chrysler/Dodge head unit is a 1.5 DIN, so it is about 3" tall. That means you need to remove about 1/2" above and below the original opening to be able to fit a double DIN.

Do yourself a favor, and put some masking tape over the 4 gauge cluster in case your cutting tool of choice gets away from you.

Everything that is black in the picture above is plastic, so you can use pretty much anything you have handy to make the cuts. I chose to use an oscillating multi-tool to make mine - they are designed for making plunge cuts, so it seemed like an obvious choice to me. A Dremel with a cutoff wheel would likely work just fine too. Just take your time, and you'll end up with something that looks like this:

You must be registered for see images attach


You must be registered for see images attach


And another picture where I highlighted the original opening (shaded green) vs. what I had to cut (shaded red):

You must be registered for see images attach


Now you just have to test fit the head unit and make adjustments as necessary:

You must be registered for see images attach


Super.

As you'll notice, I left the plastic protective screen cover in place on the head unit until the very end; you'll be moving it around and pulling it in and out a lot during the next step, and you don't want to tempt fate and end up with a scratched screen. Been there, done that.

Here are some additional pics showing the clearances I ended up with. You'll notice that I had plenty of clearance on the bottom, and it is a little tighter at the top. Hopefully that will help you plan your cuts.

You must be registered for see images attach


You must be registered for see images attach


You must be registered for see images attach


Next comes the hard part: cutting, filling, and shaping the dash bezel.
 
OP
OP
Steve M

Steve M

Enthusiast
Joined
Dec 29, 2011
Posts
1,071
Reaction score
202
Location
Dayton, OH

Section 4.1: Cutting/Filling/Shaping the Dash Bezel​

Part 1

This next part concerned me more than any other aspect of this project. The cuts you make here have the biggest impact on whether or not the install looks clean, or like you paid some kid $20 at the local car stereo shop to take a stab at it. I had no idea what I was doing, so I literally made this up as I went. And now you get to suffer through my thought process.

First, the bezel. Or according to the Mopar parts catalog, "BEZEL. Instrument Panel. Center.", part number 0XT23DX9AA. I ordered an extra before I even started this project so I could either:

1. Put it back the way it was, or
2. Try again if I messed up the first one

Thankfully, I was able to save the new, unmolested bezel for some unknown future purpose.

This piece of very expensive plastic is more complicated than it looks. Allow me to explain:

You must be registered for see images attach


It looks fairly normal, but if you look closely at it, you'll notice that there are uneven gaps with where the vents go, an even larger gap between the bottom of the radio opening and the top of the opening for the HVAC controls, and the radio opening itself has rounded corners with a tighter radius on top than on the bottom (i.e. it isn't symmetric top-to-bottom):

You must be registered for see images attach


And then there's this:

You must be registered for see images attach


I always thought this panel was relatively flat, but it most definitely isn't. That becomes even more clear when you look at the profile of the Metra 99-6503:

You must be registered for see images attach


That complicates things greatly.

Do you know what isn't curved? The face of your nice, new double DIN head unit. Where it matters is with the top cut that you have to make to accommodate the new, taller head unit.

Now we've reached a decision point that determines how you are going to go about doing your cuts, filling in the gaps, and contouring the bezel to make it look nice. There are two basic methods (look at the top part of the cut-out for the double DIN head unit in each picture):

1. The "Blended" Approach, which looks something like this (pictures from Billy C and Hammer):

You must be registered for see images attach


2. The "Straight Cut" Approach, which looks something like this (pictures from cubican and mnc2886):

You must be registered for see images attach


Pick your poison. I chose Method #2, mainly because I knew it would be far less work than trying to blend the top edge like is done with Method #1. The only drawback to Method #2 is that the center part of the screen will sit slightly recessed compared to the sides. I didn't feel that it looked significantly better or worse than the blended method, just different. Most would likely not even notice a difference.

Now it's time to up the pucker factor a few notches and start making your first rough cuts. I used a Dremel with a cut-off wheel to do most of the first pass:

You must be registered for see images attach


The bottom edge just so happened to line up pretty much perfectly with the stiffening rib that sits between the original radio opening and the HVAC controls opening:

You must be registered for see images attach


That was not planned, but ended up being quite helpful.

And now we're left with what needs to be filled in:

You must be registered for see images attach


Oh my.
 
OP
OP
Steve M

Steve M

Enthusiast
Joined
Dec 29, 2011
Posts
1,071
Reaction score
202
Location
Dayton, OH

Section 4.2: Cutting/Filling/Shaping the Dash Bezel​

Part 2

If I was making an infomercial for the Metra 99-6503 Dash Kit, this is where I would say, "BUT WAIT, THERE'S MORE!!!"

That wonderful piece of plastic already served me well as a template for making my brackets, so what else could it possibly have to give? So much more actually. It ended up being the best $12 I ever spent. Seriously.

In the process of agonizing over how I was going to fill in the gaps in the bezel, I noticed that Kenwood's supplied trim ring fit perfectly width-wise inside the Metra piece:

You must be registered for see images attach


So what if I chopped off the sides of the Metra plastic piece and used it to fill in the big gaps, and then somehow used the trim ring to frame the opening?

There was only one way to find out, but it involved bonding plastic together. For that, I used this fine product (JB Weld Plastic Bonder):

You must be registered for see images attach


Incredibly strong, yet stays quite flexible after curing, which it does fairly quickly. It is also easy to sand once cured.

Here goes nothing. For this step, keep in mind that the Metra plastic piece has a top and bottom ("Top" is marked on the back). All of the pictures I've shown in this thread of that piece are actually upside down (that was before I realized the curves of the radio opening were different top to bottom). Just make sure it is straight when bonding it to the bezel:

You must be registered for see images attach


That ain't going anywhere. Now you just need to cut out the middle section:

You must be registered for see images attach


I was originally going to use all 4 sides of the trim ring to frame the opening, but I was happy enough with my original rough cuts that I decided to just use the sides to make a nice, clean edge:

You must be registered for see images attach


I spent a lot of time making the cuts in the bezel just the right size to squeeze those pieces in place. Once I was happy with the fit, out came the JB Weld again:

You must be registered for see images attach


You must be registered for see images attach


You must be registered for see images attach


You must be registered for see images attach


Here's a tip: before you cut it, lay the Kenwood trim ring face down on a piece of paper and trace around the inside opening. You can cut that out and use it as a template to make sure you get those side pieces exactly in the right place.

So now we are left with a slightly different kind of mess:

You must be registered for see images attach


Now what?

I researched many different products that could be used to solve this problem. I was originally going to use Bondo to fill everything in and sand it smooth, but I quickly learned that regular Bondo (or any other product like it) is very hard and brittle once it cures. That's not ideal for a piece of plastic like this bezel that has a lot of flex to it. I'm sure it would get the job done, but I didn't want to take any chances on the finish cracking sometime later down the road. After a few hours of poking around on various websites, I stumbled across this fine product (3M 05895):

You must be registered for see images attach


It is two-part epoxy that is designed to do exactly what I needed to do: fill in damaged plastic pieces so you can restore the nice, smooth finish (or in this case, create one).

There are two big drawbacks to this product:

1. It is pretty expensive
2. It smells like poo. Literally.

But it cures fast, and is pretty easy to sand. It also stays nice and flexible even after it fully cures.

I decided to sand the entire bezel to remove the OEM soft touch rubber coating...I wanted to make sure this stuff would have no issue bonding to what was there:

You must be registered for see images attach


Now you can slap some of that stuff on, have a go at it with some sandpaper, and you'll end up with something that looks like this:

You must be registered for see images attach


You must be registered for see images attach


Not pictured: the huge mess of plastic dust that was left behind.

How much you have to sand will depend on what type of finish you are going to use on the bezel. More about that in the next section.
 
OP
OP
Steve M

Steve M

Enthusiast
Joined
Dec 29, 2011
Posts
1,071
Reaction score
202
Location
Dayton, OH

Section 5: Finishing Options for the Dash Bezel​

I'll apologize in advance - this section probably won't be as helpful as some were hoping. This is not going to be a how-to, but rather some insight into my thought process, and what led me to trying the vinyl wrap you've already seen.

There are quite a few options for finishing, only a couple of which are DIY friendly:

1. Paint (can be DIY friendly)
2. Hydro-dip (not really DIY friendly)
3. Real carbon fiber (definitely not DIY friendly)
4. Vinyl Wrap (DIY friendly)

Paint

The OEM soft touch coating is a type of paint, but unfortunately, it isn't something you can just find in a spray can. To date, I don't know of anyone that's been able to exactly replicate that rubberized finish, which is sad because it is actually a very nice coating, minus the durability. In the process of sanding it off of my original bezel, I noticed quite a few blemishes in the underlying plastic that that coating did a wonderful job of hiding. The finish is uniform, feels nice, and is a nice color. Someone somewhere knows how this is done, but they ain't talking. I get the feeling that it is something that would only be feasible for large production runs, and likely requires special equipment to lay it down uniformly. If you go down the double DIN route, you can kiss this finish goodbye, so keep that in mind before you go whipping out your Dremel.

Aside from the OEM coating, the sky's the limit for colors and sheens you can accomplish with paint. If I would have gone down this path, I would have had to spent a lot more time prepping the pieces. You'd have to strip off all of the original coating, make sure the plastic filler was smoothed and feathered in perfectly, use some high build primer, sand some more, prime some more, sand some more, and then lay down your desired finish. That would have also delayed my project for a few months as I waited for the weather to warm up around here. Winter in Ohio is good for some things, but painting outdoors is not one of them, and I refuse to paint in my garage.

As I've already stated, I'll end up redoing the rest of my dash later on this year due to the original coating peeling off in a few spots. I will not be doing vinyl, because I think it would look way too busy, and also because it would be a royal PITA to wrap it. I'll likely end up using something from SEM, as I've had great luck with their paints in the past:

https://www.semproducts.com/product/...oattm-aerosols

Hydro-dip

This process goes by many names: water transfer printing, immersion printing, water transfer imaging, hydro-dipping, watermarbling, cubic printing, or hydrographics. This became popular many years ago, and lots of shops popped up trying to cash in on the process. You can read about it all over the internet, like here: https://www.hydrocreations.com/blogs...-hydro-dipping

There are lots of options for designs and colors, so again, the sky's the limit. Once you know what to look for, you can pretty easily spot a hydro-dipped job.


I don't consider this to be a DIY option, so I dismissed it as an option for me. I could always go back and have this done sometime in the future if desired, but I'm not wild about how wavy some of the patterns are when placed on parts with curves (and both the bezel and shifter console qualify as curvy IMO).

Real Carbon Fiber

I would consider this the least DIY friendly finish, but probably one of the best looking IMO. Real carbon fiber has a depth that just can't be matched by anything else, but the process is labor intensive, and therefore expensive. I didn't want to have to worry about scratching it up during the install, or if I ever have to get back in there, which happens more often for me than I'd like because I can't leave stuff alone. Still, it's good stuff, and looks great if done well.

Vinyl Wrap

I ran across this thread many years ago:

https://www.viperclub.org/vca/thread...-think.661400/

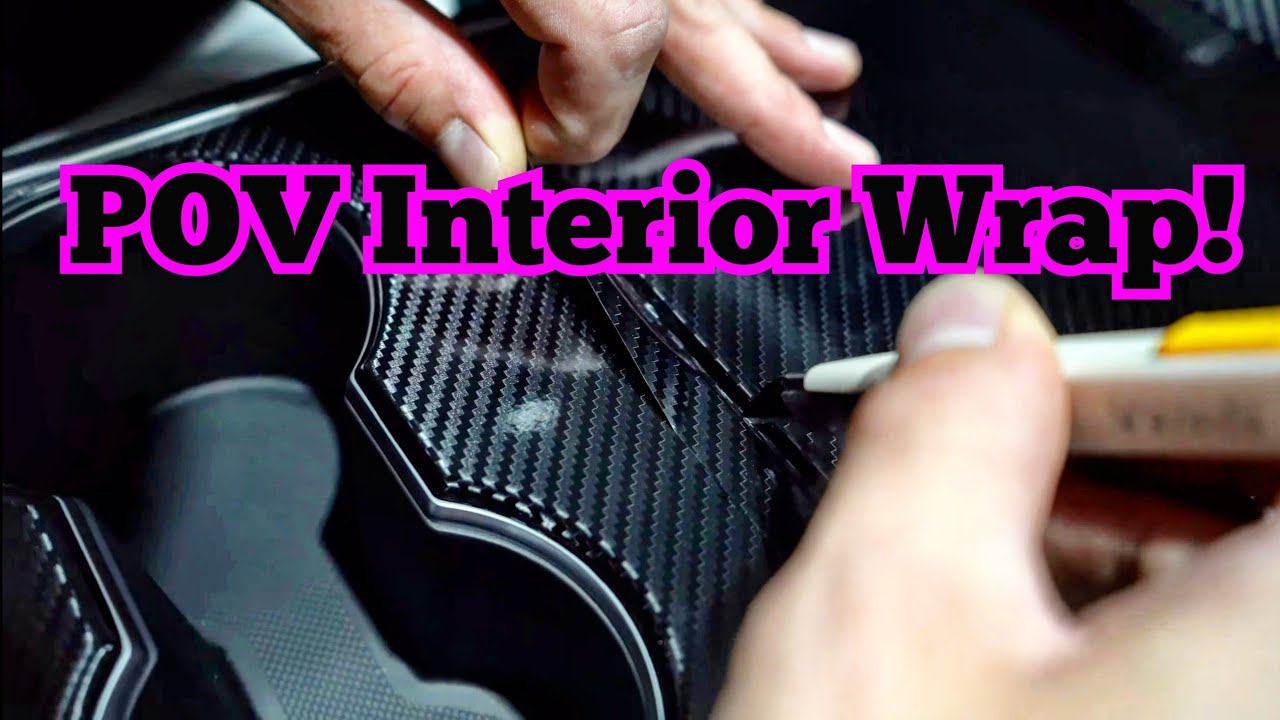
My initial thought was that it looked pretty nice, and it might be worth doing to mine. Vinyl is very DIY friendly, and is also good at hiding imperfections, which is why I chose it. It is the quickest way to go from this:

You must be registered for see images attach


To this:

You must be registered for see images attach


...in a couple of hours, less if you've done it before. Yeah, it looks fake compared to real carbon fiber, but it has a nice texture, and the color also works well in this application.

I watched lots of different YouTube videos on the subject to get a general idea of what I was getting into. These two were helpful for me:


Based on that along with a lot of other reading, I quickly realized that you get what you pay for when it comes to vinyl, and 3M and Vvivid are a couple of the most highly regarded films out there. Some of what sets them apart is the adhesive; the good stuff will have air channels that help you work any air bubbles out from under the wrap without constantly having to peel it back and lay it back down. That makes getting a nice, uniform finish a lot easier for a first timer like me.

I went with the 3M 2080 series (1080 is being phased out) black carbon fiber (CFS-12): https://www.metrorestyling.com/3M-20...2080-cfs12.htm
They also make a grey-ish anthracite color (CFS-201): https://www.metrorestyling.com/3M-20...080-cfs201.htm
And white (CFS-10) https://www.metrorestyling.com/3M-20...2080-cfs10.htm
Vvivid's Epoxy Gloss Black Carbon also looks nice: https://vvividshop.com/collections/c...s-black-carbon

My advice is to just pick something, and see if you like it. If you don't, you can just peel it up and try something else with fairly minimal effort. 3M states that their vinyl can be easily removed up to 3 years later, although I'm assuming at least some adhesive residue will be left behind.

The bezel above was literally the first part I've ever done, and that was my first attempt. Here are some tips that might help:

1. Use a good, SHARP knife - I had the best luck with an xacto type knife, like this: https://www.target.com/p/fiskars-sof...E&gclsrc=aw.ds
2. You need a heat gun of some sort - could be an actual heat gun, could be a hair dryer. Be careful with a full blown heat gun - too much heat will melt the vinyl. The heat serves a couple purposes. The first is it allows you to stretch the material around curved surfaces (especially important on the shifter console); the second is that it can "reset" the vinyl after you stretch it. Vinyl has a memory, so if you overstretch it, just apply a little heat and it will go back to its original shape.
3. Take your time...this requires a lot of patience.
4. Order more than you need. I ordered a 24" wide by 5 foot long piece - that gave me enough to do both pieces, with enough left over that I was able to mess up one of the pieces (and I did).
5. The good stuff uses pressure sensitive adhesive, which will allow you to move/slide it around before you stick it down.

There's really not much to it, but I did struggle with the shifter console due to the curves (which is why I had to redo it). I was not able to get the vinyl to stretch down into the window switch area, which was a little disappointing, and going around the shifter bump-out on the driver's side was especially hard. I ended up having to use two pieces to make it work. Thankfully, it isn't something you ever really notice. This is where a more experienced installer would shine. IMO, vinyl is easy to do, but a little harder to master.

I also only pushed the wrap part way down into the recessed gauge areas, mostly because I knew they would be covered with my MGW aluminum trim rings. And in the "oh by the way" category, if you need to mess with those trim rings, you'll need this 1/4" 3M VHB double sided tape to stick them back down: https://www.amazon.com/gp/product/B0...?ie=UTF8&psc=1

And now I'll leave you with some pics:

You must be registered for see images attach


You must be registered for see images attach


You must be registered for see images attach


You must be registered for see images attach
 
OP
OP
Steve M

Steve M

Enthusiast
Joined
Dec 29, 2011
Posts
1,071
Reaction score
202
Location
Dayton, OH

Section 6: Tools That Helped​

I'll keep this brief and to the point. This list is by no means all inclusive of absolutely everything you'll need to tackle something like this, but I did want to highlight some of the tools that made my life much easier. Most of these things I've acquired over the years of doing random projects around the house, but some of them I picked up specifically because of this project. I view tools as investments; obviously some are better than others.

Anyway, here's Wonderwall.

Trim Tool

There are many trim tools out there, but I've taken a liking to this one: https://www.amazon.com/gp/product/B0091LZV0I/

You must be registered for see images attach


It's thin, but strong enough to be able to pry up some of the more stubborn trim pieces. Highly recommended.

Nibbler

What's a nibbler? It's good for cutting sheet metal - you get a little less distortion, and it is way easier to cut stuff like 1/16" thick aluminum than it would be with shears. They are a little pricey, so maybe pass on this one if you are on a tight budget: https://www.amazon.com/Tools-90-55-2...dp/B00OYQ3MBA/

You must be registered for see images attach


Oscillating Multi-Tool

Again, it's pricey, but I never knew how much I needed one until I bought one last summer. Plunge cuts, flush cuts, zipping off nail heads, undercutting trim, sanding, etc. If I were to recommend one tool to splurge on, it would be this one:
https://www.amazon.com/Dremel-MM50-0...dp/B07PJVJY5D/

You must be registered for see images attach


Needle File Set

This one should be self explanatory - these help enlarge small holes, and lets you get into tight areas with at least some semblance of precision: https://www.homedepot.com/p/Husky-St...476H/207112197

You must be registered for see images attach


Sanding Blocks

Not necessarily needed, but it made sanding much more enjoyable:

https://www.amazon.com/gp/product/B003978QGQ/
https://www.amazon.com/gp/product/B002XMOX3I/

You must be registered for see images attach


Adhesive Backed Sandpaper

...and if you want to use sanding blocks like those shown above, it helps to have sandpaper you can easily stick to it:

https://www.amazon.com/gp/product/B001AV9BJY/

You must be registered for see images attach


I used a lot of 120, 180, and 240-grit varieties. It adds up in a hurry, but it seems like lately I'm always reaching for sandpaper for something.
 
OP
OP
Steve M

Steve M

Enthusiast
Joined
Dec 29, 2011
Posts
1,071
Reaction score
202
Location
Dayton, OH

Bonus Section: iDataLink Maestro Rr (Gen 4 ONLY)​

While looking through all the different head unit install threads, I came across a post from Redx showing a head unit with a nice gauges display. It looked useful, so I decided to figure out exactly how to do it. And I did:

You must be registered for see images attach


If you have Instagram, you can see a short video of it working here: https://www.instagram.com/p/CLzUOYYn93G/

In order to do the same thing, you need three things:

1. An iDataLink Maestro Rr
2. A compatible head unit (many are, including the Kenwood unit I installed here)
3. A car that puts out data on the CAN Bus (which is why this will only work on 2008-2010 Vipers)

I had no idea what the iDataLink Maestro even was before I started digging into this. Basically, it is intended to be used on vehicles where the head unit is used for more than just music and navigation. Many vehicles these days have head units that are integrated with the vehicle's climate controls, heated/ventilated seats, TPMS, steering wheel controls, etc. The iDataLink Maestro is a magic box that allows you to retain most, if not all of the functionality of the factory head unit when you swap in an aftermarket head unit.

And now I'll state the obvious: the Gen 4 Viper's factory head unit is barely passable as a radio, so if that's all you want, you don't need this magic box. If you want to display gauges like shown above, you do.

The problem is that the Viper is not supported by that company. That's where another of Redx's posts came in handy:

Originally Posted by Redx

I believe he used for a mid 2000’s Mazda, you just need one with a can hi/can lo input and tap into your obd2 plug.

More specifically, a 2004-2009 Mazda 3.

The iDataLink Maestro does not come pre-programmed for any specific vehicle, so you have to do some legwork. Here's the basic process:

1. Log on to their website: https://maestro.idatalink.com/produc...product_id/102
2. Drill down through the options, selecting the following:

- Radio Replacement
- 2004 Mazda 3
- No Steering Wheel Controls
- Select your head unit (Kenwood DMX706S in my case)

3. That should give you what you need; in this case, an iDataLink Maestro Rr, "SI-MAZ01-DS" Firmware, and an install guide.
4. Once you have the magic box, you need to hook it up to your computer and squirt the SI-MAZ01-DS firmware on to it - this process will require your aftermarket head unit's serial number, located both on the head unit itself as well as the box it came in

This is the relevant page from the install guide:

You must be registered for see images attach


Disregard Step 2 - that only applies if you are trying to retain steering wheel controls.

I also ran across this while digging around online - you don't really need it, but I'm including it for completeness:

You must be registered for see images attach


Based on the wiring diagram above, you need to figure out a way to tap into the CAN H and CAN L wires from the OBDII port (also known as the Data Link Connector in the factory service manual). There are two basic ways to do this:

1. Buy an OBDII to Open Plug Wire connector (https://www.amazon.com/gp/product/B07F16GPMB/) and connect to the appropriate wires (pins 6 and 14)
2. Tap into the vehicle's wiring harness

I chose #2 because I didn't want to have to worry about plugging/unplugging anything from my OBDII port, which is pretty much right in line with the clutch pedal. I won't go into any details of how I did that here, but I can if needed/wanted.

I had a hard time finding the OBDII port pin-outs and wire colors for a Gen 4 Viper (it's not in the service manual - you need the separate manual with all of the detailed wiring diagrams), so I took my best guess on the functions (most are a universal standard), and married that up with the plug orientation and wire colors from mine to make this diagram:

You must be registered for see images attach


Highlighting the wires/pins you need:

You must be registered for see images attach


And putting it all together:

You must be registered for see images attach


Easy squeezy, provided you can do some basic wiring.

You also need to mount the iDataLink Maestro. I mounted mine behind the head unit - it's shallow, so there's plenty of room behind it to mount the box. I did not take any pictures of that.

Helpful tip: you'll have to remove your head unit to install this, which means your precise alignment with the gauge bezel will be lost. Do yourself a favor and take a black marker and color around the fastener heads on the aluminum mounting brackets before you remove them...that'll let you pretty easily get everything back in the exact right spot when you reinstall it.

So was the juice worth the squeeze with the iDataLink Maestro? Maybe, maybe not...only you can decide.

Is it perfect? No.

Does it display useful data in the gauges display? Yes.

It is pretty limited though. Here are the supported PIDs:

- Acceleration
- Accelerator Pedal Position
- Air Fuel Ratio
- Average Fuel Economy
- Battery Voltage
- Boost/Vacuum
- Dist. to Empty
- Engine coolant Temp
- Engine Load
- Engine Oil Temp
- Exhaust Gas Temp
- Fuel Level
- Fuel pressure
- Instantaneous Fuel Economy
- Intake air Temp
- Intake Manifold Air Pressure
- Mass Air Flow
- RPM
- Throttle Plate Position
- Timing advance
- Torque
- Transmission Fluid Temp
- Vehicle Speed

And some of those are not supported for the Viper, like transmission fluid temp (there's no sensor) and engine oil temp (not sure why, but the data doesn't appear to be broadcast on the bus).

Still, there are useful things you can see real time while driving (IAT being a big one), and you can select up to five parameters to display at one time.

On the negative side, there are very limited options for how the data is displayed...you can't just freely move the gauges around on the screen, change the gauge sizes, how they look, etc. It'd be nice if they'd let you change that through some custom firmware, but some of that is also tied to the head unit itself.

Bottom line: it is pretty pricey for what you get, but it was a fun science project.
 

Ramtuff

Enthusiast
Joined
May 5, 2023
Posts
12
Reaction score
5
Location
MI
Your write ups are nothing short of epic, I have a hard enough time just doing projects none the less documenting and editing.
nice job as always!
 

MoparMap

VCA National President
VCA Officer
Joined
Jan 7, 2013
Posts
2,443
Reaction score
274
Location
Kansas
So completely unrelated, but I think some of your pictures finally solved an age old mystery I've had with my car and some parts that I know came out of it, but I can never remember where they came from. Looks like there are 4 plastic clips on that magnesium structure that help support the radio and allow it to slide in and out better without rubbing on the metal. I've had two of those sitting in a drawer for years now because I could never figure out where they came from. I could have sworn they fell off when I was doing some kind of steering column thing, but now I'm going to have to pop my radio out and take a look (and see if I can still find them in my drawer...).
 
OP
OP
Steve M

Steve M

Enthusiast
Joined
Dec 29, 2011
Posts
1,071
Reaction score
202
Location
Dayton, OH
So completely unrelated, but I think some of your pictures finally solved an age old mystery I've had with my car and some parts that I know came out of it, but I can never remember where they came from. Looks like there are 4 plastic clips on that magnesium structure that help support the radio and allow it to slide in and out better without rubbing on the metal. I've had two of those sitting in a drawer for years now because I could never figure out where they came from. I could have sworn they fell off when I was doing some kind of steering column thing, but now I'm going to have to pop my radio out and take a look (and see if I can still find them in my drawer...).
Now that you mention it, it looks like I'm missing one :p Oh well...not important now. I'll keep an eye out for it if I'm ever back in there.
 

Latest posts

Members online

Forum statistics

Threads
153,200
Posts
1,681,922
Members
17,698
Latest member
Tombala
Top