
Steve M
Enthusiast
Late last year, I ran into the all-too-common torn sway bar end link boot - just one on the passenger side rear. While I was digging around, I also noticed that the paint was flaking off of both:
I decided to push it off a bit since I knew it would make a good winter time project. As fate would have it, I didn't put too many miles on the car after discovering the torn boot - I broke an OS Giken output stub at the drag strip a few days later, and the car sat on jack stands the entire winter while I made the necessary repairs.
Naturally, I checked around in the archives and saw that most folks just bought new aftermarket links - they are relatively cheap from sources like Rock Auto, so it makes a lot of sense. Then I stumbled across this interesting tidbit from Dan Cragin:
Since mine had no play, I decided that a rebuild was the best option for me. It ended up being a hugely labor intensive process since I took it to the extreme:
Sourcing replacement boots took a bit of leg work, and a lot of waiting to get what I wanted (polyurethane instead of rubber like come on pretty much all aftermarket end links). Fatboy 18 on the other site was kind enough to post this helpful link:
The original boots were some sort of polyurethane, and although they eventually tore open, they did last for quite a long time (~14-15 years) before finally letting go. I'm hoping these will last equally as long.
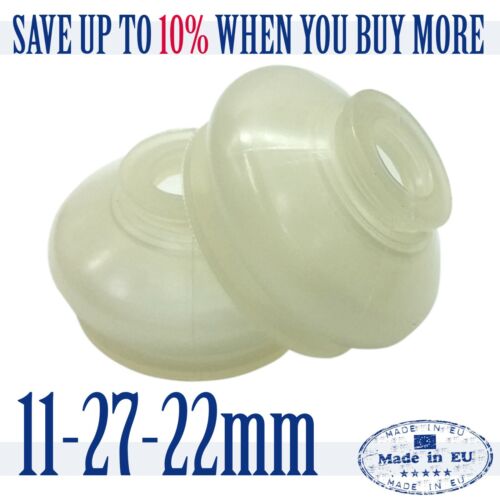
For anyone looking for something similar, here are the dimensions (all in millimeters):
Be warned that they come on the slow boat from Bulgaria, but they did arrive at my door step after about 3 weeks of waiting.
My paint job had long since dried, and it was time to reassemble:
And reinstalled (rears only):
The torque spec on the nuts is 200 in-lbs (pay attention to the units). I also put a bit of anti-seize on the tapered portions (NOT on the threads) that interface with the control arms/sway bar to make disassembly a bit easier in the future.
I had the same issue with the fronts...one torn boot between the pair, so I followed the same process for those, minus stripping/sanding/repainting since they were in a little better shape than the rears. No pictures of those, but I might grab some later if there's interest.
A couple helpful tips:
1. You can reuse the original clips that hold the boots in place (the new ones from Ebay didn't come with any)
2. The small clip goes on the new boot before putting it in place, and definitely before greasing (otherwise the boot is too slippery to handle, and you'll end up cussing up a storm like I did trying to get it in place)
3. You should be able to use any type of chassis grease to repack the end link ball joints (the original stuff was dark gray). I used Lucas Red "N" Tacky grease (https://lucasoil.com/products/grease/red-n-tacky-grease). It's an NLGI #2 GC-LB rated (LB = for chassis, GC = for axle and wheel bearings) grease that should work just fine for this application.
4. I greased both the boots and the ball joints to make sure there was plenty everywhere (not sure how much is too much though)
5. I slid the boots into place and over the end links first before installing the larger retaining clip - there's enough stretch to the poly boots that you can slip the larger clip over the entire boot/end link assembly after it is in place. Doing this will keep the paint in much better shape...putting the clip on first and then trying to slide it into place ended up scratching the heck out of my new paint job, forcing me to touch it up.
6. New end links are pretty darn cheap, so if you are crunched for time, just order new ones while you rebuild your OEM ones on the side. Whatever you do, don't toss your old ones unless they have excessive play.
7. This puller set (Orion Motor Tech 5-in-1 Ball Joint Separator, Pitman Arm Puller, Tie Rod End Tool Set for Front End Service, Splitter Removal Kit (BS06)) worked pretty well to separate the links from the sway bars/control arms: https://www.amazon.com/gp/product/B08J6QV984/
OEM part numbers:
Front links: 68231477AA (supersedes 04763147; 04763147AB)
Rear links: 04709289 (supersedes 04709289AB; 4709289)
You must be registered for see images attach
I decided to push it off a bit since I knew it would make a good winter time project. As fate would have it, I didn't put too many miles on the car after discovering the torn boot - I broke an OS Giken output stub at the drag strip a few days later, and the car sat on jack stands the entire winter while I made the necessary repairs.
Naturally, I checked around in the archives and saw that most folks just bought new aftermarket links - they are relatively cheap from sources like Rock Auto, so it makes a lot of sense. Then I stumbled across this interesting tidbit from Dan Cragin:
Originally Posted by Dan Cragin:
The aftermarket links are not as good, except for the MOOG front replacements.
Typically your boots are just bad and the links are good.
I've learned this over time, thinking the replacement links were a good option.
The stock sway bar links have a solid ball with no cushion, unlike the aftermarket direct replacement (except Moog fronts).
That's why the stock sway bar links are $150 each, you get what you pay for.
Unless there is play in the link, I just replace the boots.
Since mine had no play, I decided that a rebuild was the best option for me. It ended up being a hugely labor intensive process since I took it to the extreme:
You must be registered for see images attach
Sourcing replacement boots took a bit of leg work, and a lot of waiting to get what I wanted (polyurethane instead of rubber like come on pretty much all aftermarket end links). Fatboy 18 on the other site was kind enough to post this helpful link:
2 X UNIVERSAL Tuning Polyurethane 11 27 22 Track Rod End and Ball Joint Boots | eBay
Find many great new & used options and get the best deals for 2 X UNIVERSAL Tuning Polyurethane 11 27 22 Track Rod End and Ball Joint Boots at the best online prices at eBay! Free shipping for many products!
www.ebay.com
The original boots were some sort of polyurethane, and although they eventually tore open, they did last for quite a long time (~14-15 years) before finally letting go. I'm hoping these will last equally as long.
For anyone looking for something similar, here are the dimensions (all in millimeters):
You must be registered for see images attach
Be warned that they come on the slow boat from Bulgaria, but they did arrive at my door step after about 3 weeks of waiting.
My paint job had long since dried, and it was time to reassemble:
You must be registered for see images attach
And reinstalled (rears only):
You must be registered for see images attach
The torque spec on the nuts is 200 in-lbs (pay attention to the units). I also put a bit of anti-seize on the tapered portions (NOT on the threads) that interface with the control arms/sway bar to make disassembly a bit easier in the future.
I had the same issue with the fronts...one torn boot between the pair, so I followed the same process for those, minus stripping/sanding/repainting since they were in a little better shape than the rears. No pictures of those, but I might grab some later if there's interest.
A couple helpful tips:
1. You can reuse the original clips that hold the boots in place (the new ones from Ebay didn't come with any)
2. The small clip goes on the new boot before putting it in place, and definitely before greasing (otherwise the boot is too slippery to handle, and you'll end up cussing up a storm like I did trying to get it in place)
3. You should be able to use any type of chassis grease to repack the end link ball joints (the original stuff was dark gray). I used Lucas Red "N" Tacky grease (https://lucasoil.com/products/grease/red-n-tacky-grease). It's an NLGI #2 GC-LB rated (LB = for chassis, GC = for axle and wheel bearings) grease that should work just fine for this application.
4. I greased both the boots and the ball joints to make sure there was plenty everywhere (not sure how much is too much though)
5. I slid the boots into place and over the end links first before installing the larger retaining clip - there's enough stretch to the poly boots that you can slip the larger clip over the entire boot/end link assembly after it is in place. Doing this will keep the paint in much better shape...putting the clip on first and then trying to slide it into place ended up scratching the heck out of my new paint job, forcing me to touch it up.
6. New end links are pretty darn cheap, so if you are crunched for time, just order new ones while you rebuild your OEM ones on the side. Whatever you do, don't toss your old ones unless they have excessive play.
7. This puller set (Orion Motor Tech 5-in-1 Ball Joint Separator, Pitman Arm Puller, Tie Rod End Tool Set for Front End Service, Splitter Removal Kit (BS06)) worked pretty well to separate the links from the sway bars/control arms: https://www.amazon.com/gp/product/B08J6QV984/
OEM part numbers:
Front links: 68231477AA (supersedes 04763147; 04763147AB)
Rear links: 04709289 (supersedes 04709289AB; 4709289)