Kevan
Enthusiast
PREFACE:
Many of my DIY articles are transposed from the dozens that I did for my 2005 Dodge Ram SRT-10. In regards to the engine and transmission, they are pretty much identical to what's found in the Gen.3 cars.
If you see something amiss or incorrect, please contact me and I will make sure this post gets updated.
Remember: All of these DIY articles come with a "PERFORM AT YOUR OWN RISK!!!" disclaimer.
I've idiot-proofed them as best I can but.....
Enjoy!
++++++++++++++++++++++++++++++++++++++++++++++++++ +++++++++++++++++++++++++++++++++++++++++
BRAIDED OIL COOLER LINES FOR 2004-2006 DODGE RAM SRT-10
This DIY article will cover removal and installation of the oil cooler lines (with new AN fittings) for the Ram SRT-10.
To help keep the mess to a minimum, I HIGHLY recommend doing this hose change-out in the middle of an oil change procedure.
It will save you a ton of clean-up time and a bunch of money (extra oil).
TIME: About 1 hour (plus hose-build time).
DIFFICULTY: 2
PARTS REQUIRED:
- (4) Radiused -10 pump fittings. (Black matches the oil cooler, but they're also available in Blue)
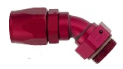
- (2) 45º -10 AN swivel fittings. I went with the red/black, but red/blue, all black, and polished (chrome) are also available.
- (2) Straight -10 AN swivel fittings. Again, I went with the red/black, but they are also available in red/blue, all black, and polished (chrome).
- (3') of braided hose. I used the black nylon braided lines for a few reasons: weight reduction (it's heavy enough in front), and heat reduction (SS lines will get hotter and retain that heat for longer), and it's MUCH easier to work with. If you really want stainless steel can be found here.
PARTS TOTAL: $136.91 (plus shipping/tax)
It sounds kind of expensive, but take a look around at oil cooler line prices and you'll see that they're in the $180-$250 range....AND, they usually only come in one color/finish. With this, you're choosing.
TOOLS REQUIRED:
- -10 AN wrench (just get a whole set from here: http://www.jegs.com/i/JEGS/555/80658/10002/-1)
- AN vise clamp jig
- 1-1/4" open-end wrench
- 1" socket
- FT-lb. torque wrench
- Masking tape
- Electrical tape
- Measuring tape
- Razor blade (new!), Dremel, or stainless braid hose cutter
- "Catch Cup"
- Rag
HOSE BUILDING
First thing we need to do is build the new oil lines (DIY article on hose building can be found here: http://www.srtconnection.com/forums/showthread.php?t=10668.
Attach the AN fittings to the (2) 17" hoses.
NOTE: Viper cars get (1) 17" hose and (1) 20" hose.
Each hose gets (1) straight AN end.
On the other ends, each hose gets (1) 45º fitting.
If you're using the nylon braided hose like I did, you can simply measure out the required length, cover the cut area with masking tape, measure again (heh heh), then make your cut. The masking tape will help keep the fraying of the braid to a minimum.
If you're using the stainless steel hose, then you'll need a good hose cutter. Some use a fine-tooth blade on a hacksaw, or the cut-off wheel on a Dremel. Your call on that.
I use some masking tape to protect the fittings from getting scratched as I'm putting the hoses into place.
Okay, now we have all of our hoses built and ready for installation!
OIL COOLER HOSE REMOVAL
- Remove the CAI or OEM airbox. It's not required to do this, but makes access to the oil cooler and lines 1,000,000x easier.
- This should be taking place in the middle of an oil change, once all the oil has been drained from the engine.
- If you're reading this on any site or forum other than SRTConnection.com or the VCA Forums, that means some ****** stole it.
The OEM oil cooler lines are part rubber/part hardline (aluminum). They use a quick-connect system to attach them to both the engine block and the oil cooler:
Before we take these lines out, we need to get a small oil catch for the small amount that's still inside the oil cooler. I use a regular 12 oz. plastic cup, and hold it under the port that I'm working on.
I do the lower port first, then the upper port.
To remove the lines from the oil cooler, slide the plastic protector ring back from the connector:
The hoses can spin 360 deg. while mounted in the quick-release adapter, so we can just remove the adapter.
Using the 1-1/4" open-end wrench, loosen (DO NOT REMOVE YET!) the adapter:
Keep a decent grip on the hose as we don't want it out of that connection until we can get the cup under it to catch the remaining oil.
Once the adapter is loose (finger-loose), grab your catch cup and place it under the fitting:
Unthread the adapter with your hand and slowly extract the hose end from the oil cooler:
...and let the excess drain into the catch cup.
There will probably be some oil in the OEM line as well, so keep it elevated until the oil cooler is finished draining. Then you can use the cup to catch what's left in the OEM line.
Empty the catch cup into your oil drain pan after draining each connector.
I used shop paper towels to keep the oil from dripping out of the hoses:
Repeat this same process for all of the quick connector adapters- (2) on the oil cooler; (2) on the engine block.
Do the oil cooler lines first, then do the ones on the engine block.
Here are the (2) on the engine block:
Use shop towels to clean up any oil that might have dripped out.
I used them as plugs too (while taking a ton of pics...heh heh).
Keep the threads as oil-free as possible.
OIL COOLER HOSE INSTALLATION
This will be nice and easy, now that we have our built hoses and AN fittings ready to go.
We need to install the adapters first.
The O-ring side goes into the (2) cooler ports:
...and (2) into the engine block:
Teflon tape can be used on the threads of the adapters, but it's not really necessary. The o-ring provides the seal here; not the threads.
Torque all (4) pump fittings to 50 ft.-lbs. using the 1" socket and appropriate torque wrench:
NOTE: Steel sockets will probably damage the aluminum adapters during the torquing process.
At the time of this posting, I haven't figured a way around that yet. Please post if you have a method that works.
It's easy to remember which line goes where: UPPER GOES TO UPPER; LOWER GOES TO LOWER:
So, the lower oil cooler line goes from the lower port on the cooler to the lower (closer to the ground) connector on the engine block.
Since there's only one other port and input left, if you don't know where to attach the other line, you shouldn't be doing this at all.")
At this time, you should 'angle' the 45º connectors so they are pointed slightly vertically (up) and towards the oil cooler. Get the fitting positioned where you want it, then snug it up by hand.
When using the wrench to do the final tightening, the fittingmay move slightly so compensate for that potential movement (or use a 2nd wrench to maintain the connector's position).
Torque settings for AN fittings is kind of a toughie because an open-end wrench is required. Not many of us have open-end torque wrenches, so we use the old-school method: Hand-tight, then 1/4 (or 1/2) a turn.
AN fittings are aluminum, so it's EASY to damage them...both inside and out. Use an AN wrench on the outside, and follow the hand+1/2 turn, and you should have nice tight connections that will last a good long time.
If you simply must have the exact torque setting for them, it's 38 ft.lbs. for all -10 AN line connections.
Oil cooler lines are now installed! WooHoo!
We can now refill the engine with oil (once you have the drain plug back in and the new oil filter on...heh heh):
As you refill, check for leaks after each quart. Tighten as necessary.
Run engine up to normal operating temp for both oil temp and coolant. Check for leaks and tighten as necessary.
REMEMBER: Hot oil burns ****. Let your engine cool before making adjustments to the oil cooler line fittings.
Our oil cooler lines are done!
Enjoy!
NOTES:
Since the new oil lines are nylon instead of hardlines, you should notice a SLIGHT drop in oil temp, as the nylon doesn't retain the heat that the hardlines did. I saw a 5 deg. drop. You might experience something different, but it's definitely worth keeping an eye on.
I have absolutely no relation or motivation regarding using JEGS other than that they are local to me, making parts are immediately available.
There are hundreds of other fine businesses out there with the exact same parts and similar prices.
Please research before placing an order with anyone.
Fun Trivia:
The SRT-10 cars and trucks use the same stacked-plate oil cooler as the Ford GT.
All content is ©2008 Kevan J. Geier
All Rights Reserved
Many of my DIY articles are transposed from the dozens that I did for my 2005 Dodge Ram SRT-10. In regards to the engine and transmission, they are pretty much identical to what's found in the Gen.3 cars.
If you see something amiss or incorrect, please contact me and I will make sure this post gets updated.
Remember: All of these DIY articles come with a "PERFORM AT YOUR OWN RISK!!!" disclaimer.
I've idiot-proofed them as best I can but.....
Enjoy!
++++++++++++++++++++++++++++++++++++++++++++++++++ +++++++++++++++++++++++++++++++++++++++++
BRAIDED OIL COOLER LINES FOR 2004-2006 DODGE RAM SRT-10
This DIY article will cover removal and installation of the oil cooler lines (with new AN fittings) for the Ram SRT-10.
To help keep the mess to a minimum, I HIGHLY recommend doing this hose change-out in the middle of an oil change procedure.
It will save you a ton of clean-up time and a bunch of money (extra oil).
TIME: About 1 hour (plus hose-build time).
DIFFICULTY: 2
PARTS REQUIRED:
- (4) Radiused -10 pump fittings. (Black matches the oil cooler, but they're also available in Blue)
- (2) 45º -10 AN swivel fittings. I went with the red/black, but red/blue, all black, and polished (chrome) are also available.
- (2) Straight -10 AN swivel fittings. Again, I went with the red/black, but they are also available in red/blue, all black, and polished (chrome).
- (3') of braided hose. I used the black nylon braided lines for a few reasons: weight reduction (it's heavy enough in front), and heat reduction (SS lines will get hotter and retain that heat for longer), and it's MUCH easier to work with. If you really want stainless steel can be found here.
PARTS TOTAL: $136.91 (plus shipping/tax)
It sounds kind of expensive, but take a look around at oil cooler line prices and you'll see that they're in the $180-$250 range....AND, they usually only come in one color/finish. With this, you're choosing.
TOOLS REQUIRED:
- -10 AN wrench (just get a whole set from here: http://www.jegs.com/i/JEGS/555/80658/10002/-1)
- AN vise clamp jig
- 1-1/4" open-end wrench
- 1" socket
- FT-lb. torque wrench
- Masking tape
- Electrical tape
- Measuring tape
- Razor blade (new!), Dremel, or stainless braid hose cutter
- "Catch Cup"
- Rag
HOSE BUILDING
First thing we need to do is build the new oil lines (DIY article on hose building can be found here: http://www.srtconnection.com/forums/showthread.php?t=10668.
Attach the AN fittings to the (2) 17" hoses.
NOTE: Viper cars get (1) 17" hose and (1) 20" hose.
Each hose gets (1) straight AN end.
On the other ends, each hose gets (1) 45º fitting.
You must be registered for see images
If you're using the nylon braided hose like I did, you can simply measure out the required length, cover the cut area with masking tape, measure again (heh heh), then make your cut. The masking tape will help keep the fraying of the braid to a minimum.
If you're using the stainless steel hose, then you'll need a good hose cutter. Some use a fine-tooth blade on a hacksaw, or the cut-off wheel on a Dremel. Your call on that.
I use some masking tape to protect the fittings from getting scratched as I'm putting the hoses into place.
You must be registered for see images attach
Okay, now we have all of our hoses built and ready for installation!
OIL COOLER HOSE REMOVAL
- Remove the CAI or OEM airbox. It's not required to do this, but makes access to the oil cooler and lines 1,000,000x easier.
- This should be taking place in the middle of an oil change, once all the oil has been drained from the engine.
- If you're reading this on any site or forum other than SRTConnection.com or the VCA Forums, that means some ****** stole it.
The OEM oil cooler lines are part rubber/part hardline (aluminum). They use a quick-connect system to attach them to both the engine block and the oil cooler:
You must be registered for see images attach
Before we take these lines out, we need to get a small oil catch for the small amount that's still inside the oil cooler. I use a regular 12 oz. plastic cup, and hold it under the port that I'm working on.
I do the lower port first, then the upper port.
To remove the lines from the oil cooler, slide the plastic protector ring back from the connector:
You must be registered for see images attach
The hoses can spin 360 deg. while mounted in the quick-release adapter, so we can just remove the adapter.
Using the 1-1/4" open-end wrench, loosen (DO NOT REMOVE YET!) the adapter:
You must be registered for see images attach
Keep a decent grip on the hose as we don't want it out of that connection until we can get the cup under it to catch the remaining oil.
Once the adapter is loose (finger-loose), grab your catch cup and place it under the fitting:
You must be registered for see images attach
Unthread the adapter with your hand and slowly extract the hose end from the oil cooler:
You must be registered for see images attach
...and let the excess drain into the catch cup.
There will probably be some oil in the OEM line as well, so keep it elevated until the oil cooler is finished draining. Then you can use the cup to catch what's left in the OEM line.
Empty the catch cup into your oil drain pan after draining each connector.
I used shop paper towels to keep the oil from dripping out of the hoses:
You must be registered for see images attach
Repeat this same process for all of the quick connector adapters- (2) on the oil cooler; (2) on the engine block.
Do the oil cooler lines first, then do the ones on the engine block.
Here are the (2) on the engine block:
You must be registered for see images attach
Use shop towels to clean up any oil that might have dripped out.
I used them as plugs too (while taking a ton of pics...heh heh).
Keep the threads as oil-free as possible.
OIL COOLER HOSE INSTALLATION
This will be nice and easy, now that we have our built hoses and AN fittings ready to go.
We need to install the adapters first.
The O-ring side goes into the (2) cooler ports:
You must be registered for see images attach
...and (2) into the engine block:
You must be registered for see images
Teflon tape can be used on the threads of the adapters, but it's not really necessary. The o-ring provides the seal here; not the threads.
Torque all (4) pump fittings to 50 ft.-lbs. using the 1" socket and appropriate torque wrench:
You must be registered for see images attach
You must be registered for see images
NOTE: Steel sockets will probably damage the aluminum adapters during the torquing process.
At the time of this posting, I haven't figured a way around that yet. Please post if you have a method that works.
It's easy to remember which line goes where: UPPER GOES TO UPPER; LOWER GOES TO LOWER:
You must be registered for see images attach
So, the lower oil cooler line goes from the lower port on the cooler to the lower (closer to the ground) connector on the engine block.
Since there's only one other port and input left, if you don't know where to attach the other line, you shouldn't be doing this at all.
At this time, you should 'angle' the 45º connectors so they are pointed slightly vertically (up) and towards the oil cooler. Get the fitting positioned where you want it, then snug it up by hand.
When using the wrench to do the final tightening, the fittingmay move slightly so compensate for that potential movement (or use a 2nd wrench to maintain the connector's position).
Torque settings for AN fittings is kind of a toughie because an open-end wrench is required. Not many of us have open-end torque wrenches, so we use the old-school method: Hand-tight, then 1/4 (or 1/2) a turn.
AN fittings are aluminum, so it's EASY to damage them...both inside and out. Use an AN wrench on the outside, and follow the hand+1/2 turn, and you should have nice tight connections that will last a good long time.
If you simply must have the exact torque setting for them, it's 38 ft.lbs. for all -10 AN line connections.
Oil cooler lines are now installed! WooHoo!
We can now refill the engine with oil (once you have the drain plug back in and the new oil filter on...heh heh):
You must be registered for see images attach
As you refill, check for leaks after each quart. Tighten as necessary.
Run engine up to normal operating temp for both oil temp and coolant. Check for leaks and tighten as necessary.
REMEMBER: Hot oil burns ****. Let your engine cool before making adjustments to the oil cooler line fittings.
Our oil cooler lines are done!
You must be registered for see images attach
You must be registered for see images attach
Enjoy!
NOTES:
Since the new oil lines are nylon instead of hardlines, you should notice a SLIGHT drop in oil temp, as the nylon doesn't retain the heat that the hardlines did. I saw a 5 deg. drop. You might experience something different, but it's definitely worth keeping an eye on.
I have absolutely no relation or motivation regarding using JEGS other than that they are local to me, making parts are immediately available.
There are hundreds of other fine businesses out there with the exact same parts and similar prices.
Please research before placing an order with anyone.
Fun Trivia:
The SRT-10 cars and trucks use the same stacked-plate oil cooler as the Ford GT.
All content is ©2008 Kevan J. Geier
All Rights Reserved