high beam switch problem

creese

VCA Member
Joined
Nov 16, 2019
Posts
17
Reaction score
1
Location
butler, pa
have a 2003 srt10, high beam switch would sometimes shut the lights off altogether, got a new one and when I put it in, lights and hi beams work fine, but no turn signals...checked fuse, its good, bought another switch from another company thinking the first was faulty, and exact same results.... (******** me threw original switch away, so i cant try it to compare) really don't think two new switches would be bad, one came from a dodge dealer, one from rock auto, same part....wiring harness looks fine that goes into switch, searched forums and couldn't find anything, checked my service manual and nothing about replacing high beam switch.....any help would be appreciated.....thanks
 

MoparMap

VCA National President
VCA Officer
Joined
Jan 7, 2013
Posts
2,439
Reaction score
273
Location
Kansas
That is odd. I know I've had that switch apart as I was having an issue with my fog lights turning on randomly. Turned out I had a worn piece in the switch I built back up with some epoxy. But can't remember how the high beams worked off the top of my head. Either way I would tend to agree with you that it's doubtful two different switches would be bad. Have you checked all the bulbs and sockets around the car? The only other guess that comes to mind would be the flasher module. I think it sits on top of the steering column, so could be possible that you knocked it loose while taking the old one out maybe? I was thinking there was one small extra connector on the turn signal switch as well. Something like a little 2 pin flat deal. I don't know what it runs though. Maybe that goes to the flasher?
 
OP
OP
C

creese

VCA Member
Joined
Nov 16, 2019
Posts
17
Reaction score
1
Location
butler, pa
Thanks, ill check the flasher module, as my turn signals and hazards don't work (they worked before I installed new multifunction switch)...there is a side plug on the switch that is plugged in from the factory (small black two prong two wires come from switch shaft) I left it plugged in, didn't know if it had anything to do with it.....I will try and report what I find..
 

steve e

Enthusiast
Joined
Oct 23, 1995
Posts
988
Reaction score
59
Just some feed back on after market stuff, had a shop for 40 years and I can't tell you how many window, headlamp,turn switches were wired wrong were windows did not work, headlamps and turn switches did not work, which can play with your mind thinking you miss diagnosed the problem, the last problem I had was with a master window switch, left rear window would not go down, plugged in a new switch and right front window go's down and stays there with out touching the switch, rear windows did not work at all. went through 3 switches, gave up, took old switch apart and cleaned switch with contact cleaner and bent tabs to make a good contact, all is good, just a little story from a shop owner. PS not the best way to make money in your shop, but very happy costumers, guess that's why I lasted so long.
 

MoparMap

VCA National President
VCA Officer
Joined
Jan 7, 2013
Posts
2,439
Reaction score
273
Location
Kansas
Yeah, my first instinct whenever something is broken is to take it apart and see why, but I know that's not a majority sentiment. Being an engineer has something to do with that too I'm sure. A lot of stuff is built to be disposable though, so it's getting tougher and tougher to repair your own stuff.
 
OP
OP
C

creese

VCA Member
Joined
Nov 16, 2019
Posts
17
Reaction score
1
Location
butler, pa
moparmap, having one problem, cant find the flasher relay location, I have the 2003 service manual, (car is a 2003) shows its under (or directly behind) the multifunction switch, it is not, (pic of my steering column with multi switch removed below)
You must be registered for see images
cannot find anything else in the serv. manual, nothing in owners manual, nothing on forums for location of relay....I did do one bad, did not unhook the battery the first time I pulled the original switch off, don't know if it could fry the relay and NOT the fuse, but double checked the fuse and all good (even checked continuity just to make sure)….

You must be registered for see images attach
 
OP
OP
C

creese

VCA Member
Joined
Nov 16, 2019
Posts
17
Reaction score
1
Location
butler, pa
well, (and yes feeling a very heightened point of stupidity) I know noticed the flasher relay plugs directly into the multi switch....ill let you guess what I did with the original one.....
 

MoparMap

VCA National President
VCA Officer
Joined
Jan 7, 2013
Posts
2,439
Reaction score
273
Location
Kansas
I was going to say I could have sworn it was right on top under the steering column cover. I guess that maybe answers your question as to why it wasn't working though. ***** that you need another one, but hopefully cheap enough and hopefully that really does fix it.
 
OP
OP
C

creese

VCA Member
Joined
Nov 16, 2019
Posts
17
Reaction score
1
Location
butler, pa
everything working fine, here is a pic of the multiswitch WITH FLASHER RELAY INSTALLED, hope my stupidity can save someone else $25, still could not find location mentioned anywhere in service manual, and the picture definitely did NOT do it justice….MoparMap, steve, thanks very much for the help.....
You must be registered for see images attach
 

MoparMap

VCA National President
VCA Officer
Joined
Jan 7, 2013
Posts
2,439
Reaction score
273
Location
Kansas
Awesome! Glad you got it figured out at least.
 

TexasViper35

Enthusiast
Joined
Jan 26, 2013
Posts
231
Reaction score
31
everything working fine, here is a pic of the multiswitch WITH FLASHER RELAY INSTALLED, hope my stupidity can save someone else $25, still could not find location mentioned anywhere in service manual, and the picture definitely did NOT do it justice….MoparMap, steve, thanks very much for the help.....
You must be registered for see images attach
Hi, I have a MFS on order and will be tackling this same job this weekend. Any advice about the removal process would be much appreciated!

Would you please confirm for me that your new MFS was just the lights related stalk on the left side, that it did not include the windshield washer stalk on the right? I had a lot of confusion with the part numbers, I went with 5066185AA.
 
Last edited:

TexasViper35

Enthusiast
Joined
Jan 26, 2013
Posts
231
Reaction score
31
That is odd. I know I've had that switch apart as I was having an issue with my fog lights turning on randomly. Turned out I had a worn piece in the switch I built back up with some epoxy. But can't remember how the high beams worked off the top of my head. Either way I would tend to agree with you that it's doubtful two different switches would be bad. Have you checked all the bulbs and sockets around the car? The only other guess that comes to mind would be the flasher module. I think it sits on top of the steering column, so could be possible that you knocked it loose while taking the old one out maybe? I was thinking there was one small extra connector on the turn signal switch as well. Something like a little 2 pin flat deal. I don't know what it runs though. Maybe that goes to the flasher?

This is what my car is doing, touch the MFS to activate / deactivate the right turn signal and the fog lamps come on, to get them off I have to twist the switch back super tight. They do come on sometimes just driving down the road! Really irritating, and risky of running down the battery if I don't notice them on when I park the vehicle, so I have to activate the turn signal to signal left whenever I shut off the car.

I ordered a new switch but I would love to know if you would recommend your repair for a non-engineer. And if so, how did you do it?
 

MoparMap

VCA National President
VCA Officer
Joined
Jan 7, 2013
Posts
2,439
Reaction score
273
Location
Kansas
This is what my car is doing, touch the MFS to activate / deactivate the right turn signal and the fog lamps come on, to get them off I have to twist the switch back super tight. They do come on sometimes just driving down the road! Really irritating, and risky of running down the battery if I don't notice them on when I park the vehicle, so I have to activate the turn signal to signal left whenever I shut off the car.

I ordered a new switch but I would love to know if you would recommend your repair for a non-engineer. And if so, how did you do it?

Yep, that is exactly why my switch was doing. I can't really say whether or not you might want to attempt it. In a certain sense it wasn't really "hard", you just had to pay attention to the parts as you took them out and put them back together. Once you get the whole switch out I think there are a few screws or clips that hold the back cover on. You have to be careful taking the cover off as I believe some of the contacts under it are spring loaded. Not a high pressure things go flying kind of spring, but more just to make sure you can see where they go. I think there is another middle layer of plastic you have to take out that holds some more stuff in place. The culprit is a plastic piece that rides on a little hinge. There is a curved surface on it that had a groove worn into it on mine. I tried a few different epoxies to fill the groove before finding one that stuck well (I think I used fiberglass resin if I remember right). Has been working fine since.

So long story short, if the switches are cheap enough, I would probably just replace the whole assembly. I think that assembly was shared among several Dodge vehicles, so probably easy enough to find. If you don't mind taking stuff apart I think it's an easy enough job and can save you money. No special tools required (maybe an odd screwdriver bit, I can't remember off the top of my head). My first instinct is always to take apart broken stuff and see if I can fix it before buying new, but I also like taking things apart to see how they work. I don't think it's a difficult job, you just have to pay attention and keep track of where parts went.
 

MoparMap

VCA National President
VCA Officer
Joined
Jan 7, 2013
Posts
2,439
Reaction score
273
Location
Kansas
I'd be willing to try to repair switches for people, but I don't know between shipping vs the cost of a new part how it would work out financially.
 

TexasViper35

Enthusiast
Joined
Jan 26, 2013
Posts
231
Reaction score
31
The MFS is pricy, about $200 from the dealership, but about $87 (plus shipping handling and tax, so $115) from a Dodge dealer on eBay or from a Viper specialty online vendor. I don’t know if it is found on any other Dodge vehicles, hopefully it is so that it remains available.
 

MoparMap

VCA National President
VCA Officer
Joined
Jan 7, 2013
Posts
2,439
Reaction score
273
Location
Kansas
Oh wow, I didn't think it was that expensive. Glad I fixed mine, lol. I thought I remember reading in the past that the Viper shared a steering column with the Grand Cherokee or something, but that might have also been earlier gens. I would think they would probably still try to use common parts though. That looks an awful lot like a generic Dodge MFS, but I suppose there could always be something slightly different about it.
 
OP
OP
C

creese

VCA Member
Joined
Nov 16, 2019
Posts
17
Reaction score
1
Location
butler, pa
BYAIC, sorry, just saw your question...this was a very easy fix, i unhooked the negative lead on my battery first, because the hazard flasher has constant power, two phillips screws under the steering column shrouds, comes off in top and bottom pieces (snaps together) , two Philips holding the MFS down, two plugs on the back of the mfs, the driver side plug has a red lock tab on it that u have to disengage first, once you have it off, the wiper modue will need to be removed using a #10 torx, MAKE SURE TO TAKE THE SQUARE FLASHER OFF OF YOUR ORIGINAL MFS AND PUT IT ON THE NEW ONE, DON'T THROW IT AWAY LIKE I DID, intall wiper module on new switch and reinstall....if u have any questions, please ask....like I said earlier, very easy fix...Moparmap, the switch I put in DID share its part number with a grand Cherokee also...
 

TexasViper35

Enthusiast
Joined
Jan 26, 2013
Posts
231
Reaction score
31
BYAIC, sorry, just saw your question...this was a very easy fix, i unhooked the negative lead on my battery first, because the hazard flasher has constant power, two phillips screws under the steering column shrouds, comes off in top and bottom pieces (snaps together) , two Philips holding the MFS down, two plugs on the back of the mfs, the driver side plug has a red lock tab on it that u have to disengage first, once you have it off, the wiper modue will need to be removed using a #10 torx, MAKE SURE TO TAKE THE SQUARE FLASHER OFF OF YOUR ORIGINAL MFS AND PUT IT ON THE NEW ONE, DON'T THROW IT AWAY LIKE I DID, intall wiper module on new switch and reinstall....if u have any questions, please ask....like I said earlier, very easy fix...Moparmap, the switch I put in DID share its part number with a grand Cherokee also...
Hey a Creese, couldn’t have done it without you! I ran in to two snags though, and for future DIYers I add them here. My clamshell was very tightly secured together even though the two screws were removed, it felt like it would break with the force I had to use to pull it apart but it eventually popped loose. And then those electrical connectors! Both of mine had the red lock that needs to be slid outwards, but I couldn’t see well and didn’t see that I then needed to depress the small centered latch right in front of the red locks while pulling the connectors off, a Jeep YouTube video explained it and I was able to finish up.

Thank you for your help!
 
Last edited:

MoparMap

VCA National President
VCA Officer
Joined
Jan 7, 2013
Posts
2,439
Reaction score
273
Location
Kansas
Yeah, that clamshell has two tabs that lock into each other toward the back as well I believe. You have to kind of press in on the lower piece I think. That helps them to pop loose easier, though you have to know where the tabs are to know where to push. Glad you got it fixed though!
 

TexasViper35

Enthusiast
Joined
Jan 26, 2013
Posts
231
Reaction score
31
Yeah, my first instinct whenever something is broken is to take it apart and see why, but I know that's not a majority sentiment. Being an engineer has something to do with that too I'm sure. A lot of stuff is built to be disposable though, so it's getting tougher and tougher to repair your own stuff.
Can someone please tell me how to remove the cover from the turn signal side of the multifunction switch? I cannot seem to be able to figure it out! And which side comes off? Thank you!
 

MoparMap

VCA National President
VCA Officer
Joined
Jan 7, 2013
Posts
2,439
Reaction score
273
Location
Kansas
Now I wish I took pictures all those years ago, lol. I'll see about pulling my MFS out to take some photos and better explain the fix I did.
 

MoparMap

VCA National President
VCA Officer
Joined
Jan 7, 2013
Posts
2,439
Reaction score
273
Location
Kansas
Not sure if this will all fit in one post, so likely going to be a couple to get all the pictures. First step is obviously to remove the MFS from the column (I don't have any pictures of this step). It's pretty straightforward and easy. There are two phillips screws on the bottom of the steering column shroud just behind the steering wheel. Remove those and press in at the back of the shroud above the seam separating the top and bottom pieces just behind the stalks on either side. They can be a bit finicky, but the tabs should eventually pop loose with a little negotiation and wiggling to separate the shroud. The bottom can actually stay in place, just remove the top portion to gain access to the mounting screws for the MFS. There are two silver phillips screws right at the front that hold the MFS in. There are also two electrical connectors on the back side that have locks on the release levers. Pull the red locking tabs away from the connector first, then press down on the latch and pull the connectors out. At this point you should have a loose MFS you can take to a table to disassemble (now the pictures start).

Looking at the back of the MFS you should see the flasher relay and a few screws:
You must be registered for see images attach


Remove the relay and you'll see the second ***** a little more clearly. Remove these two screws (I believe it was a T10 torx bit). Also there is a small 2 pin connector at the top right you need to unplug and take the wires out of the routing clips so you don't pull on them later:
You must be registered for see images attach


Now you'll have to go around the perimeter of the MFS to release some tabs. There should be a small slot on the backside of the MFS you can get a small screwdriver in to help. Be gentle and take your time. You might need to apply light pressure when popping the tabs to get them past the ledge, but there is some spring pressure on the inside that will help push them apart. I would caution from this point on you should really keep the MFS with the back facing up as much as possible. Try not to tilt it sideways as parts can fall out.
You must be registered for see images attach

You must be registered for see images attach


You must be registered for see images attach


At this point the first "layer" of the switch should pull off. Be careful as the pins for the connector go through this plate, so don't pull super hard or bend them while trying to get it off.

Continued on next post.
 

MoparMap

VCA National President
VCA Officer
Joined
Jan 7, 2013
Posts
2,439
Reaction score
273
Location
Kansas
With the top layer removed you should start to see the various moving parts inside the MFS that make the magic happen. As a side note here, the passenger side of the swtich actually doesn't need to come apart. It's more or less a self contained unit to run the wipers and has a separate backshell that isn't connected to the turn signal/light side. Carefully remove the three white/beige pieces, noting how they are installed to begin with (this picture should be with all the parts in the "neutral" position I believe, so no turning or headlights of any sort) and the small silver ***** at the top right, another T10 torx:
You must be registered for see images attach


After that you should be able to pull up on the "middle layer" of the switch. There is another small tab at the bottom right corner that will hold it in you might need to lightly nudge with a small screwdriver. Also, be careful not to pull too ******* the hazard light switch. It is connected to this middle layer and comes out with it, but I believe is only held in securely by the back cover that we already removed. There is a spring you can just make out at the bottom of it that you don't want to lose. Here is a picture of where the tab is, note how it's on the "second level" of the setup:

You must be registered for see images attach


With the middle layer removed we can finally see the heart of the problem (at least in my case with the fog lights randomly going on). There is a little lever here that rides on a post that extends from the turn signal stalk.
You must be registered for see images attach


Lift up on the top portion of this lever and it should pivot to allow you to remove it:

You must be registered for see images attach


Push the lever down gently along its length to pop it off the pivot, then you should be able to move the whole level toward the top of the MFS and lift it out.

Continued on next post.
 
Last edited:

MoparMap

VCA National President
VCA Officer
Joined
Jan 7, 2013
Posts
2,439
Reaction score
273
Location
Kansas
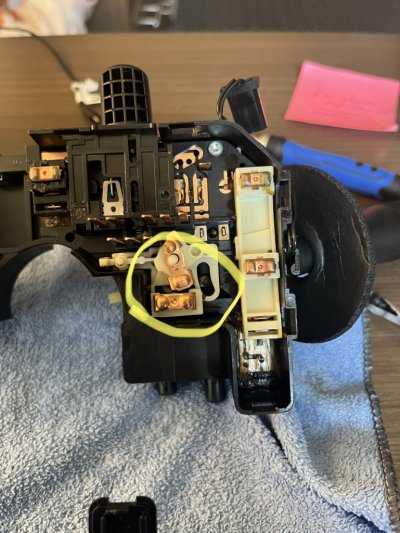
If your switch is anything like mine was, there will be a small groove worn into the opposite face of the lever where there is a little concave dish that the post from the turn signal stalk rides on. I exaggerated it a little bit on the second image, but I drew a line that shows where the surface should have been and you can see a small notch that developed:

You must be registered for see images attach

You must be registered for see images attach


For those that care, you aren't supposed to be able to turn on the fog lights unless at least the parking lights have been turned on as well. When you turn on the fog lights you pull the little post that comes from the turn signal stack into the stalk and spring pressure allows this little ramp to pivot and close the contacts to turn on the fog lights. When the groove develops in this surface it allows the lever to pivot just enough to make that contact when the fog light switch is still in the off position.

The little post coming out of the turn signal stalk:
You must be registered for see images attach


The lever has the concave shape because the post has to be able to slide around on it and pivot when the turn signal stalk is operated in all the various directions (turns, high beam toggle, high beam pulse). It seems the post is harder than the lever surface and wore into it over time, so I just built the surface back up with a little fiberglass resin. I tried JB weld and plain super glue, but they just didn't want to stick very well. Once I built the surface back up I made sure it was all well greased and put it back in. Haven't had the problem again in several years since, though it does still look like I have some grooving on the surface. I didn't wipe it off really well to see, but I figure until it gives me problems again I won't mess with it.

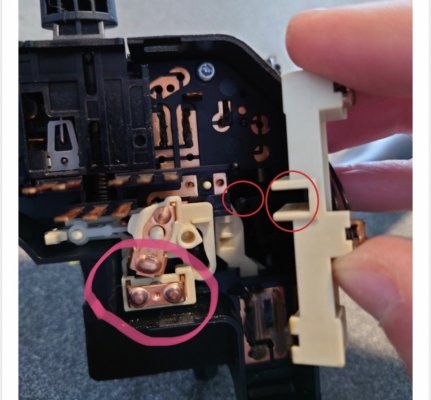
Assembly is the reverse of the above. The main thing to watch out for is when pull the large slide bar on the right hand side back in, make sure to line up the slot on the back side of the slider with the black post on the turn signal:
You must be registered for see images attach


There will be light spring pressure on everything when you put it back together, but don't push anything too hard. Use common sense, if it's not lining up or feels like you have to push extra hard, take it back apart and make sure stuff lines up. Take pictures for reference and take your time. Make sure you line up the pins for the connector when you put the back plate back on as that should be a good reference for where things go. Let me know if you have any questions and I'll do what I can to help. It's a complex little piece that does a lot of stuff, but generally speaking if you just pay attention when taking it apart and take your time it's pretty easy to do.
 

TexasViper35

Enthusiast
Joined
Jan 26, 2013
Posts
231
Reaction score
31
Absolutely invaluable and I appreciate everything you did! I’m sure many others will too in the future! Following your write up the cover is now off and I’m moving to the second layer.

What are your thoughts on me using a small piece of Gorilla Tape to fill in that void? I don’t have access to fiberglass products, but I do have some very high quality super glue, and that tape.
 

TexasViper35

Enthusiast
Joined
Jan 26, 2013
Posts
231
Reaction score
31
This is mine. Hard to believe this tiny defect is causing so much trouble.


You must be registered for see images attach
 

TexasViper35

Enthusiast
Joined
Jan 26, 2013
Posts
231
Reaction score
31
I’m sort of confused by one issue. A small piece of mine is pointed in the opposite direction from yours. I have played with it and I just don’t think mine could have moved when I took the cover off. I’m a little concerned about causing electrical damage by putting it back when my part is not matching yours. This piece is linked to the high beam activation.

Mine after I took the cover off circled in yellow, yours circled in pink:
 

Attachments

  • 5D8B9957-C96A-4E00-B8D0-031649EB7936.jpeg
    5D8B9957-C96A-4E00-B8D0-031649EB7936.jpeg
    174.1 KB · Views: 4
  • B6FCEFE9-B9D9-43B3-83A3-58494F4AA8CA.jpeg
    B6FCEFE9-B9D9-43B3-83A3-58494F4AA8CA.jpeg
    175.8 KB · Views: 4

MoparMap

VCA National President
VCA Officer
Joined
Jan 7, 2013
Posts
2,439
Reaction score
273
Location
Kansas
You probably could do some tape or other glue, as long as it sticks for you. I ended up with the resin just because I had a hard time getting anything else to work. I think tape would probably wear through fairly quickly though.

As for your piece being different, I'll have to give mine a try when I get home. I didn't actually run it through all the positions when I put it back in the car, just moved to stalk to make sure it didn't jam or anything. I might have toggled the high beam when I took it out or put it back in and moved that. Since the stalk resets to center on the high beam whether on or off I think it's probably okay to assemble it either way, but I'll try to confirm tonight.
 

MoparMap

VCA National President
VCA Officer
Joined
Jan 7, 2013
Posts
2,439
Reaction score
273
Location
Kansas
Just confirmed my high beams were on, so thinking I must have bumped the switch when I was pulling it out or putting it back in. As long as the assembly goes together the way you took it apart I think you should be good.
 
Top