Re: Boy. Some some people are so fickle.
Update on installation of Team Tech six point 6004 SRTTA harness.
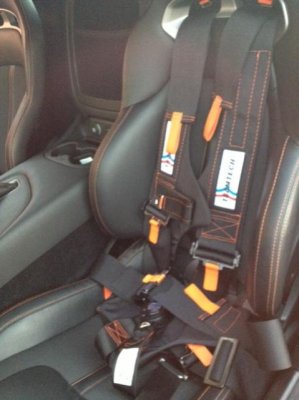
1. I ordered mine with orange stitching and black pull tabs. The workmanship is excellent. See photo above of the harness with orange stitching and orange pull tabs installed in a friends Viper.
2. There are two slots already created between the upper part of the seat and the bottom of the seat for the crotch straps to go through. I put them through first ( make sure you preposition them correctly so that the correct side of the strap ends facing up on the seat ); then put each end over each end of the bar; and then attached the bar. If you do not have a magnetized ratchet head - which I do not - use a bolt/nut/screw retriever - which I do have - and preposition the nut on the bolt after you put the washer in. Then just use a socket with the base socket wrench without an extention assuming your sockets are about two inches long. If they are short ones, use a short extension because if it is too long, you will not get enough leverage because of the tightness of the space to easily remove the stock nuts.
3. The bar attaches flat side down with the v facing rearward like this >.
4. Next I put the eye bolts in for the shoulder straps. When you remove and replace the plastic cover/panel, the rubber grommet that the lower part of it clips into can fall off down behind the bulkhead panel so be careful and gentle. I used locking washers that were available from TeamTech with the eye bolts.
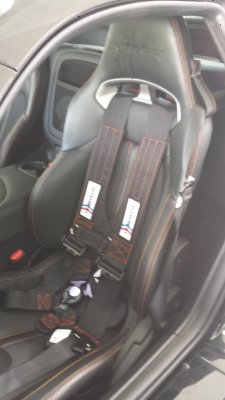
5. The next part took a little while to figure out since there were no instructions on how to do it. In order to get the shoulder straps through the holes in the top of the seat it is necessary to fold the metal clip down so that you make the end as narrow as possible and twist the end 90 degrees so that it is parallel to the strap. You have to carefully experiment with this a bit. Once you have it folded the correct way, it goes through the hole without much of a problem. Make sure that you put the driver's right strap through the driver's right hole.
6. I then adjusted the four point set up to see how it feels. Since this harness is doubly adjustable and has Team Tech's most advanced adjusting tech, it was easy to do.
7. I have not located the inboard and outboard lap belt eye bolt holes yet so that will come later. I want to install the eye bolts without removing carpet. So far I tried the "feel around method" and I probed using a large pin. The inboard one should be roughly 7 inches from the rear bulkhead ( a liittle less from the top of the carpeting) and 3.75 from the floor ( a little less from the top of the carpeting.) The outboard one is supposed to be a bit farther back.
Once I do find them, I want to cut a small X in the carpeting to install the Eye bolt. That way if I choose to remove them later I can glue the carpet back together cleanly. If any of you have installed eye bolts for the lap belts in a TA, please post a photo clearly showing the exact location of these bolt holes. It would be much appreciated.
You must be registered for see images attach
Thanks Bruce.Update on installation of Team Tech six point 6004 SRTTA harness.
1. I ordered mine with orange stitching and black pull tabs. The workmanship is excellent. See photo above of the harness with orange stitching and orange pull tabs installed in a friends Viper.
2. There are two slots already created between the upper part of the seat and the bottom of the seat for the crotch straps to go through. I put them through first ( make sure you preposition them correctly so that the correct side of the strap ends facing up on the seat ); then put each end over each end of the bar; and then attached the bar. If you do not have a magnetized ratchet head - which I do not - use a bolt/nut/screw retriever - which I do have - and preposition the nut on the bolt after you put the washer in. Then just use a socket with the base socket wrench without an extention assuming your sockets are about two inches long. If they are short ones, use a short extension because if it is too long, you will not get enough leverage because of the tightness of the space to easily remove the stock nuts.
3. The bar attaches flat side down with the v facing rearward like this >.
4. Next I put the eye bolts in for the shoulder straps. When you remove and replace the plastic cover/panel, the rubber grommet that the lower part of it clips into can fall off down behind the bulkhead panel so be careful and gentle. I used locking washers that were available from TeamTech with the eye bolts.
5. The next part took a little while to figure out since there were no instructions on how to do it. In order to get the shoulder straps through the holes in the top of the seat it is necessary to fold the metal clip down so that you make the end as narrow as possible and twist the end 90 degrees so that it is parallel to the strap. You have to carefully experiment with this a bit. Once you have it folded the correct way, it goes through the hole without much of a problem. Make sure that you put the driver's right strap through the driver's right hole.
6. I then adjusted the four point set up to see how it feels. Since this harness is doubly adjustable and has Team Tech's most advanced adjusting tech, it was easy to do.
7. I have not located the inboard and outboard lap belt eye bolt holes yet so that will come later. I want to install the eye bolts without removing carpet. So far I tried the "feel around method" and I probed using a large pin. The inboard one should be roughly 7 inches from the rear bulkhead ( a liittle less from the top of the carpeting) and 3.75 from the floor ( a little less from the top of the carpeting.) The outboard one is supposed to be a bit farther back.
Once I do find them, I want to cut a small X in the carpeting to install the Eye bolt. That way if I choose to remove them later I can glue the carpet back together cleanly. If any of you have installed eye bolts for the lap belts in a TA, please post a photo clearly showing the exact location of these bolt holes. It would be much appreciated.