Dave's Proportioning Valve ISSUES!

SmokinViperGTS

Enthusiast
Joined
Sep 22, 2007
Posts
258
Reaction score
0
Location
Bellevue, WA
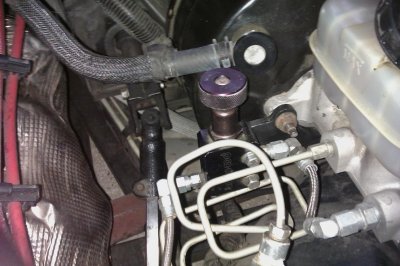
I have a full Wilwood setup, and I've just spent a week talking to Wilwood and Porterfield, but that's another story. Anyway, the Wilwood guys told me that their PV will flow full pressure to the rear brakes when it is backed all the way out, and only cuts down to 65% pressure when it is screwed all the way in.

Since I use my car on the street, auto-cross, and tracking, I've spent the last couple of track days carefully dialing in the PV and tire pressures to optimize for hard stops with hot brakes. I concur with GTS Dean to dial it out until you start getting rear lockup under your target conditions, and then dial it back in 1/2 turn. Most people want front lockup first, albeit just barely. Note that this is also a function of your tire grip too, so tire pressure and temperature should be carefully controlled while you're setting your PV!

But this is also a personal preference in how you drive - I strive for smooth. But my mechanic, who used to drive NASCAR Super Stocks likes his Viper setup with the dial turned all the way in, so he can more easily throw the rear end out. I wouldn't call his driving style smooth - more like kamikaze! To each their own...

Steve
 

vancouver-gts

Viper Owner
Joined
Jan 19, 2010
Posts
1,042
Reaction score
0
Location
Vancouver BC
my mechanic, who used to drive NASCAR Super Stocks likes his Viper setup with the dial turned all the way in, so he can more easily throw the rear end out. I wouldn't call his driving style smooth - more like kamikaze! To each their own...

Steve


Before I 've installed the 03 srT 14" rotors/calipers with the DBB kit on my 99 GTS ,the front brakes were locking up even at as slow speed as 30mph on sudden stops.Now there's only a slight rear lock up on the rears from high speeds and easily overcome by modulating the brakes with the OEM proportioning valve. I'm still going to install the Wilwood unit in the rear circuit and will try to dial the brakes in for no lockups . My friend's Noble doesn't have ABS either and I can stop that car braking the hardest without a hint of brake lock up. :eater:.
 
OP
OP
J

Jance GTS

Enthusiast
Joined
Feb 28, 2010
Posts
1,003
Reaction score
11
Location
Oklahoma City, Oklahoma
I just drove my car tonight for the first time since May! Brakes seem to be working fine with no lockup in the rear. Of course I'm still new at driving a Viper so I'm taking it easy.

I did notice that what appears to be front brakes are already squeaking? I'm guess it's the clip that tells you when to change your pads? Although everything is brand new. I'll check into it tomorrow.
 

GTS Dean

Enthusiast
Joined
Jul 22, 2000
Posts
3,790
Reaction score
210
Location
New Braunfels, Texas
You need to bed your pads in. Lining material will transfer into the rotor surface over the first hour or several days, depending on your driving style. They should quiet down some, but Viper brakes will squeak - it's a fact of life.
 

SmokinViperGTS

Enthusiast
Joined
Sep 22, 2007
Posts
258
Reaction score
0
Location
Bellevue, WA
The pads you are using will greatly determine how much squeak and squeal you get. The rotors, too, but to a lessor degree. And most pads will quiet down somewhat after they've been bedded in.

Pads come in two basic types: street (quiet), and track (noisy). There are a few that claim to do both well, but they're basically track pads that have been formulated to have strong cold grip as well. So, from a noise perspective, they're still track pads, and I haven't found any yet that don't have a reputation for squealing.

Whichever you choose to use, new pads should always be "bedded in". EBC says it will take anywhere from 2 hard track stops for their "pre-bedded" Bluestuff, to 1500 miles for their Redstuff (or 300 miles for their "new compound" Redstuff). It's different for every pad.

Here's the procedure that Wilwood recommends for their Polymatrix pads:

Pad Bedding:

The bedding process is the final "heat cure" for the pads. This final bedding cure differs from an oven heat cure in such that the oven heat cure does not include the pressure, torque, and elevated surface temperatures that are necessary to properly condition the pad for service. As it is with the rotors, new pads must be gradually brought up to temperature and then slowly cooled. If the pads are put into hard service right from the start, damage from fractures or accelerated deterioration due to extreme temperature variations between the surface and the body of the pad can occur. Overall poor performance with the potential for rotor damage are often the results.
Bedding Steps:
Once the brake system has been tested and determined safe to operate the vehicle, follow these steps for bedding of all pad materials and rotors.
1. Begin with a series of 8-10 light stops from approximately 30 MPH down to 15 MPH allowing 20-30 seconds for cooling between each stop.
2. Progress to series of 8-10 moderate stops from around 45 MPH down to 30 MPH allowing the 20-30 second cool down period between each stop.
3. Proceed with a series of 8-10 hard stops from 55-65 MPH down to 25 MPH allowing 20-30 seconds of cool down time between each stop.
4. Drive at a moderate cruising speed, with the least amount of brake contact possible, until most of the heat has dissipated from the brakes. Avoid sitting stopped with the brake pedal depressed to hold the car in place during this time. Park the vehicle and allow the brakes to cool to ambient air temperature.
 

Fast Viper Dan

Enthusiast
Joined
Aug 7, 2001
Posts
457
Reaction score
0
Location
Saratoga, CA, USA
Once you find the right balance for hard stopping, I would mark the knob (with a saw blade) and adjust the PV in at least 1/2 a turn for street driving.
Locking the rears in rain or dirty road will result in loss of control.
JMO
 
OP
OP
J

Jance GTS

Enthusiast
Joined
Feb 28, 2010
Posts
1,003
Reaction score
11
Location
Oklahoma City, Oklahoma
I've adjusted the knob and it works a lot better now. The problem I was having was when I pulling into the garage. I had the brakes on the floor but the car was still pushing me forward? I didn't have my foot on the gas and I had to use the ebrake?

Now that I have adjusted the PV it doesn't do that anymore. Trial and error.
 

Flyin' Low

Viper Owner
Joined
Oct 8, 2006
Posts
20
Reaction score
0
Location
Enumclaw, WA
Smokin',
My Wilwood PV is stamped on the knob " less brake" with an arrow pointing counter-clockwise. All the way out is less pressure to the rear brakes with my Wilwood PV. I'm running SRT-10 calipers all the way around with a Roe 14" kit on the front and a DBB 13" kit on the rear. With EBC yellow pads and Kuhmo 700s, I have the PV within a 1/2 turn of all the way out to keep the rear from locking up before the front.

Dave
1999 GTS black/cognac
 

vancouver-gts

Viper Owner
Joined
Jan 19, 2010
Posts
1,042
Reaction score
0
Location
Vancouver BC
The problem I was having was when I pulling into the garage. I had the brakes on the floor but the car was still pushing me forward?


Jance , you need the brakes bleed properly :omg:.No way you should roll the car forward with your foot on the pedal .You must have air in the system for sure. I still haven't got my Wilwood P/V installed . After taking the OEM spring out from the OEM PV , I found identical springs in our stock at work and started shortening it by 1/4 " incrementally until I found a good front /rear bias .I compared the braking of my car against an 08 and found the braking remarkably close if not identical. I may just polish the OEM body to make it look pretty and use the S/S lines that came in the kit and give the Wilwood unit to my friend who races ;)
 

RTTTTed

Viper Owner
Joined
Jun 6, 2007
Posts
6,438
Reaction score
0
The front brakes should hold the car easily at a stop.

Since you stopped the car with the Ebrake it seems that neither the front or rear brakes are working properly. Bleed from the fathest brake to the closest.

Ted
 

Fast Viper Dan

Enthusiast
Joined
Aug 7, 2001
Posts
457
Reaction score
0
Location
Saratoga, CA, USA
"My Wilwood PV is stamped on the knob " less brake" with an arrow pointing counter-clockwise. All the way out is less pressure to the rear brakes with my Wilwood PV."


Good catch.
I have all of the parts but have not installed yet.
I pulled the PV valve out and looked at it. Your right!, in for more rear brake, out for less.
Still same thought, back off the rear brakes a bit for street driving.

As for fittings, the kit I have from DBB looks like it will replace the first line out of the Master Cylinder. The block that has the sensor will not be removed?
I plan to do the install after next weekend. We have a Club event. After that I will put these parts to the test.
 

SmokinViperGTS

Enthusiast
Joined
Sep 22, 2007
Posts
258
Reaction score
0
Location
Bellevue, WA
My Wilwood set is older - I have GN III's on the front, and LC-GT's on the rear, and the PV is a Wilwood unit. The Wilwood engineers had to get out an older catalog to identify the calipers. Says a lot for their quality, though!

While mine doesn't have the marking yours do, it appears to be a simple needle-valve in the rear brake line, where clockwise screws it in to further obstruct the line, and counter-clockwise screws it out to open the line. Anyway, as I've gradually turned mine out 3 turns, 1/2 turn at a time, I've gotten considerably more rear brakes (and rear squeal) going on, which gives the car a much more buttoned-down feel, and less front lockup.

Unfortunately, I've been doing this concurrently with new Polymatrix B pads, so I really can't say how much of the settling down is due to the PV adjustment, and how much to the new pads getting fully bedded.

Does anyone recognize my older PV in the photo?
 

Attachments

  • IMAG0028.jpg
    IMAG0028.jpg
    94.8 KB · Views: 24
OP
OP
J

Jance GTS

Enthusiast
Joined
Feb 28, 2010
Posts
1,003
Reaction score
11
Location
Oklahoma City, Oklahoma
I actually just sent my stock PV to the company that I bought my Wilwood PV from and they are suppose to make a new setup that will have the stock sensor. They will proabably get it sometime next week and hopefully I can get this ironed out by October. :)

Jon B. is working with me on the exchange :)
 

vancouver-gts

Viper Owner
Joined
Jan 19, 2010
Posts
1,042
Reaction score
0
Location
Vancouver BC
Jance , since you installed the Wilwood unit already, did you check if the sensor/switch delete caused a warning light in the information gauge? Or perhaps the brake light not lighting up ? The Jeg unit calls the fitting on their unit a brake switch [" Includes five stainless steel fittings for 3/16" brake line, brake light switch and wiring pigtail"] :dunno:. Wonder if JonB would exchange my kit with the newer one ,once it's figured out?
 
OP
OP
J

Jance GTS

Enthusiast
Joined
Feb 28, 2010
Posts
1,003
Reaction score
11
Location
Oklahoma City, Oklahoma
Without the sensor plugged in, the dash light is on. The new one PV is suppose to have the sensor port installed as if it was the stock PV, I believe. I will let you know something as soon as I get it back :)
 

vancouver-gts

Viper Owner
Joined
Jan 19, 2010
Posts
1,042
Reaction score
0
Location
Vancouver BC
Jance , did you get your new Wilwood PV with a sensor and installed it? I still have my Wilwood unit I got from Jon in a box .If Wilwood doesn't come up with a PV with sensor port , I may get the unit from Jegs that does have it .My braking is pretty good now with the spring cut shorter in the OEM PV..
 
OP
OP
J

Jance GTS

Enthusiast
Joined
Feb 28, 2010
Posts
1,003
Reaction score
11
Location
Oklahoma City, Oklahoma
Jance , did you get your new Wilwood PV with a sensor and installed it? I still have my Wilwood unit I got from Jon in a box .If Wilwood doesn't come up with a PV with sensor port , I may get the unit from Jegs that does have it .My braking is pretty good now with the spring cut shorter in the OEM PV..

No sir, I'm still waiting on the new part to arrive. I will let you know something when I get it installed. How much are the ones from Jegs?

I might have to look into it. Thanks! :2tu:
 

MADMAX

Enthusiast
Joined
Jul 19, 2007
Posts
197
Reaction score
0
Location
UK
Smokin',
My Wilwood PV is stamped on the knob " less brake" with an arrow pointing counter-clockwise. All the way out is less pressure to the rear brakes with my Wilwood PV. I'm running SRT-10 calipers all the way around with a Roe 14" kit on the front and a DBB 13" kit on the rear. With EBC yellow pads and Kuhmo 700s, I have the PV within a 1/2 turn of all the way out to keep the rear from locking up before the front.

Dave
1999 GTS black/cognac

I agree - instructions on the Wilwood valve I fitted last winter said:-
"Rotating the knob counterclockwise will incrementally reduce line pressure up to 57% when the valve is fully out."
I only fitted the Wilwood valve though, leaving the OEM Combination Valve And Brake Waring Switch unit in the place.
You must be registered for see images attach
 
OP
OP
J

Jance GTS

Enthusiast
Joined
Feb 28, 2010
Posts
1,003
Reaction score
11
Location
Oklahoma City, Oklahoma
I agree - instructions on the Wilwood valve I fitted last winter said:-
"Rotating the knob counterclockwise will incrementally reduce line pressure up to 57% when the valve is fully out."
I only fitted the Wilwood valve though, leaving the OEM Combination Valve And Brake Waring Switch unit in the place.
You must be registered for see images attach

So you have both the stock unit and the Wilwood installed. I wonder if I should have done the same? I just swapped the stock one out for the Wilwood and that is why I didn't have the sensor port.
 

vancouver-gts

Viper Owner
Joined
Jan 19, 2010
Posts
1,042
Reaction score
0
Location
Vancouver BC
Jance , I was going to do the same as Madmax .Installing the Wilwood unit in the rear circuit , removing the spring from the OEM block and using the Wilwood PV to dial in the bias. Right now I'm satisfied with the calibration of the OEM PV by shortening the spring.
 

MADMAX

Enthusiast
Joined
Jul 19, 2007
Posts
197
Reaction score
0
Location
UK
Link attached on the same subject, for your info - it may help.

http://forums.viperclub.org/rt-10-g...ing-rear-brake-line-prroportioning-valve.html

My biggest problem turned out to be "how do I flare steel pipework" - your cheap-and-chearful pipe flaring tool won't touch steel pipe. I ended up buying the mutz-nutz pipe flaring tool so the problem vanished.

I also wasn't very impressed with the Wilwood brass fittings being too short so ended up brazing on extension colars - they should be visible in my post above. I couldn't find longer replacement pipe fittings anywhere.

Finally, I bought enough spares to install the Wilwood WITHOUT modifying any original car parts - a true bolt-on. If I wanna revert back to 'without-Wilwood' I have the part/s and it's a simple task, followed by brake bleeding.

Good luck.
Ade.

PS A final thought:- Why touch the spring on the OEM block?
 
OP
OP
J

Jance GTS

Enthusiast
Joined
Feb 28, 2010
Posts
1,003
Reaction score
11
Location
Oklahoma City, Oklahoma
Well for whatever reason I got my stock PV unit in the mail today. Nothing had been changed or altered, no note or anything. So I guess a new unit to solve the problem was out of the question so I got it back. So I guess I am right back where I started 3 months ago...
 

Latest posts

Members online

Forum statistics

Threads
153,197
Posts
1,681,910
Members
17,696
Latest member
sloth
Top