Window Lift Making Cracking Sound

OP
OP
G

ghengishahn

Viper Owner
Joined
Apr 10, 2010
Posts
232
Reaction score
0
Location
Louisville,KY
I need mine fixed, but im a little bit hesitant on fooling around with the door panel and regulator. Last thing i need right now is another repair bill if i make a mistake.

If you just take it slow and easy, you can do it without damaging door or glass. I did the joint similar to the Jon's but instead of a vinyl sleeve, I used a 3M Super Strength Molding tape. It acts like a sticky conformal coating and so far it made a rock solid joint.

Lessons learned. If your top joint is bad, the clamps from the fix can rub the glass. See how long the screw is in my picture. I trimmed the threads and still had some glass rubbing. Ultimately I zip tied and pulled the tube assembly away from the glass.

Taking this assembly in and out is the toughest part. Each time you do it you work the joints and might weaken another area. Just be gentle.

I am all done. It looks pretty crazy, and it is not in nature to do a kind make shift fix but it is secure. If it ever fails, I might just buy a part and start over.

I know I have said this before about Chrysler, but in my judgement as a seasoned automative engineer, this is a pretty poor design. The engineer needs to shot.
 

Attachments

  • IMG_2397.jpg
    IMG_2397.jpg
    79 KB · Views: 161
  • IMG_2399.jpg
    IMG_2399.jpg
    92.4 KB · Views: 141

Black Moon

Enthusiast
Joined
Dec 28, 2007
Posts
1,730
Reaction score
0
Location
Knoxville, TN
WE only used Lord Fusor with no reinforcing. It seems fine and I hope it holds up. Yours looks like it will hold this time. Good job.
 
OP
OP
G

ghengishahn

Viper Owner
Joined
Apr 10, 2010
Posts
232
Reaction score
0
Location
Louisville,KY
For the record, Black Moon used Lord Fusor 142. He fixed his without all the other stuff we show in our pictures.
 

shaftnmn

Viper Owner
Joined
Oct 10, 2007
Posts
1
Reaction score
0
Great post for a common problem with a lot of these cars. I tried to go the DIY route (3-4 months ago) and I got stuck when trying to get the regulator out of the door frame. I figured that they must have put the regulator in and riveted the door halves together. I also came up with a similar solution for fixing the nylon tubing. Back to the garage to try this fix. Thanks again for the posting.
 

lagalaxy13

Viper Owner
Joined
May 10, 2007
Posts
784
Reaction score
0
Location
Zanesfield, Ohio
Mine has been making the noise for awhile. Guess I better fix it soon. ***** having to replace my mustang window this week because the track bent on it. Last time i worked on it it broke my hand, so not looking forward to doing viper too.
 

vipergreg

Enthusiast
Joined
Nov 7, 2010
Posts
5
Reaction score
0
After reading the forums and not finding any solution to installing the window regulator, I figured I would post the steps to install a new one. The old regulator broke due to the window getting caught on the rubber weather trim behind the side door mirror. THESE INSTRUCTIONS WERE FOR A DRIVER SIDE INSTALL, SO PASSENGER EVERYTHING WOULD BE REVERSED.

I removed my old regulator by cutting the cable on both side and removing it easily throw the access hole on the door. Installing was a little more tricky. But here's how I did it.

1-Remove the 4 screws that hold the bracket to the motor. It is very easy to put it back together. Remove the 2 weather strips on the top of the door. One pulls right off and the other is held together by screws. Remove the window completely by removing the 2 allen screws and the "U" clip on the bottom of the right side of the rail by pulling it straight out.

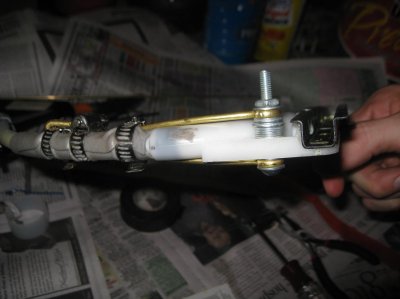
2- On the left side of the regulator assembly (the side with the steel bracket that attaches to the window with the 2 allen bolts), there is a mounting bolt at the top that is not removable. This is the only bolt that will need to be cut approximately 1/4". Remove the other bolts on the bottom of the regulator assemblY, which will screw right off with an allen key.

3- With the bolt on the left side of the regulator trimmed down and the other 2 removed, you're ready to install the regulator assembly through the top of the door.

Take the right side of the regulator assembly and turn it so it fits through the top of the door. Drop the left side of the regulator assembly through the top. Be sure to slide the steel window bracket to the bottom to make it easier. Reinstall the motor and brackets inside the door. It's pretty easy. Make sure you grease up the gear with some white lithium grease prior to installing the motor.

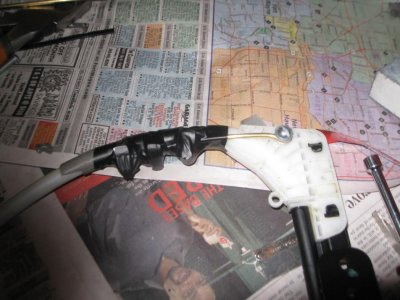
4- Attach the trim piece. Once the window is in place, 3 screws will not be accessible so make sure you attach the trim before dropping in the window. Attach the screws to the window plate and install the clip on the other side. Finger tighten everything except the window bracket.

5- There is a window stop that needs to be adjusted. The window should roll up and when the door is closed, should automatically roll up a bit more. If that adjustment is incorrect, it won't roll up automatically.

On another note, removing the door panel weeks ago was an issue until I found the two metal clips that lock the door panel into place. My advice is to collapse those clips so in the future, the panel lifts right up off of the door.
 
Joined
Feb 16, 2010
Posts
597
Reaction score
1
BTW, the left side regulator is priced much less than the right from Mopar. Not sure why, but the driver's side is a better deal for OEM if you need to replace it entirely.
 

Forum statistics

Threads
153,248
Posts
1,682,347
Members
17,742
Latest member
Mpcc
Top