Loose harmonic balancer AND crank pulley

dipietro9006

Enthusiast
Joined
Oct 22, 2024
Posts
9
Reaction score
6
Location
Virginia
Just wanted to share my recent experience. A few drives ago, I noticed my belt was squeaking. I figured it was an idler pulley. Upon closer look, my harmonic balancer was wobbling around. I loosened the sep. belt, took the balancer bolt off, and reinstalled the bolt with with red loctite and a 4 ft pipe. I could see that the balancer was pulled straight. I go to restart the viper, still have a squeak and the pulley still wobbling around. I realized the 3 pulley bolts were loose too! I don't see many people talking about the 6 balancer pulley bolts coming loose. Those got some red sauce, too. I've driven the car a few hundred miles since and everything good. I also painted a line on the bolt with nail polish (thanks, wifey) to see if it moves in the future.

I was ignorant and thought "nah, this won't happen to me". GO TIGHTEN YOUR CRANK BOLTS AND PAINT. Also, check your 6 crank pulley bolts! I'm happy the pulley and/or balancer didn't fly through my 96 GTS hood at 5,000 RPM.
 

GregVP

Enthusiast
Joined
Sep 21, 2021
Posts
22
Reaction score
5
Location
Canada
Unfortunately many years ago I was not aware of this engineering defect the pulley bolt came loose spun the pulley on the crank nose beyond use. Had to replace crank. I then pinned the pulley. So far all is good. Beware. Happened at 18,000 miles.
 

daveg

Enthusiast
Joined
Dec 26, 2006
Posts
524
Reaction score
101
Location
Mass...
Ya, I was going to ask OP how the snout looked.
I indexed the Balancer day one of purchasing my car about 10 years or so ago..
 
Last edited:

Old School

Enthusiast
Joined
May 14, 2023
Posts
189
Reaction score
102
Location
North Alabama
The worst offending Viper is the 2004 with its reduced size damper retaining bolt.

Duramax diesels are infamous for this problem also.
 

gregrowell

Enthusiast
Joined
May 10, 2023
Posts
18
Reaction score
6
Location
75093
Yes indeed. My '03, I heard the screetch, belt then frayed (brand new belt). I had heard about this as fairly common concern. Reached down and could 'hand turn' the crankshaft pulley. Couldn't believe it and this is NOT good! Got with a friend and it took taking the airbox off and both of us darn near in the engine bay ---to re-torque to 250ft-lbs. (I believe it varies on the torque, but '03's had the large size diameter bolt and 250ft-lbs. Had to use an extension/breaker bar to get to that torque:) Marked bolt with white marker---hasn't moved since and I'm at around 54K miles 6 months later. I'd estimate I had around 48K miles on my car when it came loose (Or I noticed it was loose). I would recommend all of you, All Gens (for sanity) reach down and check that bolt on your Viper---

Lucky it didn't come off completely.....

More info on this:


TEALLIFE

Enthusiast
Joined
Oct 29, 2021
Posts
194
Reaction score
84
Location
Fort Lauderdale
there's paint markings on my crank bolt. always figured they were factory, but must've been the Previous Owner.
 

Dyno Dave

Enthusiast
Joined
May 20, 2002
Posts
98
Reaction score
6
Location
Davisburg, MI 48350, USA
I had that happen on One Lap of America. The bolt fell out at the Indy dragstrip and fortunately one of the spectators saw it and brought it to me. I questioned the garage and found out they did not use the special tool to seat the damper before installing the bolt. I did my best to get it torqued up and won the event without further incidents.
 

ISMarco

Enthusiast
Joined
Feb 29, 2020
Posts
6
Reaction score
6
Location
Knoxville, TN
Good catch! The pulley bolt torque spec is super high, ~250 ft*lb. But unfortunately they still come loose.

I feel like this problem has remained common as the cars have aged and with tires being stickier than they used to be, shocks to the driveline and therefore the crank are harsher.

Some cheap insurance is to pin the damper to the crank with a kit like this https://www.revzerors.com/products/dodge-viper-crank-pin-kit-gen-1-2-3

+ torque all the bolts of the damper and pulley adequately upon reinstallation. The marker lines are smart, too
 

Viper514

Enthusiast
Joined
Apr 19, 2023
Posts
18
Reaction score
1
Location
Canada
Does the ARP bolt get torqued to the same spec? I read the instructions that came with the new bolt and not only does it say 160 ft lbs, but says to use the torquing lube on the treads, not red locktite. What is the correct procedure?
 

GTS Dean

Enthusiast
Joined
Jul 22, 2000
Posts
4,111
Reaction score
450
Location
New Braunfels, Texas
The ARP bolt was originally spec'd for the B/RB big block Mopars that all have a Woodruff key to keep the damper from spinning. They do not depend on friction fit. I originally used the 160 lb-ft spec - it unscrewed itself and the damper fell off in my driveway - thankfully not destroying the crank snout. I would recommend pinning your crank NOW. I did so, then used blue Loctite and 220 lb-ft on the bolt. I've done 3 weekends at COTA and one at Hastings, Neb. and it's still rock solid.
 

Attachments

  • Pinned Balancer.jpg
    Pinned Balancer.jpg
    153.1 KB · Views: 36
Last edited:

Viper514

Enthusiast
Joined
Apr 19, 2023
Posts
18
Reaction score
1
Location
Canada
Thank you. I was in there to pin the crank. I’ll pull the bolt out and clean/locktite it.
 

Old School

Enthusiast
Joined
May 14, 2023
Posts
189
Reaction score
102
Location
North Alabama
Old school Mopar's, both big and small block, had a larger diameter crank snout. A large diameter and thick washer was required to attach the damper because the head of the bolt was too small to contact it. The torque on the bolt was reduced because the washer would deform instead of the bolt stretching.

The Viper doesn't have this problem, not only is the crank snout smaller, but the hole in the damper is reduced to support the head of the bolt. This allows the bolt to be fully torqued.

I was going to use an ARP bolt, but since that 12 point head is taller I was unable to get a socket on it without lifting the motor or moving the rack. I ended up using the factory bolt, torqued to 250 with red Loctite.
 

TEALLIFE

Enthusiast
Joined
Oct 29, 2021
Posts
194
Reaction score
84
Location
Fort Lauderdale
i probably should have googled first lol looks like 350F for both
 

Attachments

  • 8bd08a1c-addb-45c5-9024-e6267af7833f.__CR0,0,970,300_PT0_SX970_V1___.jpg
    8bd08a1c-addb-45c5-9024-e6267af7833f.__CR0,0,970,300_PT0_SX970_V1___.jpg
    240.4 KB · Views: 12

GTS Dean

Enthusiast
Joined
Jul 22, 2000
Posts
4,111
Reaction score
450
Location
New Braunfels, Texas
^^That's my point.^^ If you use a bunch of Red on the bolt, you'll probably have to use either a propane, or O-A torch and heat the crank snout for it to break loose. The bolt is in there several inches, so you will cook your front seal, possibly melt the front cover, and likely ruin the heat treat on the nose of the crankshaft. Blue is fine for the job.
 

doctormosfet

Enthusiast
Joined
Jul 27, 2025
Posts
41
Reaction score
34
Location
Mahopac, NY
Lo and behold, it appears this exact thing happened to me today on the way home. Power steering went and then engine temperature went up toward 250. Pulled over and got the car towed the rest of the way. I haven't had a chance to really inspect it yet, but I'll see if I can shove a camera in there to see how bad it is or isn't. In the meantime, I have a new crank pulley bolt on order and a pin set on order. Won't be able to drive this car again until at least mid-September :(
 

BoondocSaint

Enthusiast
Joined
Apr 27, 2022
Posts
201
Reaction score
115
Location
Washington
Lo and behold, it appears this exact thing happened to me today on the way home. Power steering went and then engine temperature went up toward 250. Pulled over and got the car towed the rest of the way. I haven't had a chance to really inspect it yet, but I'll see if I can shove a camera in there to see how bad it is or isn't. In the meantime, I have a new crank pulley bolt on order and a pin set on order. Won't be able to drive this car again until at least mid-September :(
Sorry to hear the rough news with all the effort you have put into your GTS. Look forward to hearing about the fix.
 

doctormosfet

Enthusiast
Joined
Jul 27, 2025
Posts
41
Reaction score
34
Location
Mahopac, NY
Looks like I dodged (pun intended) a bullet here. The crank pulley bolt simply backed out and the pulley was sitting on the frame. It doesn't appear that there was much rubbing or damage to the crank or balancer. I couldn't see much from the side of the road earlier today, and for a while I was scared to death that the bolt head may have sheared off (just my luck, having just bought it and only put ~ 130 miles on it). The bolt stayed on the car inside the pulley, luckily, and there are no apparent signs of stripping or anything. It's actually morbidly convenient, since this will make it a lot easier to install the pin kit with the bolt already out. Just gotta pull the pulley out and put it on the bench for now until the kit comes in.

I don't see any signs of threadlock (although maybe heat cycling would do that? I don't know), so my best guess is when the prior owner had the underdrive pulley installed, they simply didn't crank the bolt to 250 lb-ft and/or did not use any or enough threadlock. Getting to 250 lb-ft when putting it back on...well...I'll burn that bridge when I get to it. My torque wrench maxes out at 250...

The only mystery to me is how long the temperature was spiked. It wasn't pegged (but it was close), so that's good, but it was up there for maybe a few minutes? The engine was NOT making weird noises when I pulled over, so I'm betting all is good, but it is an erie flashback to when I was much younger and had a 1989 Dodge Daytona (what POS that was). My rookie @ss put too much oil in it one day. It overheated and I drove it home on the highway regardless, stuttered my way to the driveway and parked it with smoke billowing out of the hood. Blown head gasket and those piston rings got nice and crispy. From that point on, it drank about a quart of oil per gas tank. My college friends never let me hear the end of that.
 

Attachments

  • crank_1a.jpg
    crank_1a.jpg
    119.3 KB · Views: 15
  • crank_2a.jpg
    crank_2a.jpg
    75.3 KB · Views: 16
Last edited:

doctormosfet

Enthusiast
Joined
Jul 27, 2025
Posts
41
Reaction score
34
Location
Mahopac, NY
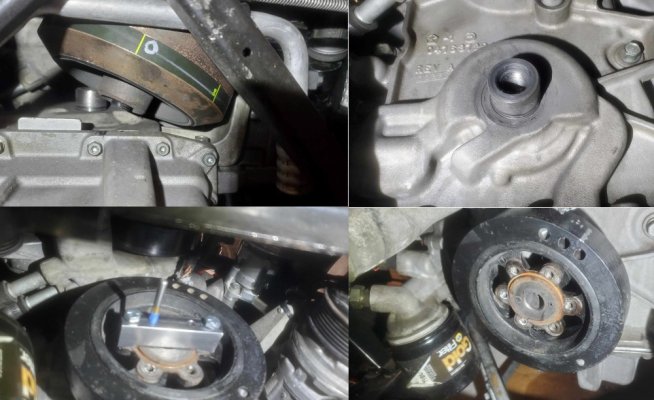
Figured it couldn't hurt to share my progress on this so far. I picked up an ATI harmonic balancer, figuring that's a better option than re-mounting the stock unit. As you may know, the ATI unit has two pieces - the hub and the balancer. The hub is what you drill into for the crankshaft pinning job. With everything out of the car, I took the crankshaft pulley and mounted it on the opposite side of the balancer hub, with the pinning jig on the other side (I got my pinning kit from Rev.Zero, which appears to be an exact copy of the ROE unit). This allows me to press down with a drill without the hub wobbling around (not all of us have machine shops with drill presses and so we have to improvise a bit ;) ). So, the pin holes are pre-drilled into the hub now (about 4-5 cycles per hole of applying cutting fluid, drilling a bit, cleaning the shavings, more cutting fluid, and so on. Drill at low speed with high pressure). I'll mount that to the crankshaft snout and drill the last little bit on the crankshaft. I think that's the most efficient way to do this job, rather than breaking your back in some awkward position in the engine bay pushing an angle drill 2.45" into two holes through solid metal. With most of that done outside of the car where I can get better leverage, it's only about half an inch or so of the other half-circle that needs to be drilled into the crankshaft snout while all bent over in the engine bay.

The inner diameter of the hub is ~ 1mm smaller than the outer diameter of the crankshaft snout (unlike the stock unit which just sides right on and probably also explains why the stock unit does nothing once that bolt comes loose...not enough friction). So...it seems you either have to heat it up and play hot potato with a fat chunk of metal while mounting it, or you get a balancer installation tool and some wrenches and do it at room temperature. I'm opting for the latter. It looks like you can get the best clearance doing this from the driver's side of the engine bay, but you'll need to remove the power steering unit to maximize access. That's fine by me, since I was going to replace the power steering pulley and mounting bracket with IPSCO parts anyway. Two birds with one stone. I mounted the PS bracket and will do the pulley later, after sorting out everything with the balancer/crankshaft.

I used a pulley removal tool to get the PS pulley off, but it still requires quite a lot of torque. You're basically using two wrenches with pipes attached to each of them in order to get enough leverage. I ended up busting a ratchet doing this, but a small price to pay to prolong the lifetime of the car. The stock pulley and bracket are still in excellent shape, but better to do this job now while I'm in there.
 

Attachments

  • 541649133_10106533226224315_8274264308910017456_n.jpg
    541649133_10106533226224315_8274264308910017456_n.jpg
    149.4 KB · Views: 10
  • 543162966_10106533208215405_6646016533909429905_n.jpg
    543162966_10106533208215405_6646016533909429905_n.jpg
    93.4 KB · Views: 10
  • 540626667_10106533208270295_7093859565197787054_n.jpg
    540626667_10106533208270295_7093859565197787054_n.jpg
    73.4 KB · Views: 10

GTS Dean

Enthusiast
Joined
Jul 22, 2000
Posts
4,111
Reaction score
450
Location
New Braunfels, Texas
When you're ready to install the ARP crank bolt, I would suggest only coat the underside of the bolt head with their lube and not put lube on the damper side of the washer. You want the washer to stay put and reduce the friction under the bolt head. Then put blue loctite 242/3 on the threads and torque to Dodge spec.
 

doctormosfet

Enthusiast
Joined
Jul 27, 2025
Posts
41
Reaction score
34
Location
Mahopac, NY
After lots of sweat and an angry wife (auto parts in the oven...ahem...), the ATI balancer hub is finally on there. Honestly, the oven trick didn't help a whole lot, other than getting the hub seated onto the crankshaft snout (anti-seize lubricant on the snout was certainly helpful). You can see from the picture that the end of the hub has ~ 1-2mm clearance to the crankshaft seal when fully mounted. The hub and crank are also pinned now (not shown here).

I used an ARP bolt with GTS Dean's recommendation of blue loctite on the threads and lube only between the bolt head and the washer. Getting to 250 lb-ft was not as bad as I had expected. I put the car in 6th gear with the e-brake on and then chocked the rear wheels. Using a Craftsman torque wrench and a 2" pipe for more leverage, 250 was certainly a bit of work but not horrible. Mounting the hub was by far the hardest part of all of this.

The ATI balancer is mounted now, although I haven't screwed it in yet. You can see from one of the pictures that when I hold the crank pulley against the face of the balancer, that the pulley has some offset to the other pulleys around the engine. Is that even normal? Do I need to find a different pulley with a different offset? What I have here is an underdrive pulley (probably IPSCO...it came with the car) and I'm not certain if the offset for those is any different from the OEM pulleys? Last thing I want is to go through all this trouble and then have the belt keep popping off...

Or am I an idiot and the balancer isn't all the way on?
 

Attachments

  • balancer.jpg
    balancer.jpg
    194.2 KB · Views: 9
  • crank pulley.jpg
    crank pulley.jpg
    99.3 KB · Views: 10
  • hub_clearance.jpg
    hub_clearance.jpg
    85.9 KB · Views: 9
Last edited:

daveg

Enthusiast
Joined
Dec 26, 2006
Posts
524
Reaction score
101
Location
Mass...
By the PIC, doesn't look right. Looks like your off a couple ribs Belt wise. Do you recall if before all the work, the belt was straight? Did you have belt issues before? How do the rest of the pulleys line up?
 

doctormosfet

Enthusiast
Joined
Jul 27, 2025
Posts
41
Reaction score
34
Location
Mahopac, NY
Nevermind...I'm an idiot...clearly the balancer wasn't all the way on.

This time, I used the pulley as a big fat spacer to spread the load and tightened two bolts 180deg from each other to press the balancer all the way in. I think all of the hammering on the hub for the pinning job, plus some hammering to help seat the hub during installation, must have roughened up the outer edge a bit. I tried dremeling the hub edge to smooth it off and help the balancer slot on, but apparently that wasn't quite enough. Anyway...now at least the pulley is more directly aligned with the others. Time to pull that off, get all of the screws in there, and finish this up.
 

Attachments

  • underdrive pulley.jpg
    underdrive pulley.jpg
    110.6 KB · Views: 6
Top